1 What is TealKit?
TealKit is a mobile and desktop AI agent platform that lets you build, schedule, and run automated AI workflows directly on your device. It connects large language models (LLMs) to the real world through the Model Context Protocol (MCP) — a standardised interface for tools that retrieve data, execute code, control services, and produce files.
Key capabilities:
- Playground — an interactive chat for testing prompts, tools, and system prompts before automating them
- Agents — saved workflows that run on a cron schedule, on demand, or chained after another agent
- MCP Tools — built-in and third-party tools for web search, document indexing, SSH, weather, email, charting, and more
- Script wizards — AI-generated JavaScript, Python, Bash, and PowerShell tools created from plain-language descriptions
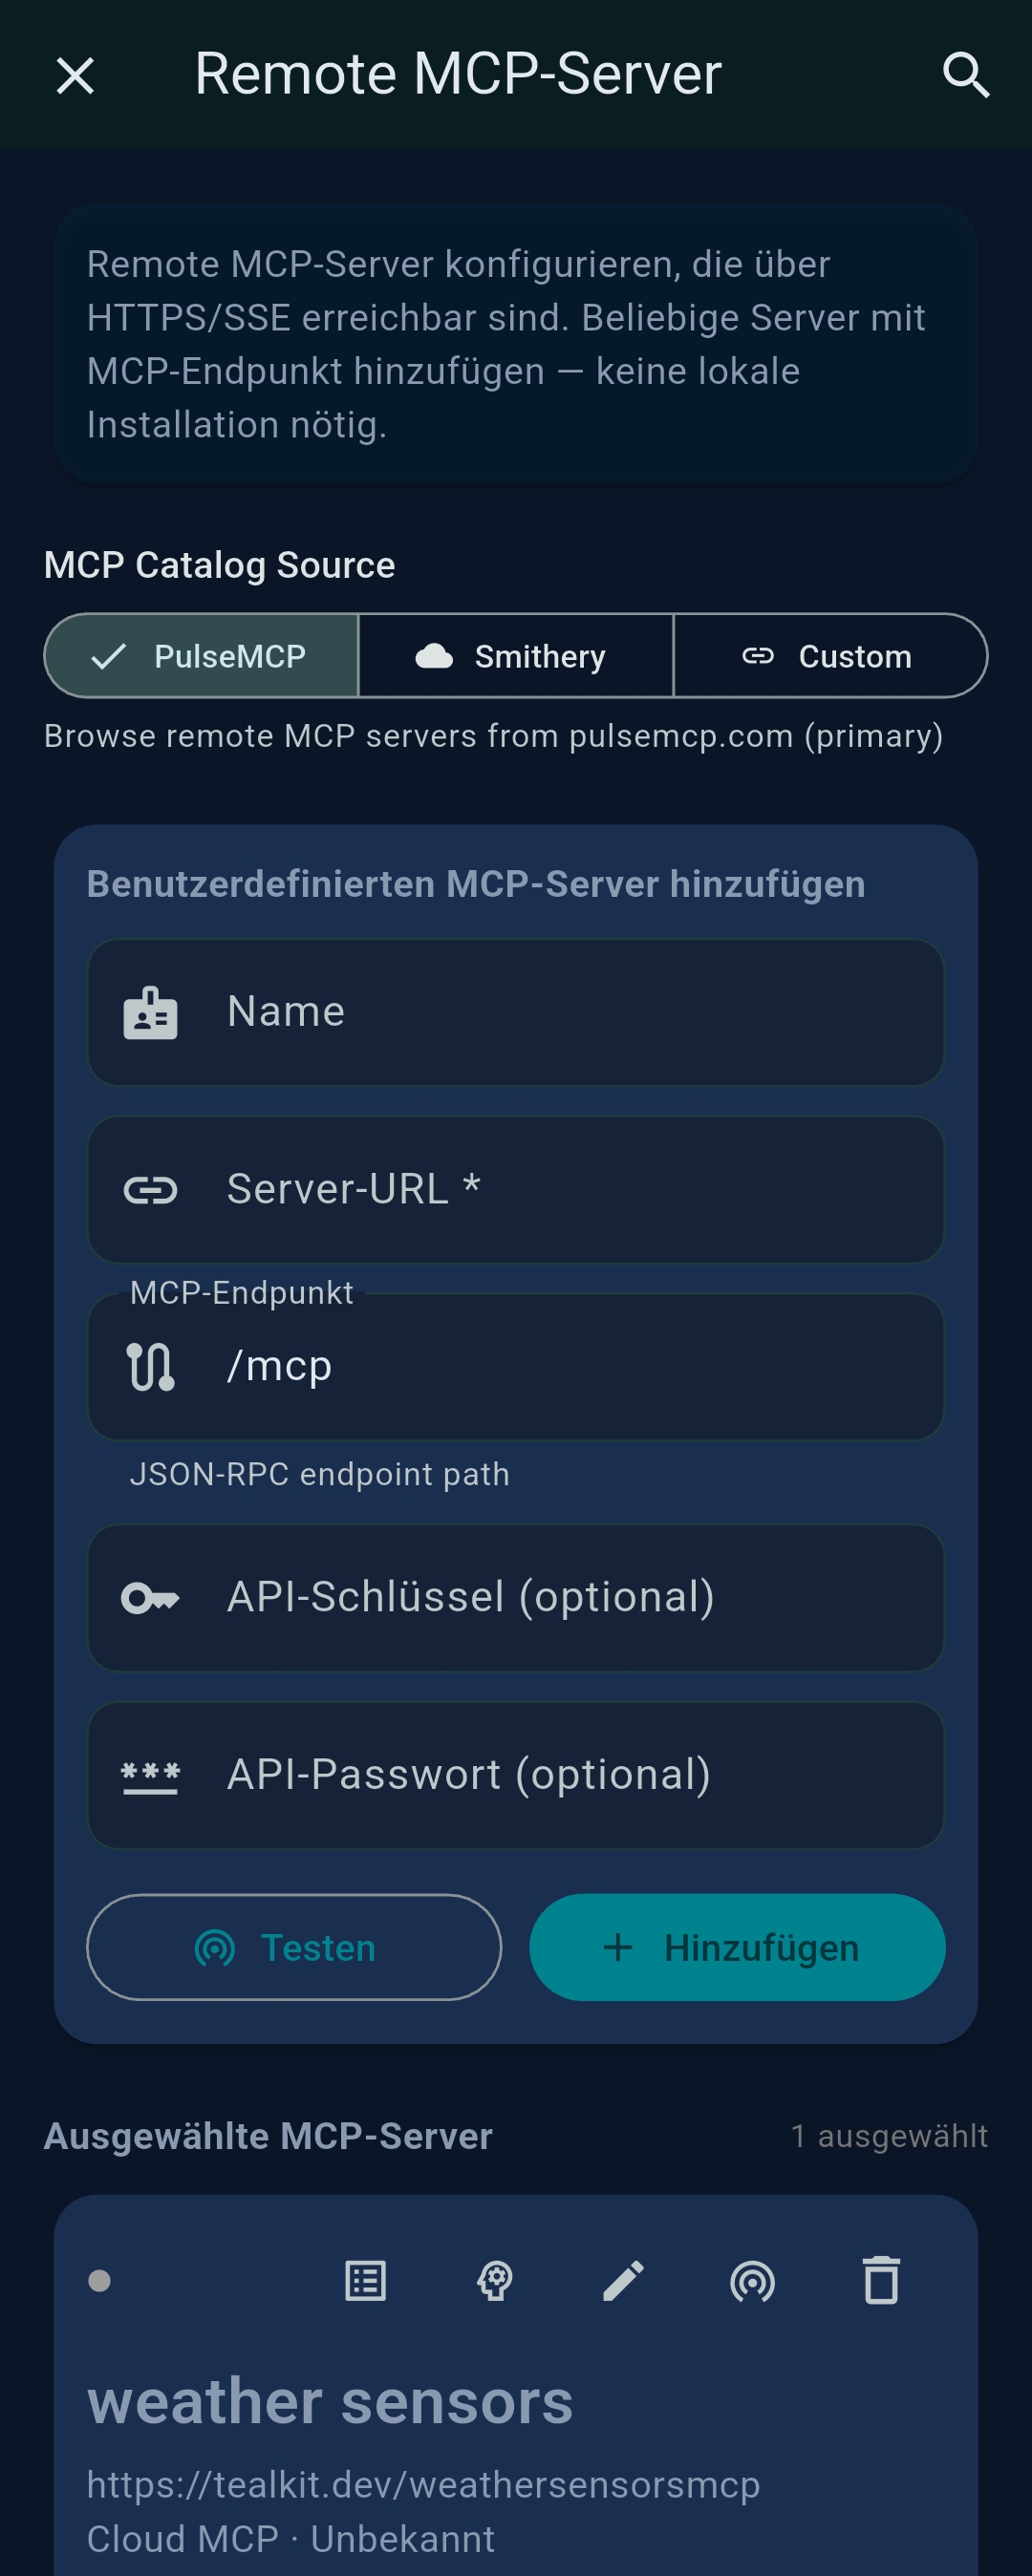
- Remote MCP Servers — connect to cloud-hosted or self-hosted MCP endpoints from any platform including mobile
- Server Mode — connect the mobile app to a persistent server that runs agents 24/7 independently of the phone
- Desktop (Windows / Linux) — full local tool execution including Python MCP generator, PowerShell scripts, and system-tray background automation
TealKit supports OpenAI, Anthropic (Claude), Google Gemini, Mistral, Azure OpenAI, Ollama, and any OpenAI-compatible endpoint. All API keys are stored exclusively in the device OS secure keychain — nothing is sent to TealKit servers.
2 Home Screen
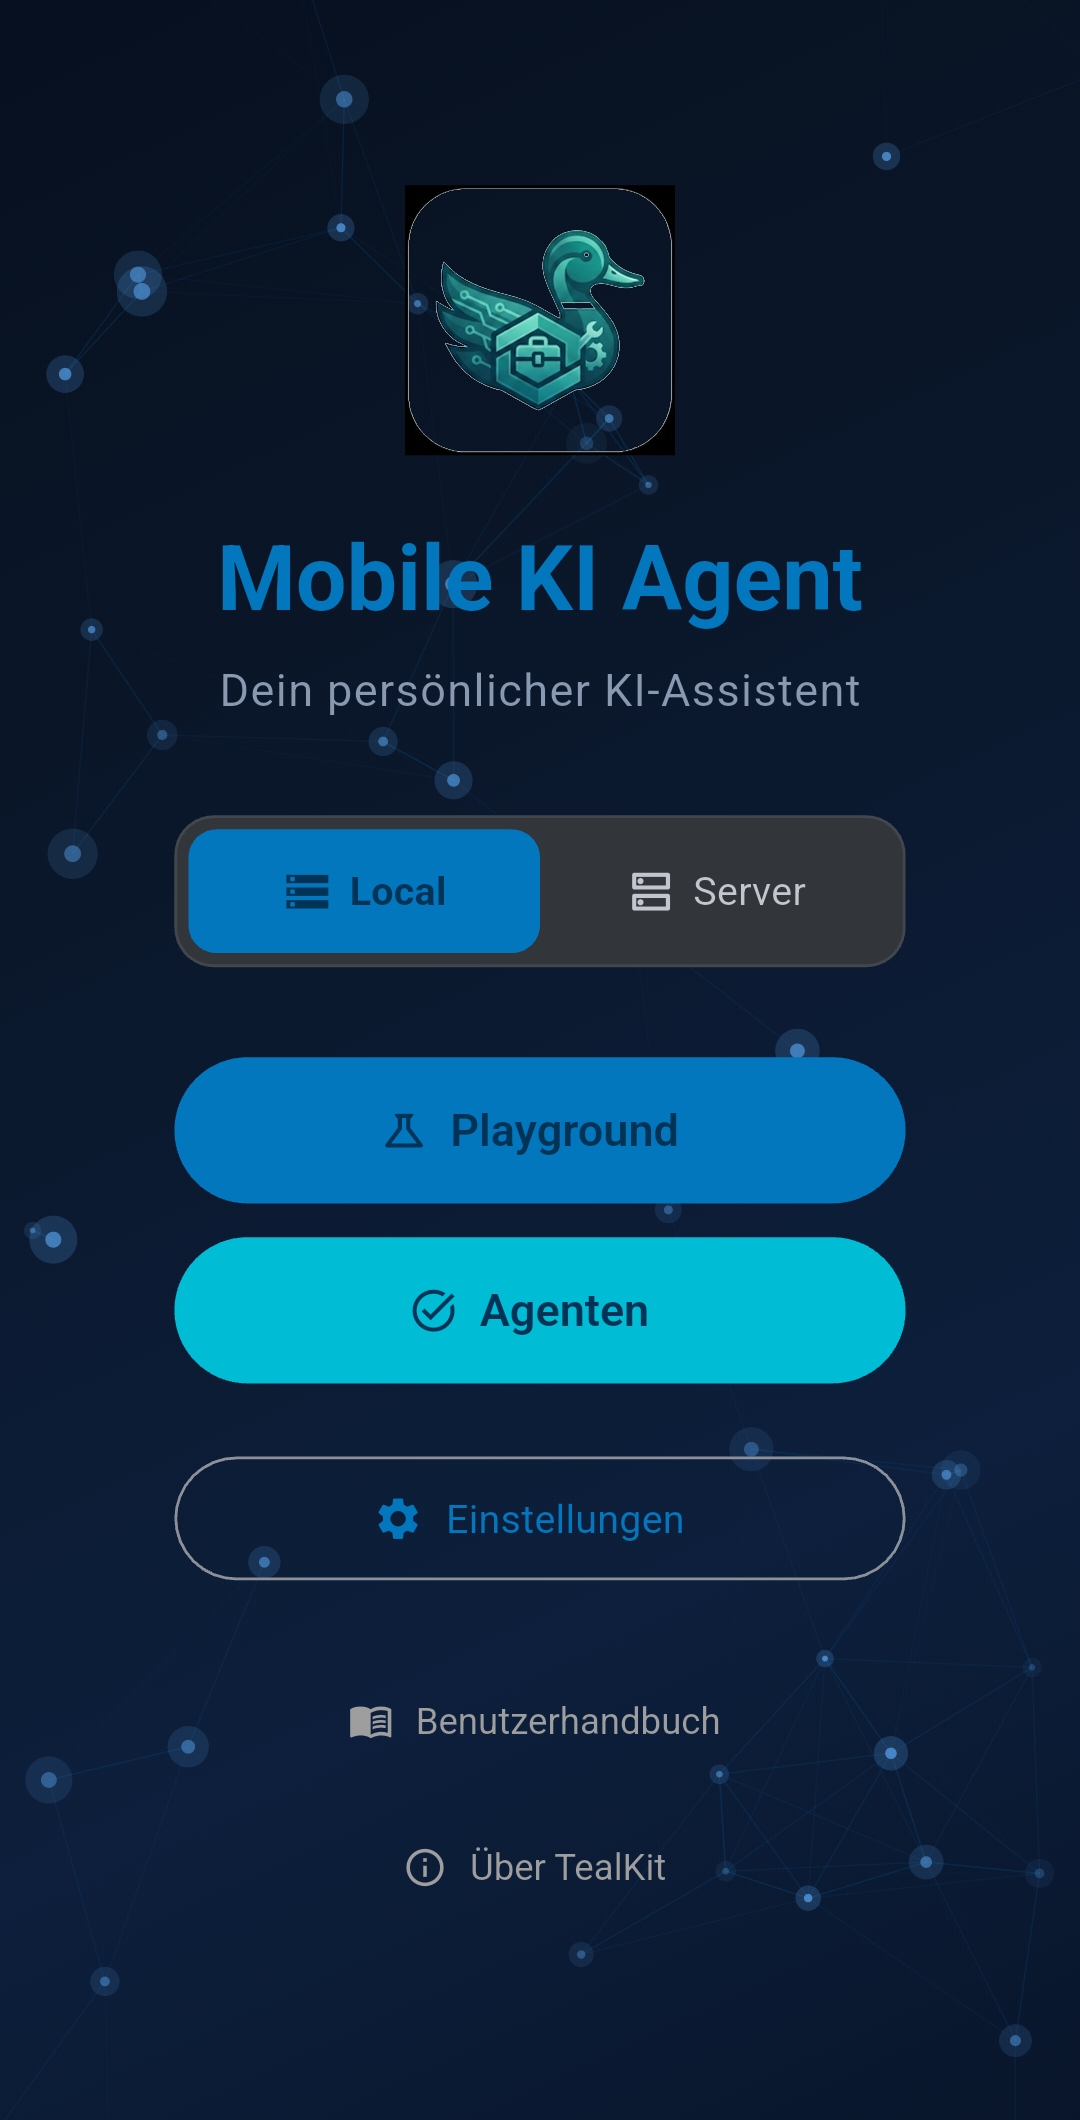
The home screen is the starting point. From here you can open the Playground for interactive sessions, navigate to the Agents list to manage your automated workflows, or open Settings to configure LLMs, data sources, and integrations.
The top bar shows a connection indicator for Server Mode (cloud icon) and a shortcut to Settings (gear icon). The Playground button opens the configuration screen where you choose tools, system prompt, and LLM before starting a chat session.
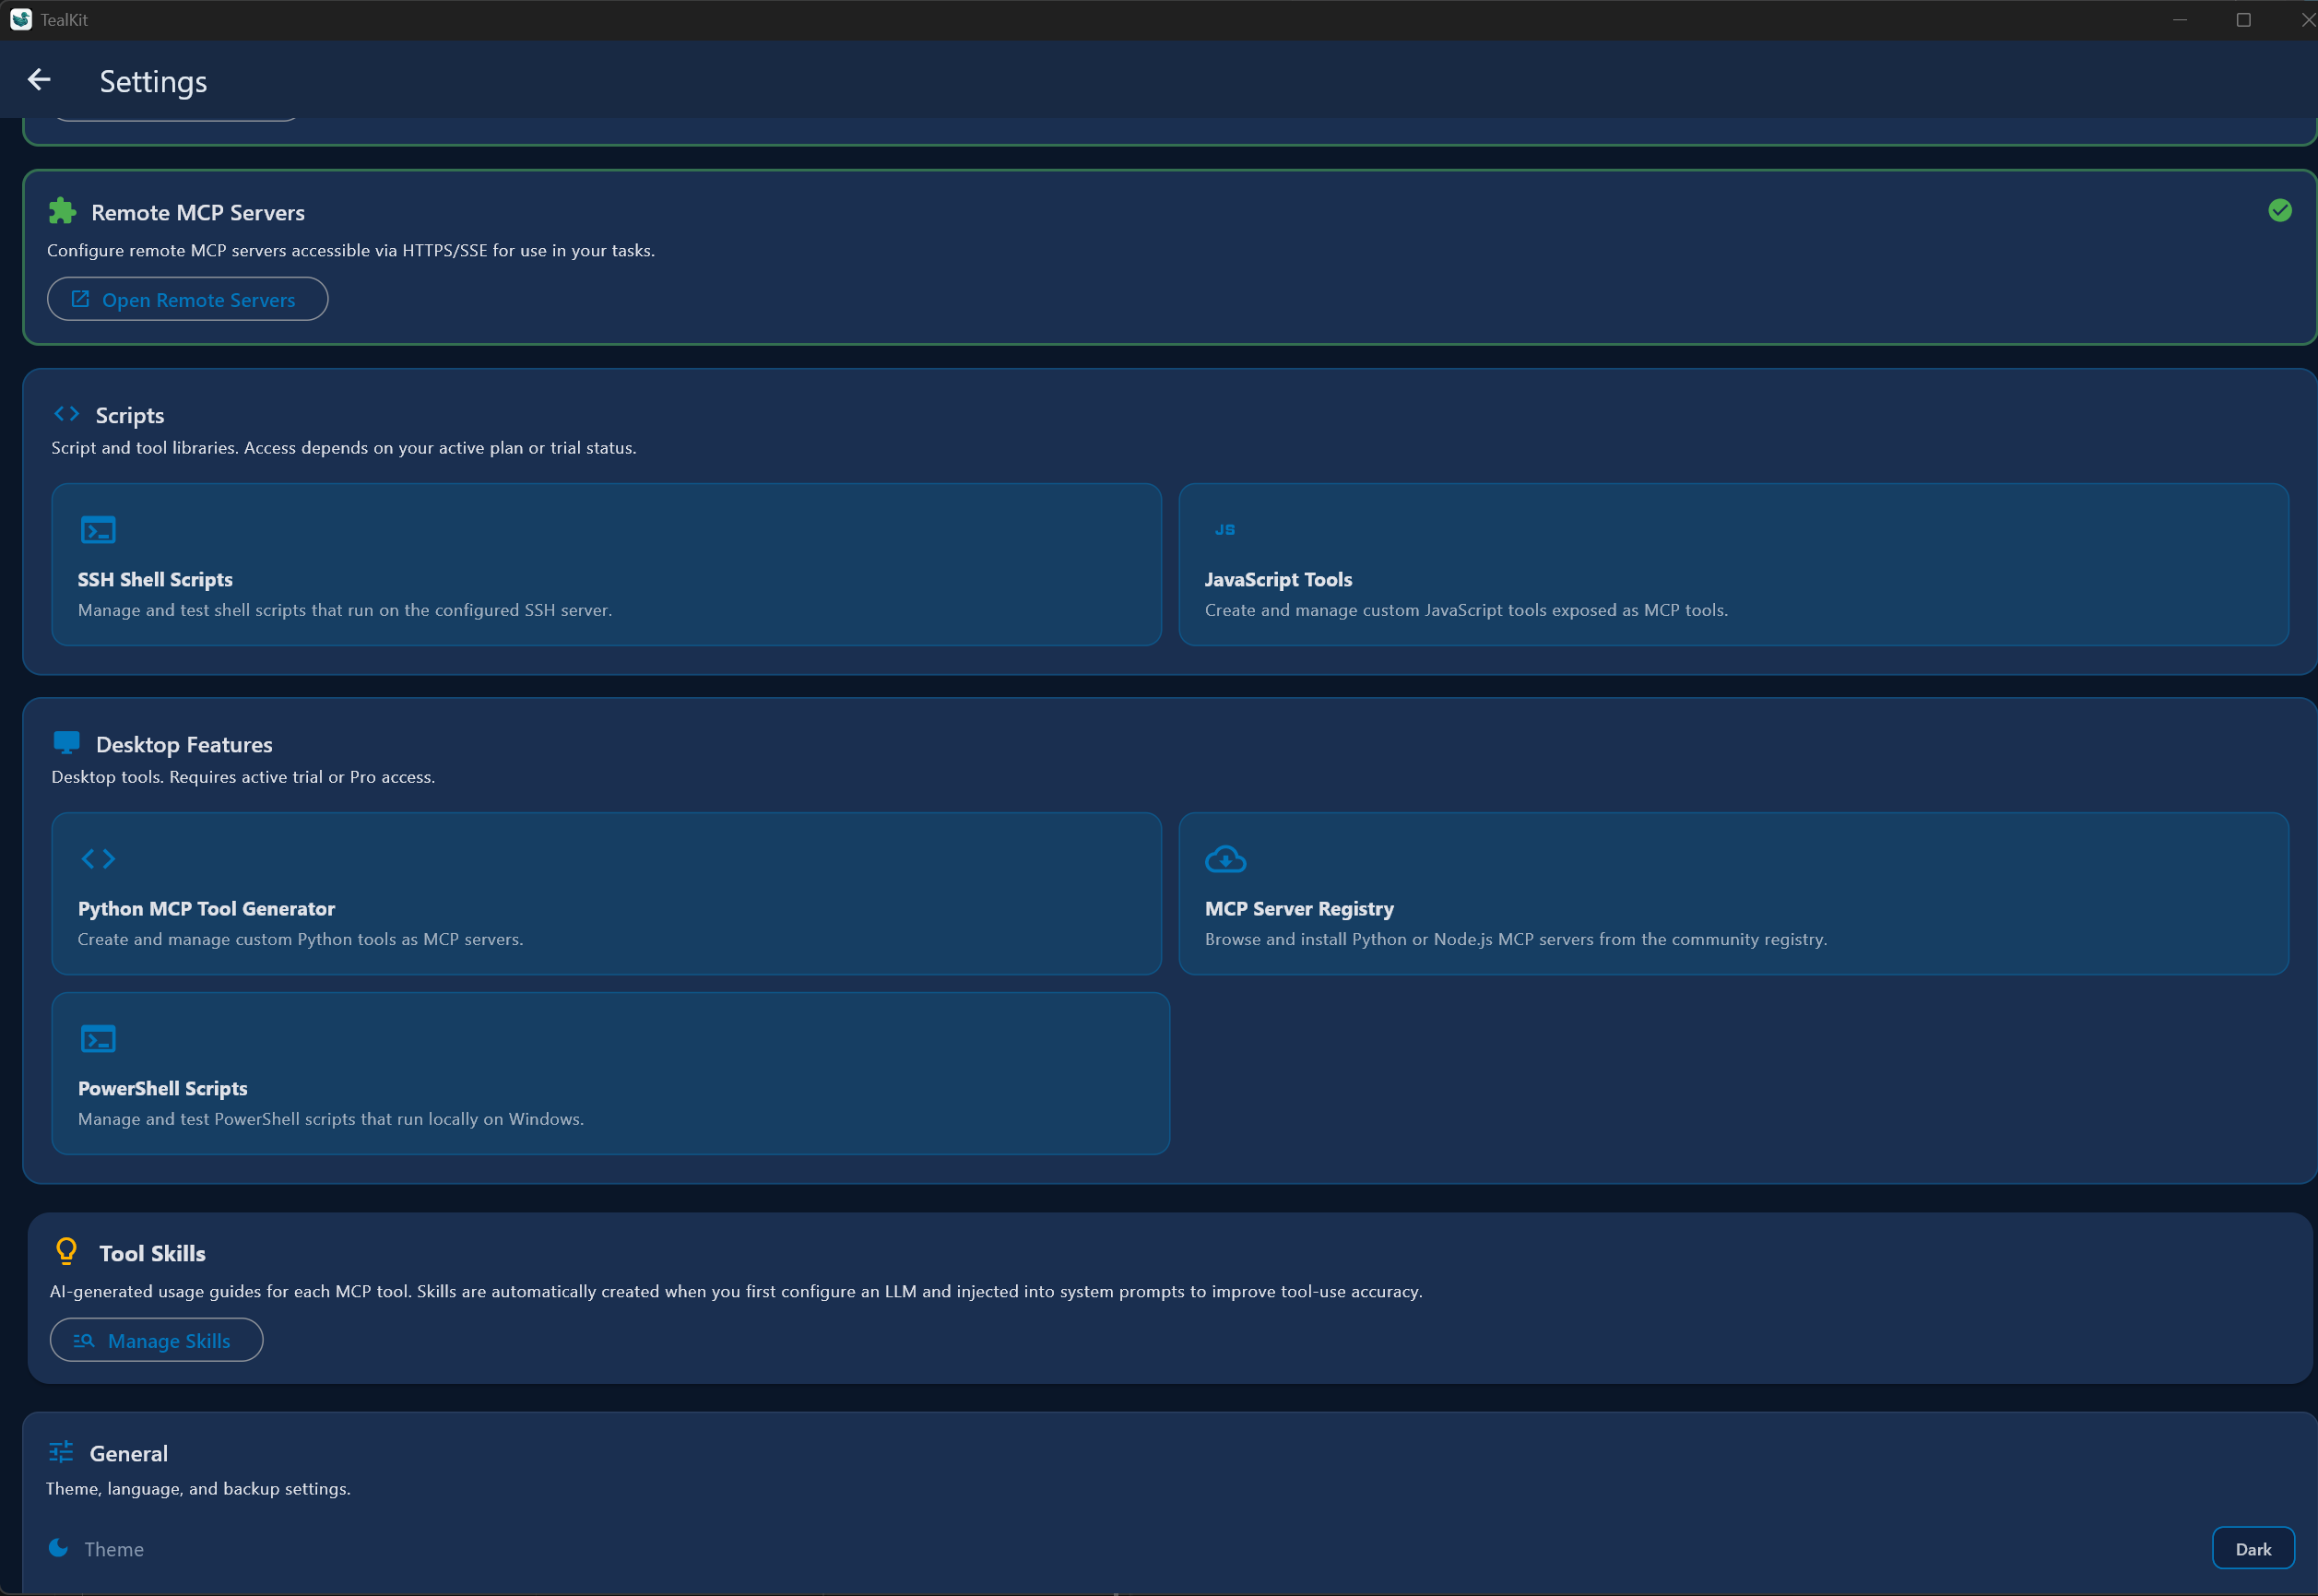
3 Global Settings
Open Settings via the gear icon in the top bar. Settings are grouped into cards: Server Mode, LLM 1 & LLM 2, Data Sources, Remote MCP Servers, Scripts, Tool Skills, General, and (on Windows) Desktop Features.
3.1 Server Mode
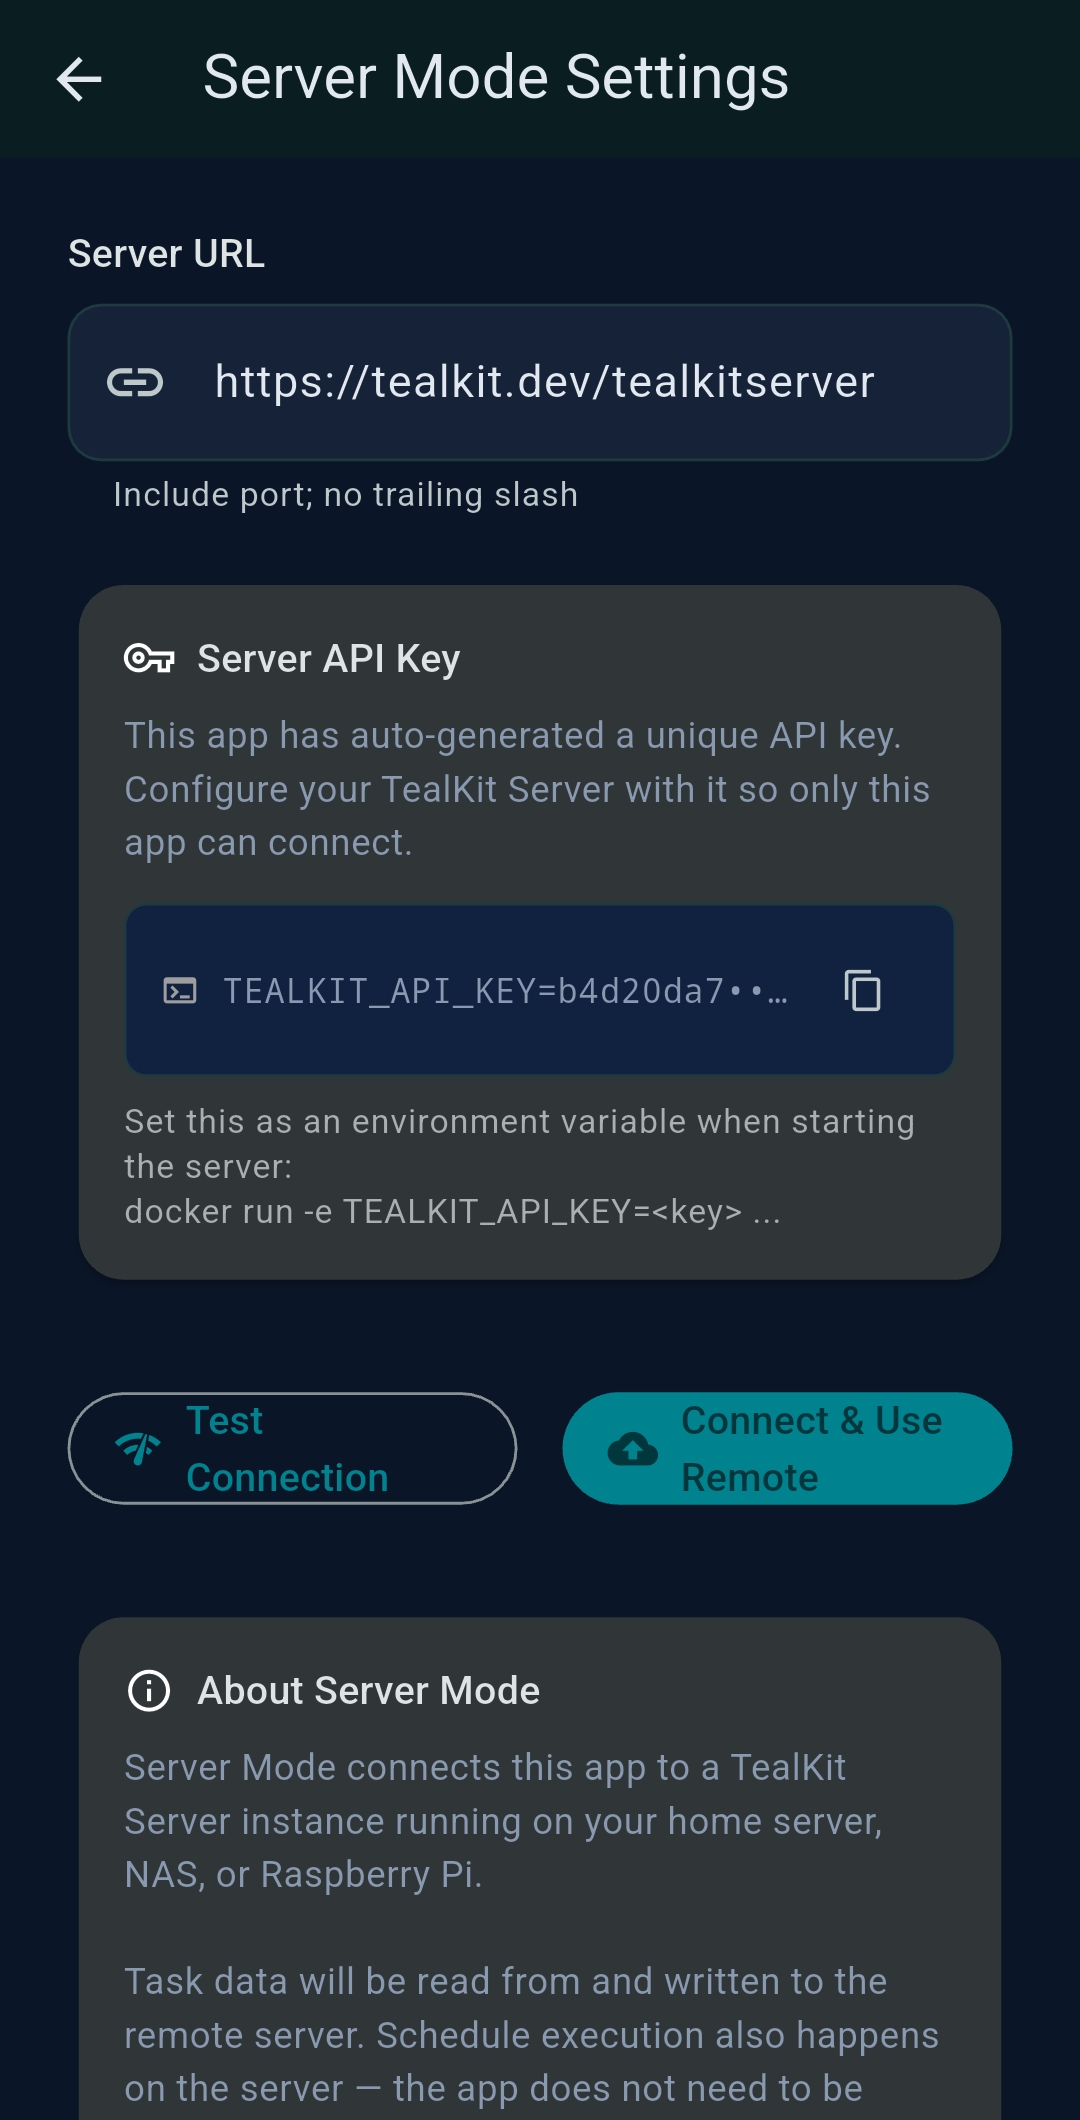
Server Mode connects TealKit to a persistent server that runs agents 24/7 without requiring the phone to stay open. The server executes all LLM calls and tool invocations; the mobile app acts as a remote control and display.
- Deploy the TealKit server on any VPS or cloud host (Docker image available)
- Enter the server URL and your credentials in Settings → Server Mode
- Once connected, agents are synced to the server and executed there on schedule
- Results are pushed back to the app in real time
- Saved Playground setups are automatically stored in the server's DuckDB database, enabling seamless configuration sharing across different devices connected to the same server
API key configuration
When running the server, set the TEALKIT_API_KEY environment variable to protect endpoints with
Bearer token authentication. You can specify a single key, a comma-separated list, or a JSON array to allow
multiple UI apps to connect with different keys:
# Single key
TEALKIT_API_KEY=my_secret_key

# Multiple keys (comma-separated)
TEALKIT_API_KEY=key_a,key_b,key_c

# Multiple keys (JSON array)
TEALKIT_API_KEY=["key_a","key_b"]
The /health and /status endpoints are always accessible without authentication.
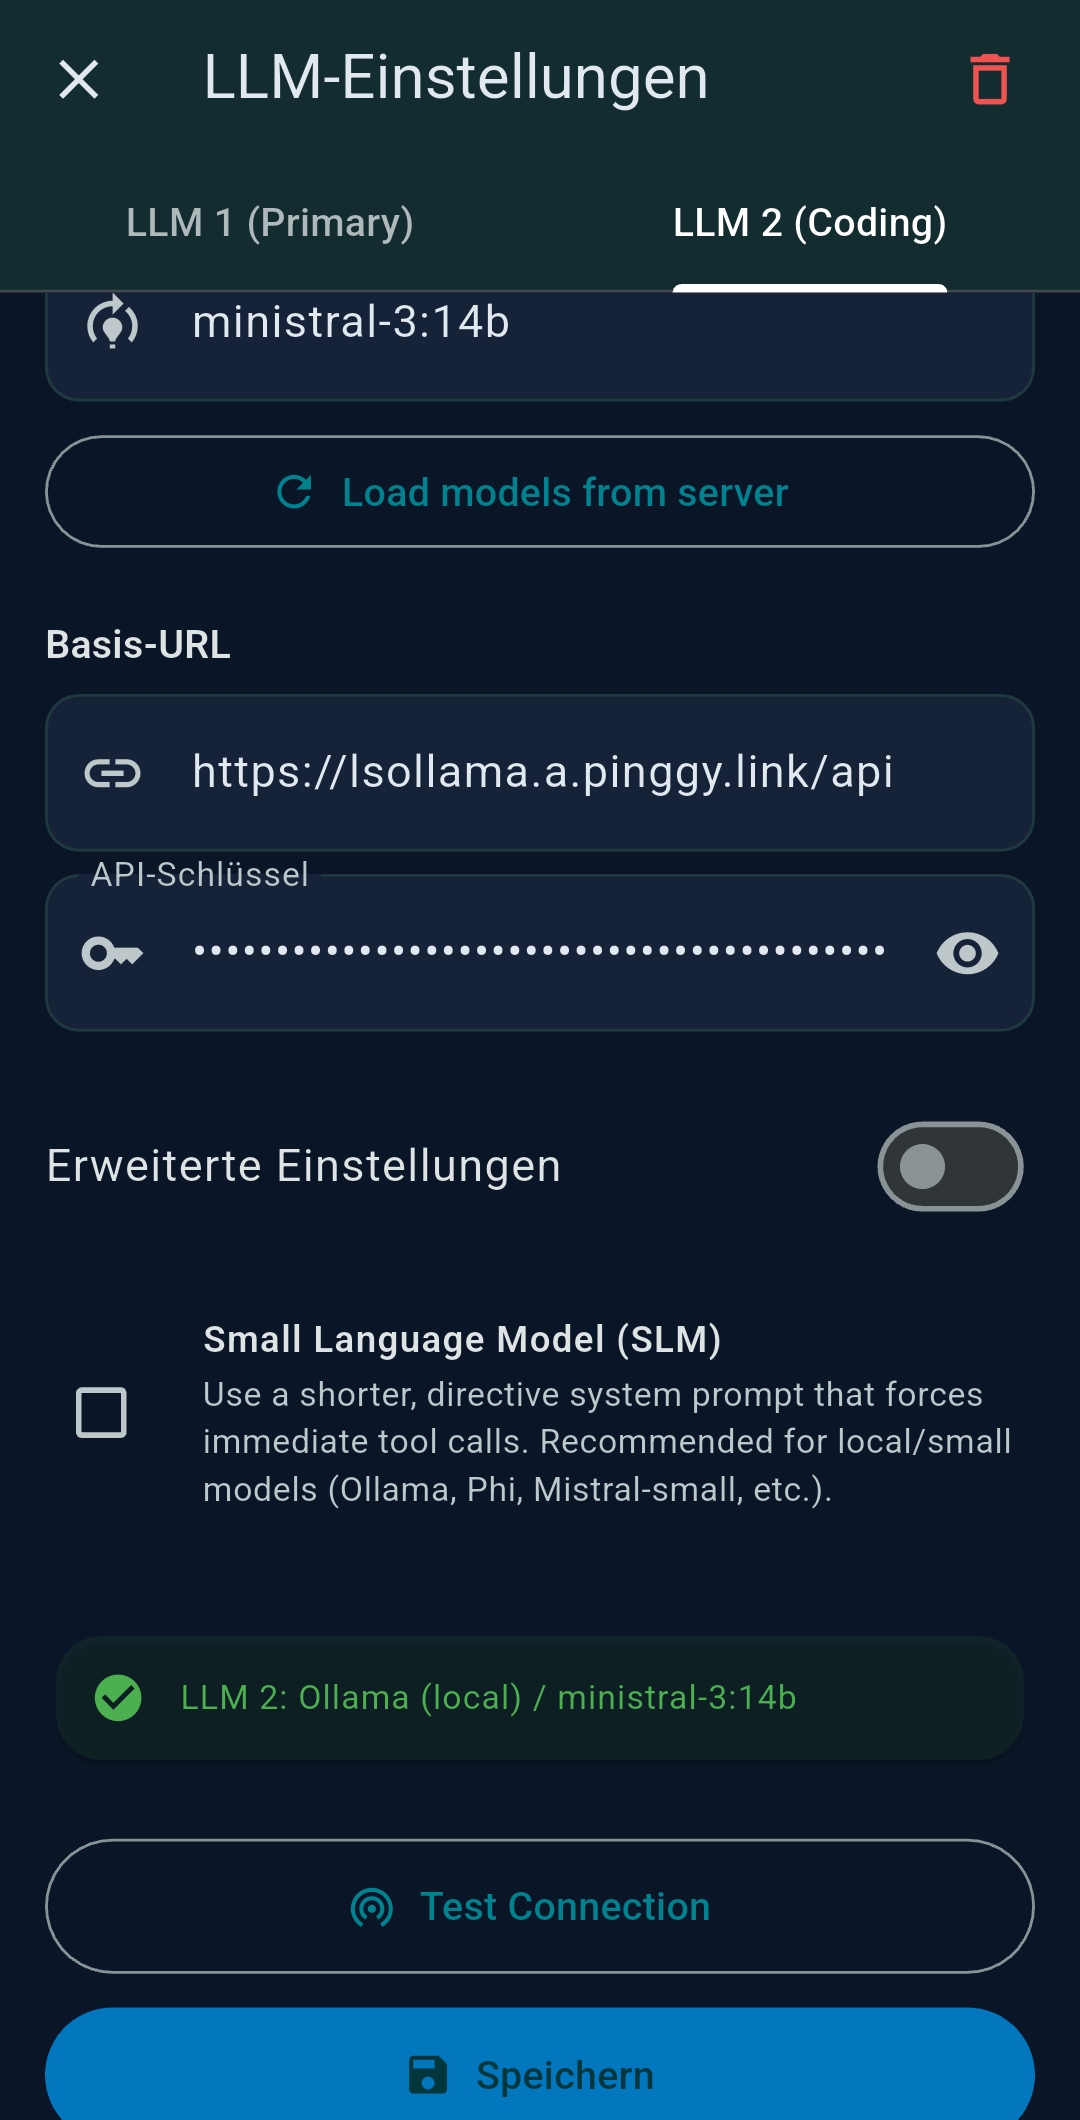
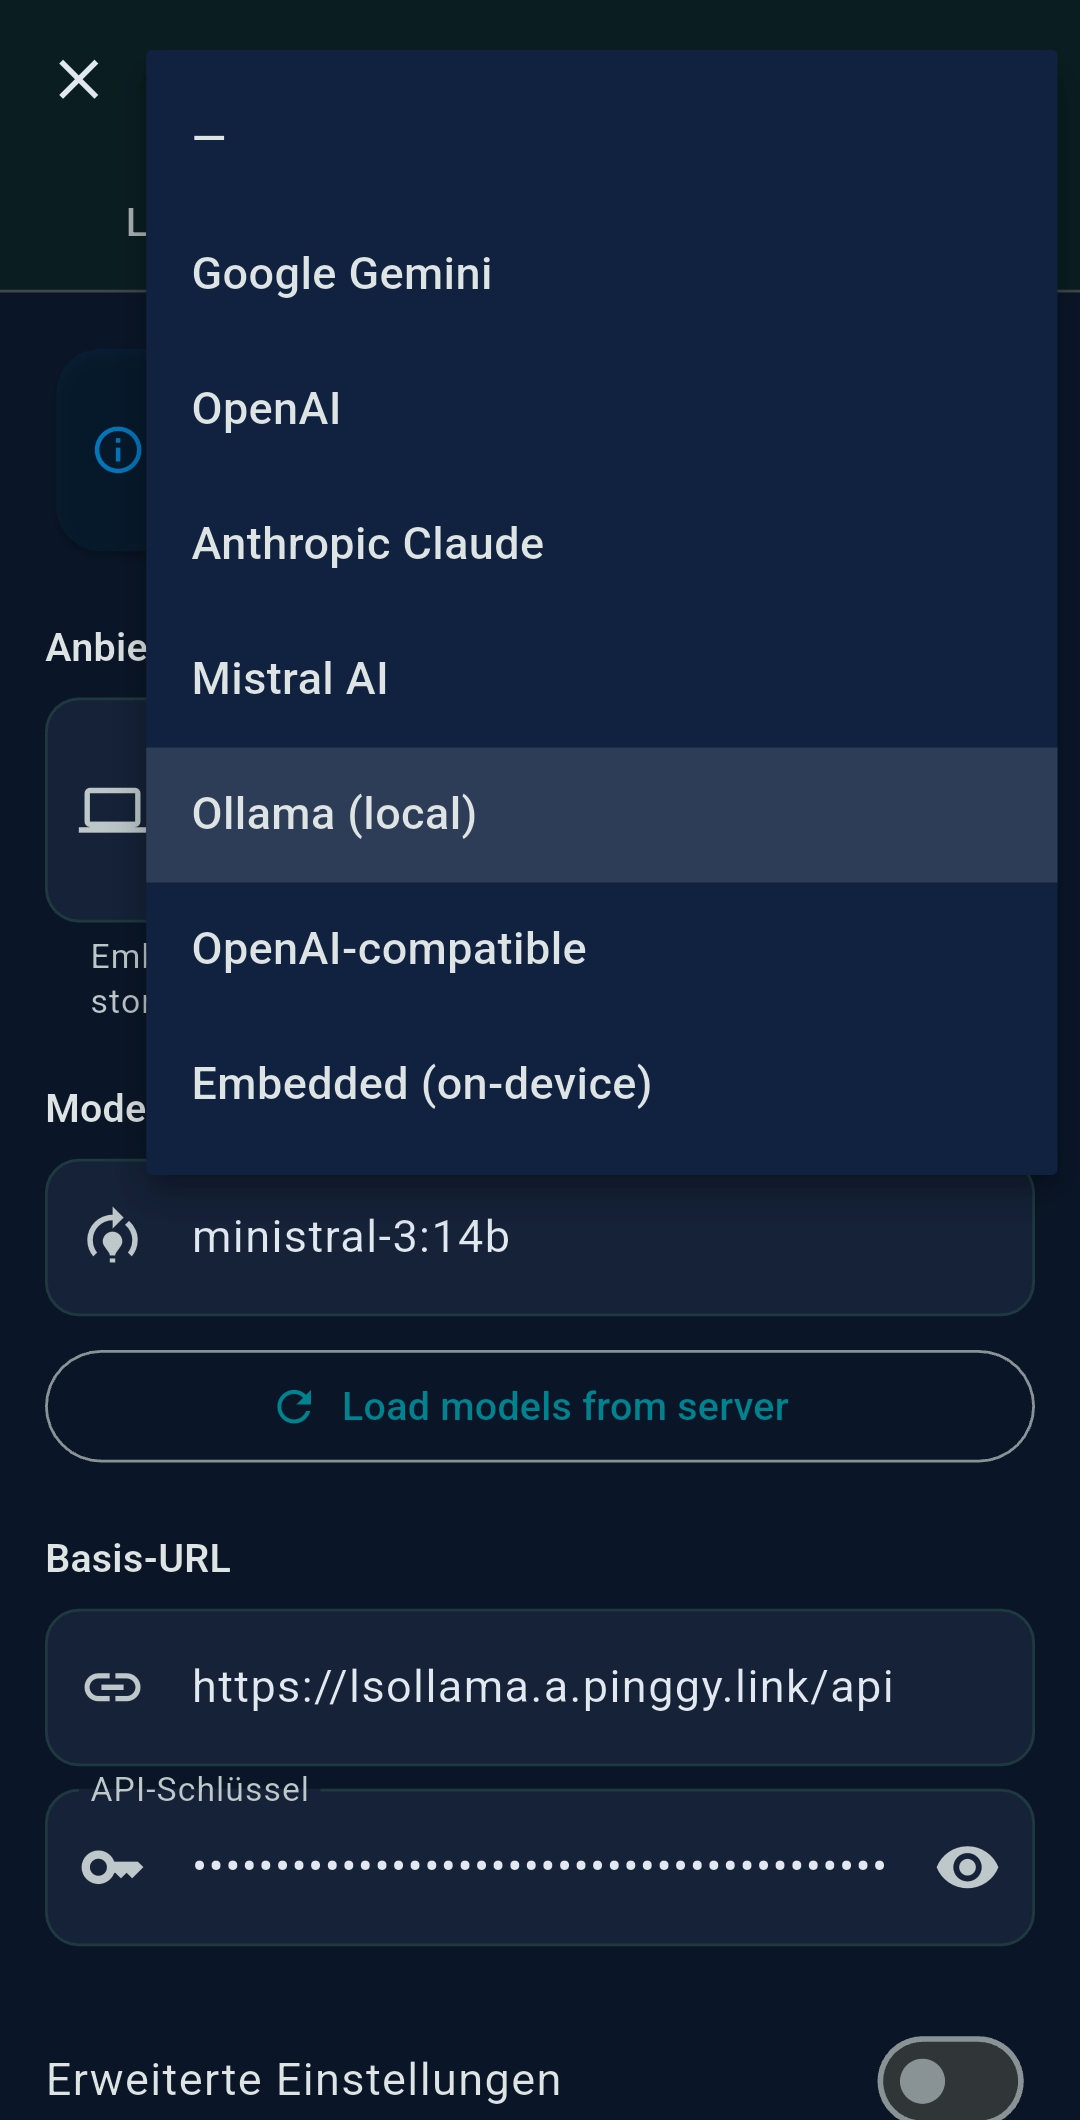
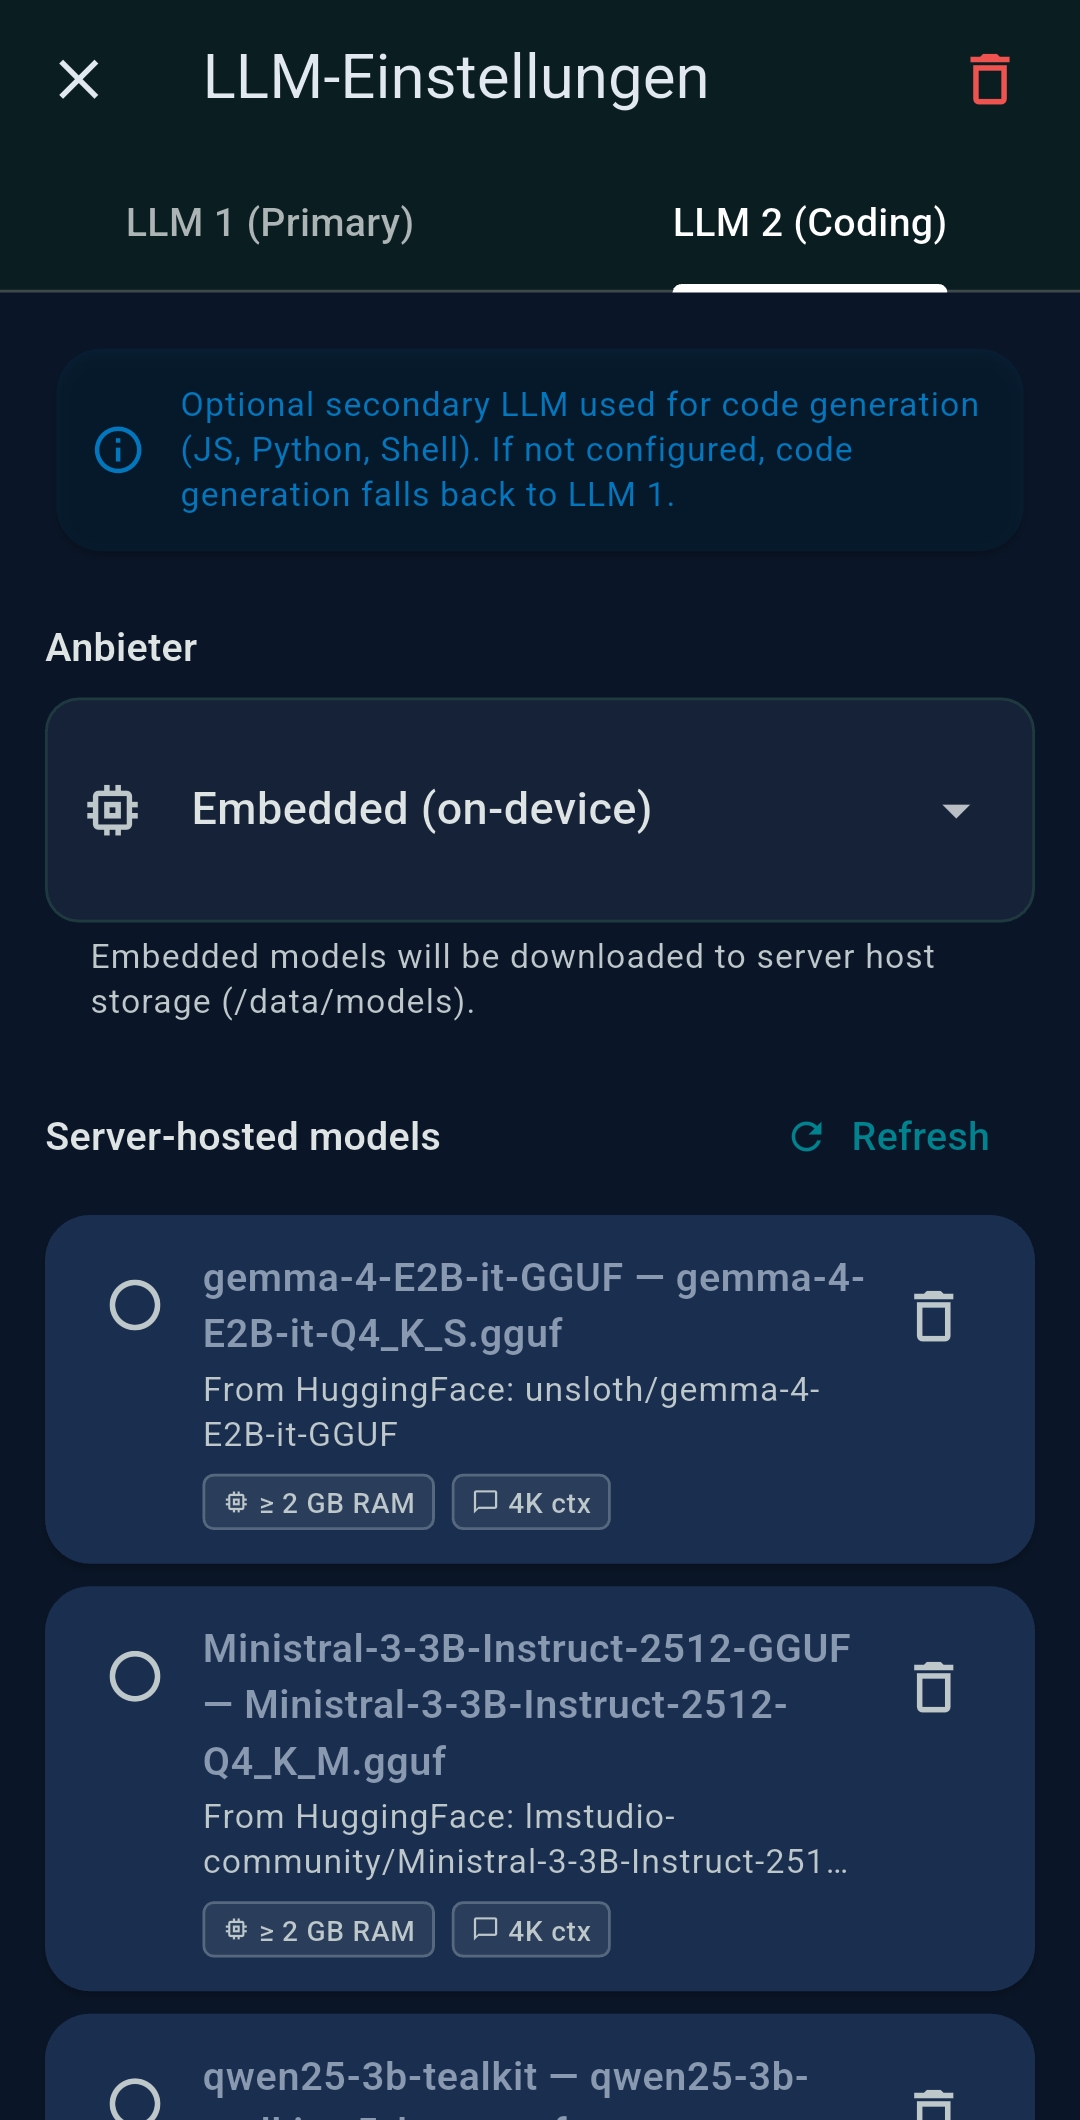
3.2 LLM Settings
TealKit supports two independently configured LLMs: LLM 1 (primary) and LLM 2 (secondary / coding model). Both are configured the same way.
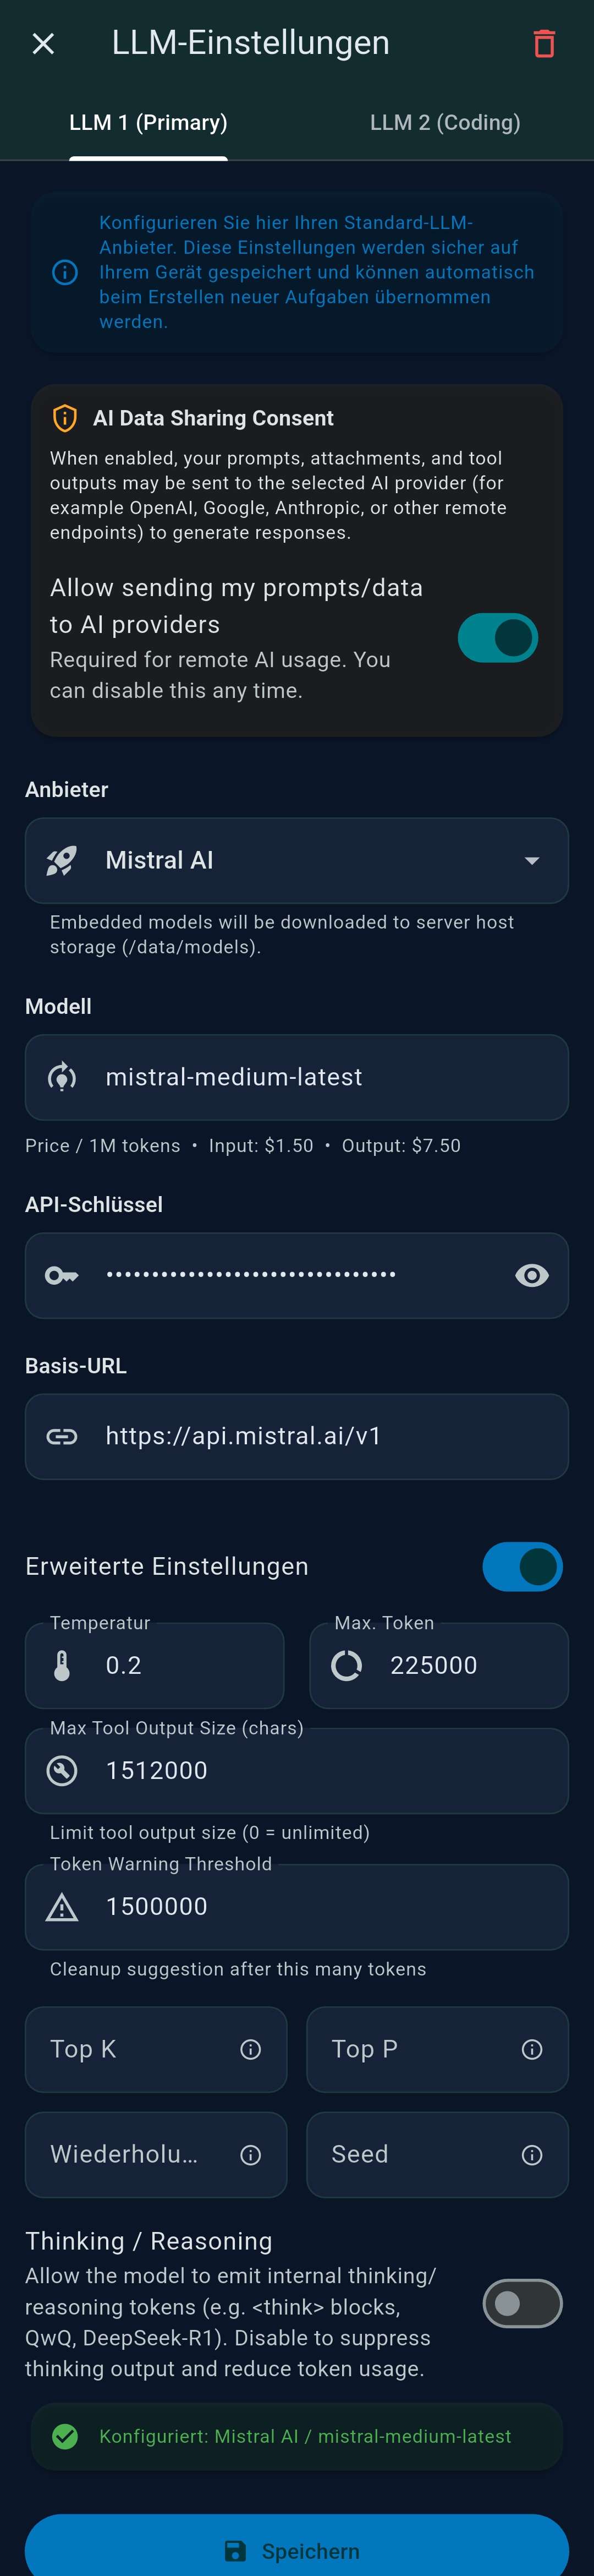
Provider & model selection
| Provider | Model examples | Notes |
|---|---|---|
| OpenAI | gpt-4o, gpt-4o-mini, gpt-4-turbo | API key required; supports function calling and vision |
| Anthropic | claude-3-5-sonnet, claude-3-haiku | API key required; excellent for long context and reasoning |
| Google Gemini | gemini-2.5-pro, gemini-2.0-flash | API key required; fast and cost-effective |
| Mistral AI | mistral-medium, mistral-large-latest | European provider (GDPR); API key required |
| Azure OpenAI | Any Azure deployment | Requires Azure endpoint URL + deployment name + API key |
| Ollama | llama3, mistral, qwen2.5, ministral-3:14b… | Local or network Ollama; no API cost; great for SLMs |
Advanced parameters
| Parameter | Default | Description |
|---|---|---|
| Temperature | 0.7 | Controls randomness. Lower values (0.1–0.3) produce more deterministic outputs — ideal for tool-calling agents. Higher values (0.8–1.0) add creativity but reduce reliability for automation. |
| Max Tokens | 0 (unlimited) | Maximum tokens in the LLM response. Set to 0 for the model default. Reduce to cap response length and save cost. |
| Max Tool Output Size | 2 560 000 | Maximum characters of a single tool result passed back to the LLM. Large outputs are truncated to prevent context overflow. |
| Token Warning Threshold | 80 000 | The token counter turns amber when cumulative session tokens exceed this value. |
| Top-K | – | Limits sampling to the K most probable next tokens. Supported by Ollama and some local endpoints. |
| Top-P | – | Nucleus sampling threshold (0–1). Tokens are sampled from the smallest set whose cumulative probability exceeds Top-P. |
| Repeat Penalty | 1.0 | Penalises repetition of recent tokens. Mostly relevant for Ollama / local models. |
| Seed | – | Fixed random seed for reproducible outputs. Leave empty for non-deterministic mode. |
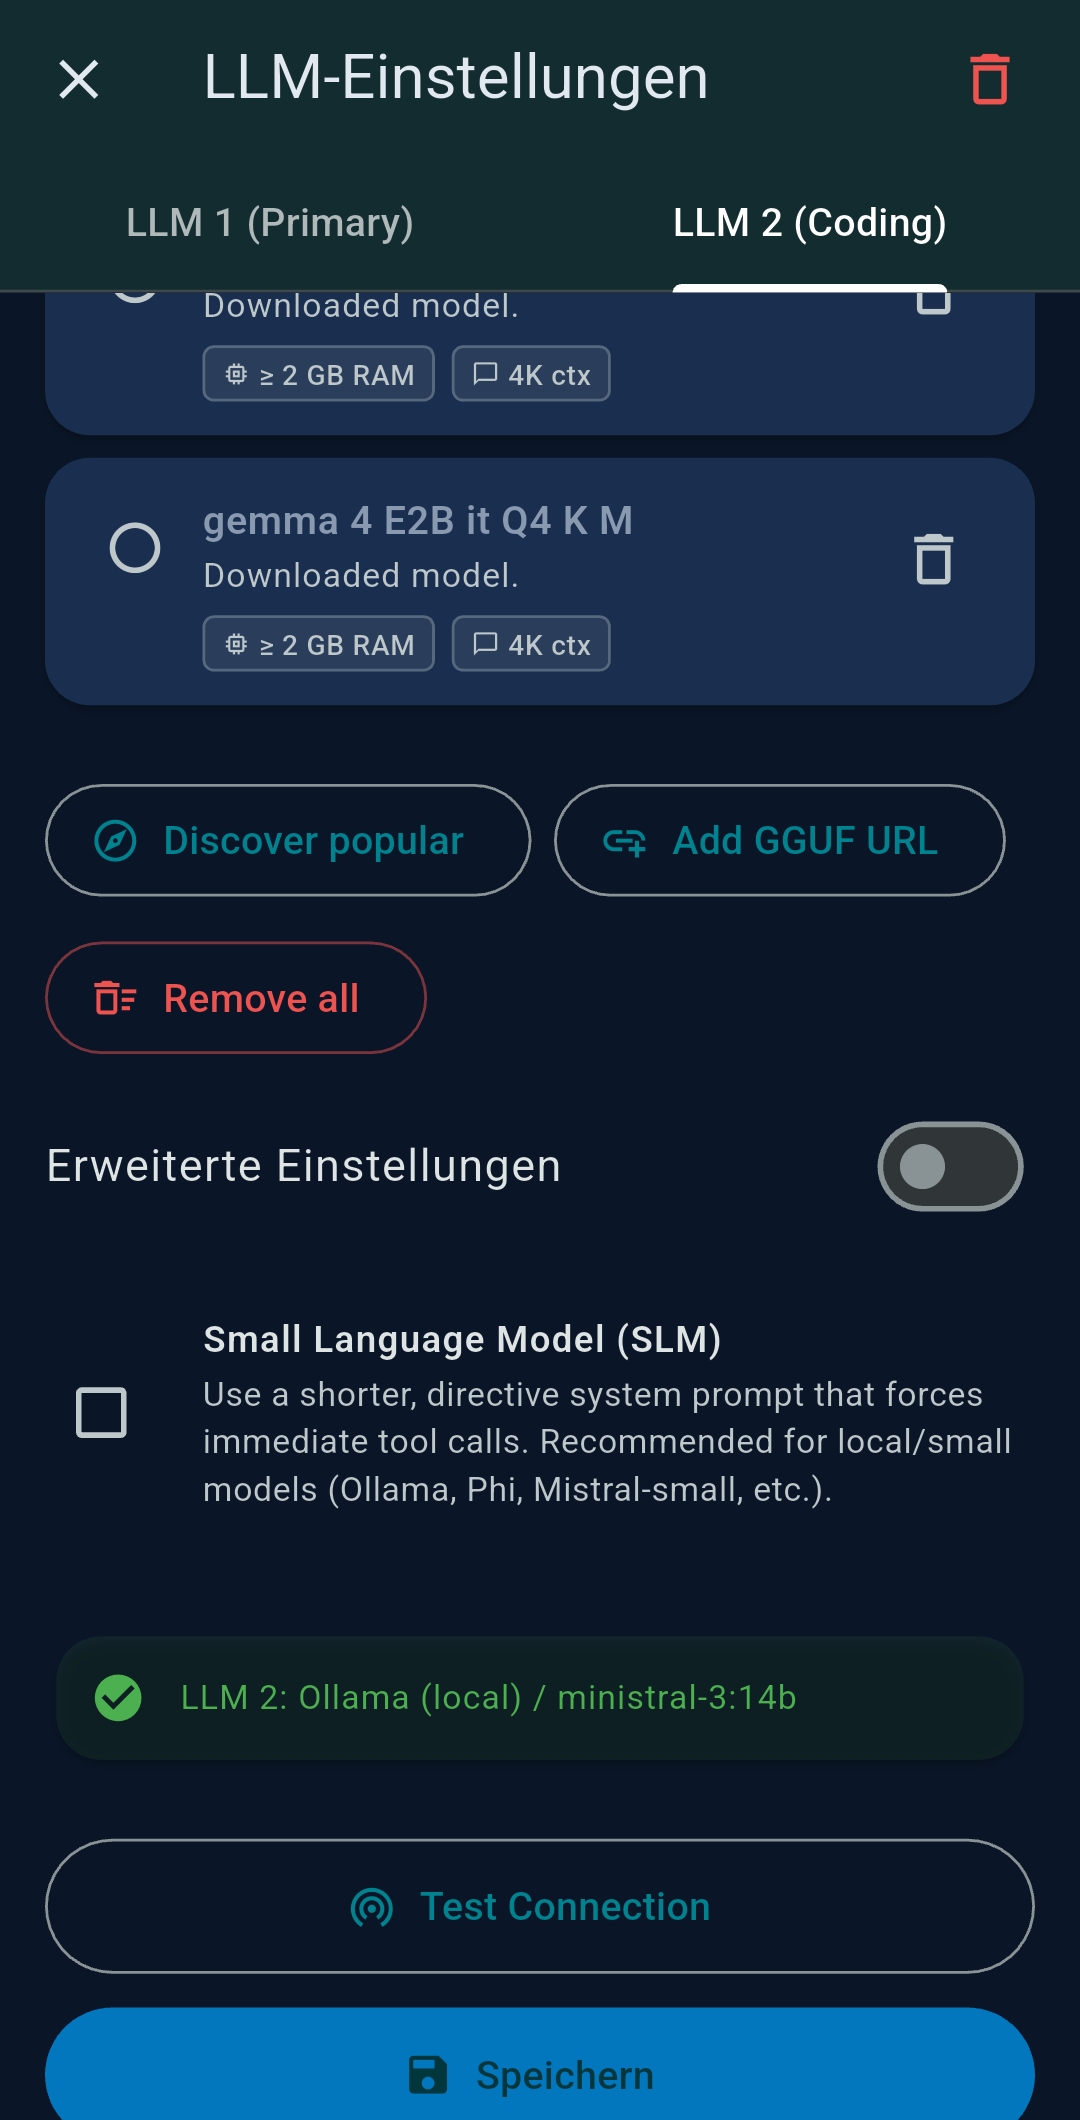
SLM mode
Enable the SLM (Small Language Model) checkbox to activate a compact system prompt that instructs small models to call tools immediately rather than explaining their plan.
Thinking / Reasoning toggle
In the Playground Advanced Settings and the Agent Editor LLM section, a
Thinking / Reasoning toggle activates extended reasoning for models that support it (e.g.
Claude 3.7 Sonnet with extended thinking, o3-mini with reasoning effort). When enabled, the
thinking: true parameter is passed in the LLM request.
Native tool calling (Ollama)
When Ollama is selected as the LLM provider, a Use native tool calling toggle
appears in the Playground and Agent Editor. When enabled, TealKit uses Ollama’s native tools
API instead of text-based tool injection. This improves reliability and enables structured tool calls with
models that support function calling natively (e.g. Qwen2.5, Mistral, Llama 3.1 or newer). Disable this
if your model does not support native tool calling or if you prefer the text-based approach.
3.3 Data Sources


| Data Source | Provides |
|---|---|
| Google / Gmail | Google OAuth for Gmail tool, Calendar |
| IMAP | Login credentials for any IMAP mailbox |
| Google Drive | OAuth for reading/writing Google Drive files |
| SMTP | Outbound email — used by Email output channel |
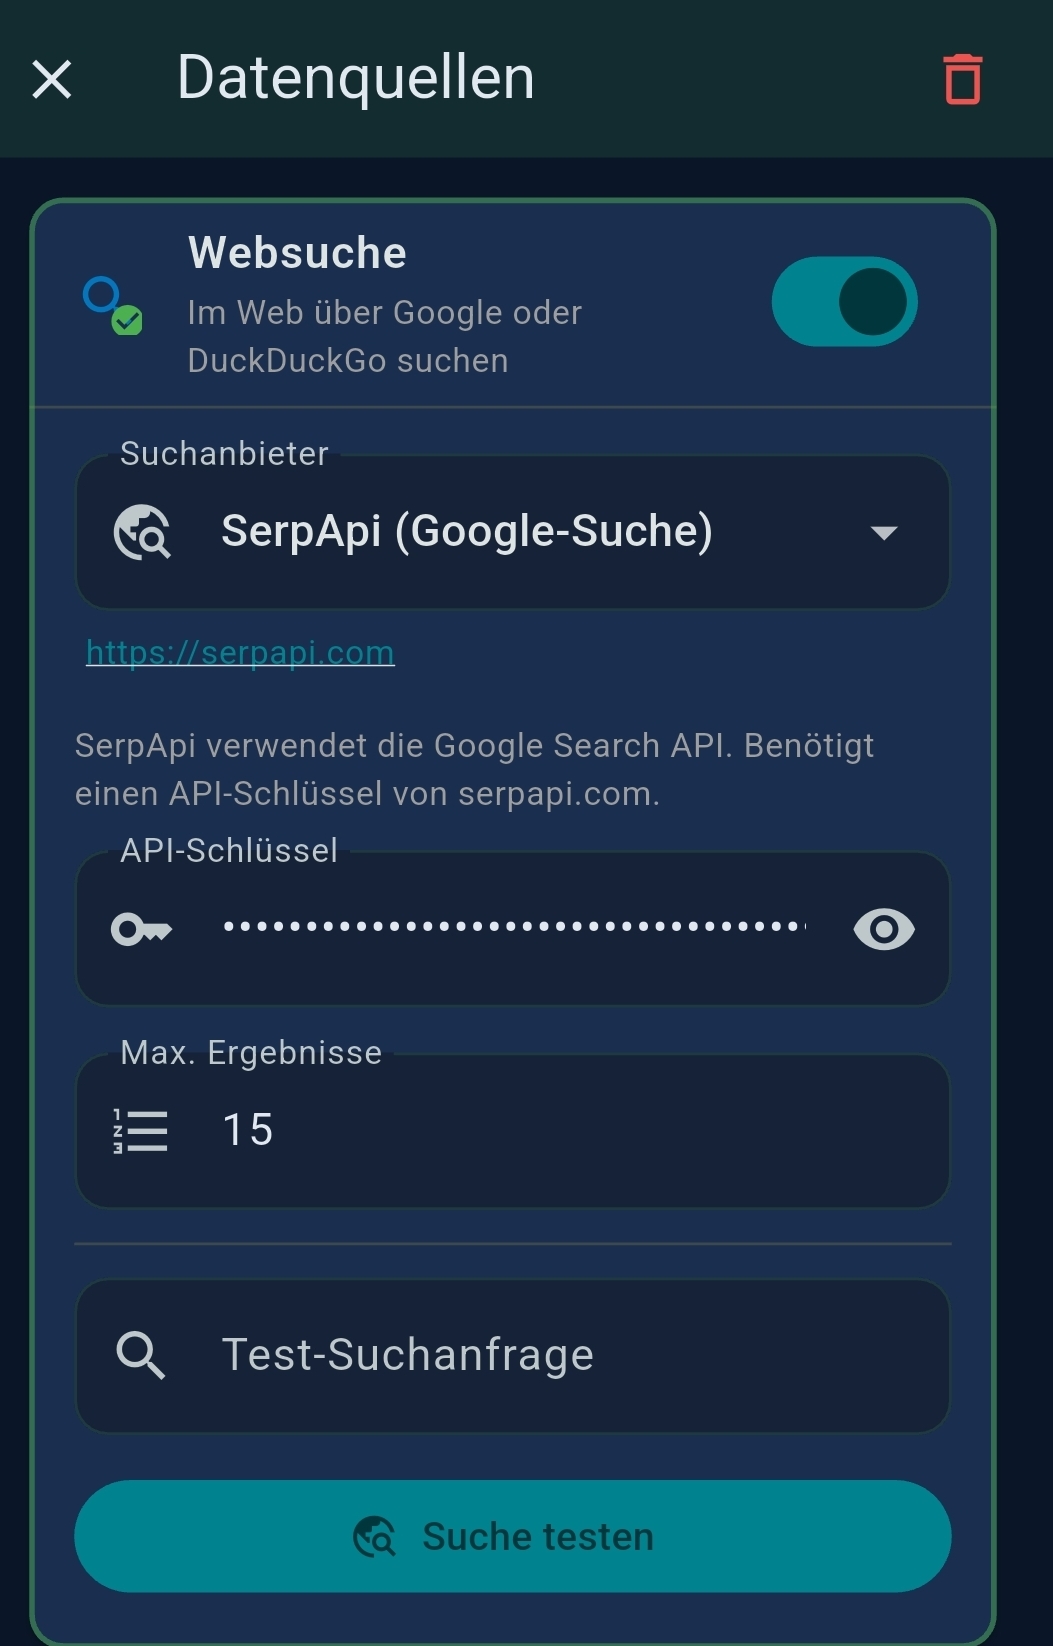
| SerpApi / Serper | API key for premium Google Search in Web Search tool |
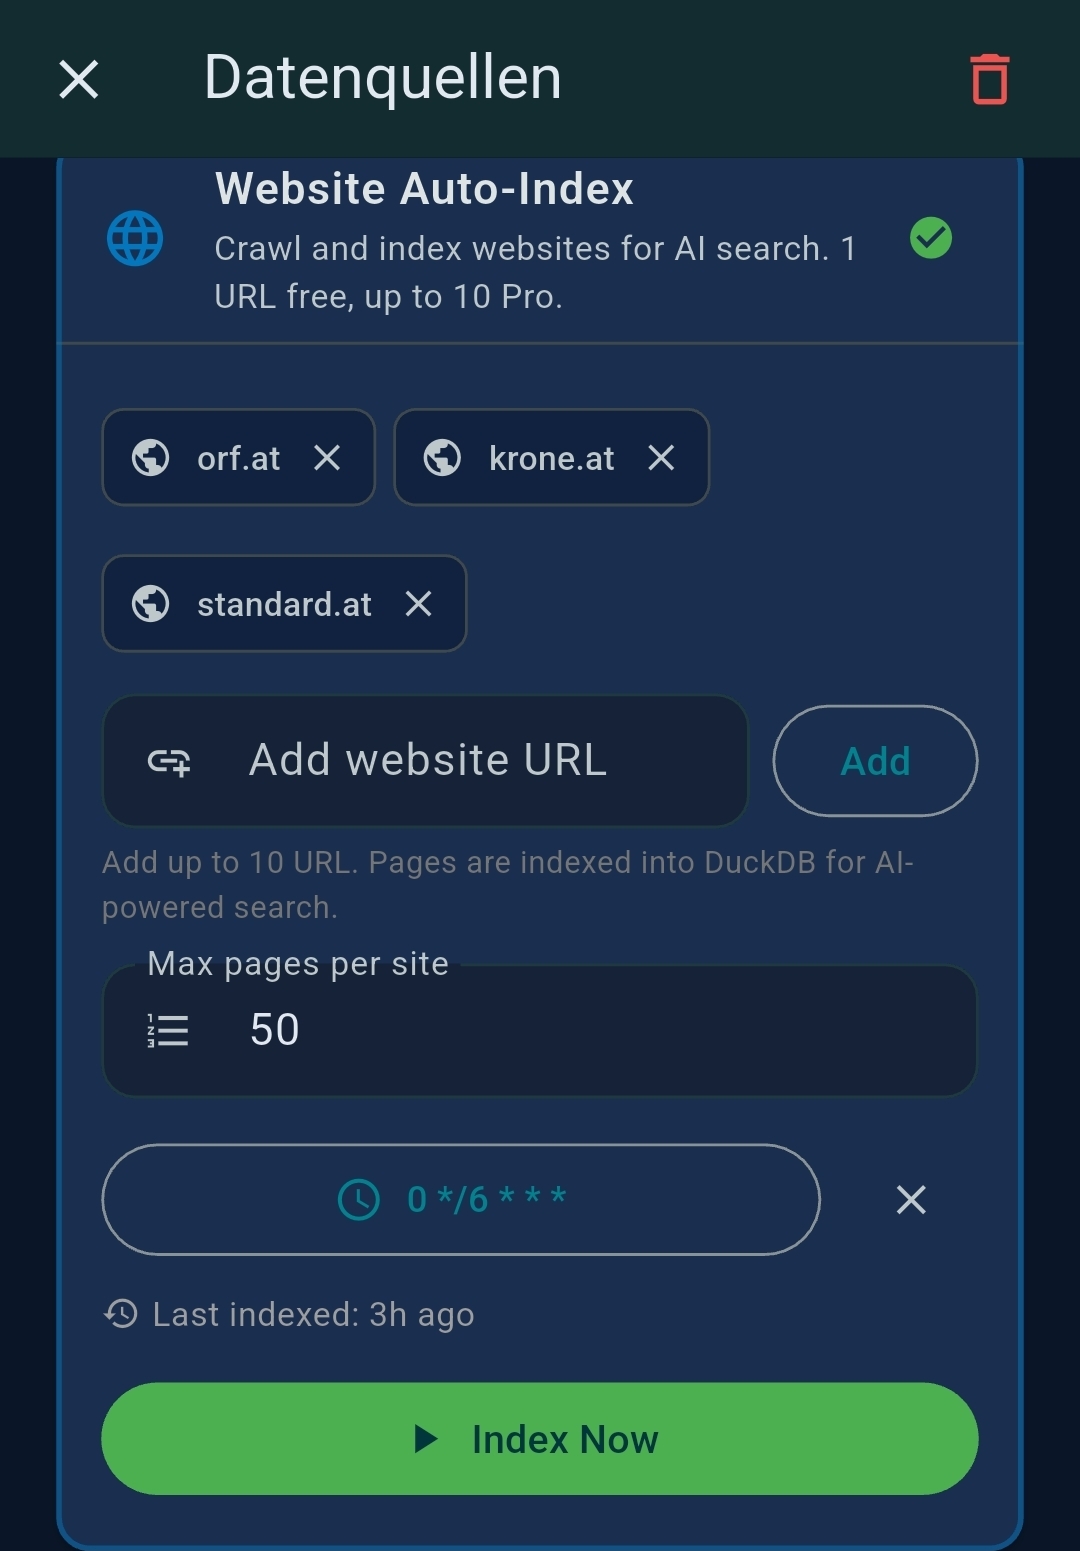
| DuckDB / Website Index | Configure websites to index and auto-refresh schedule |
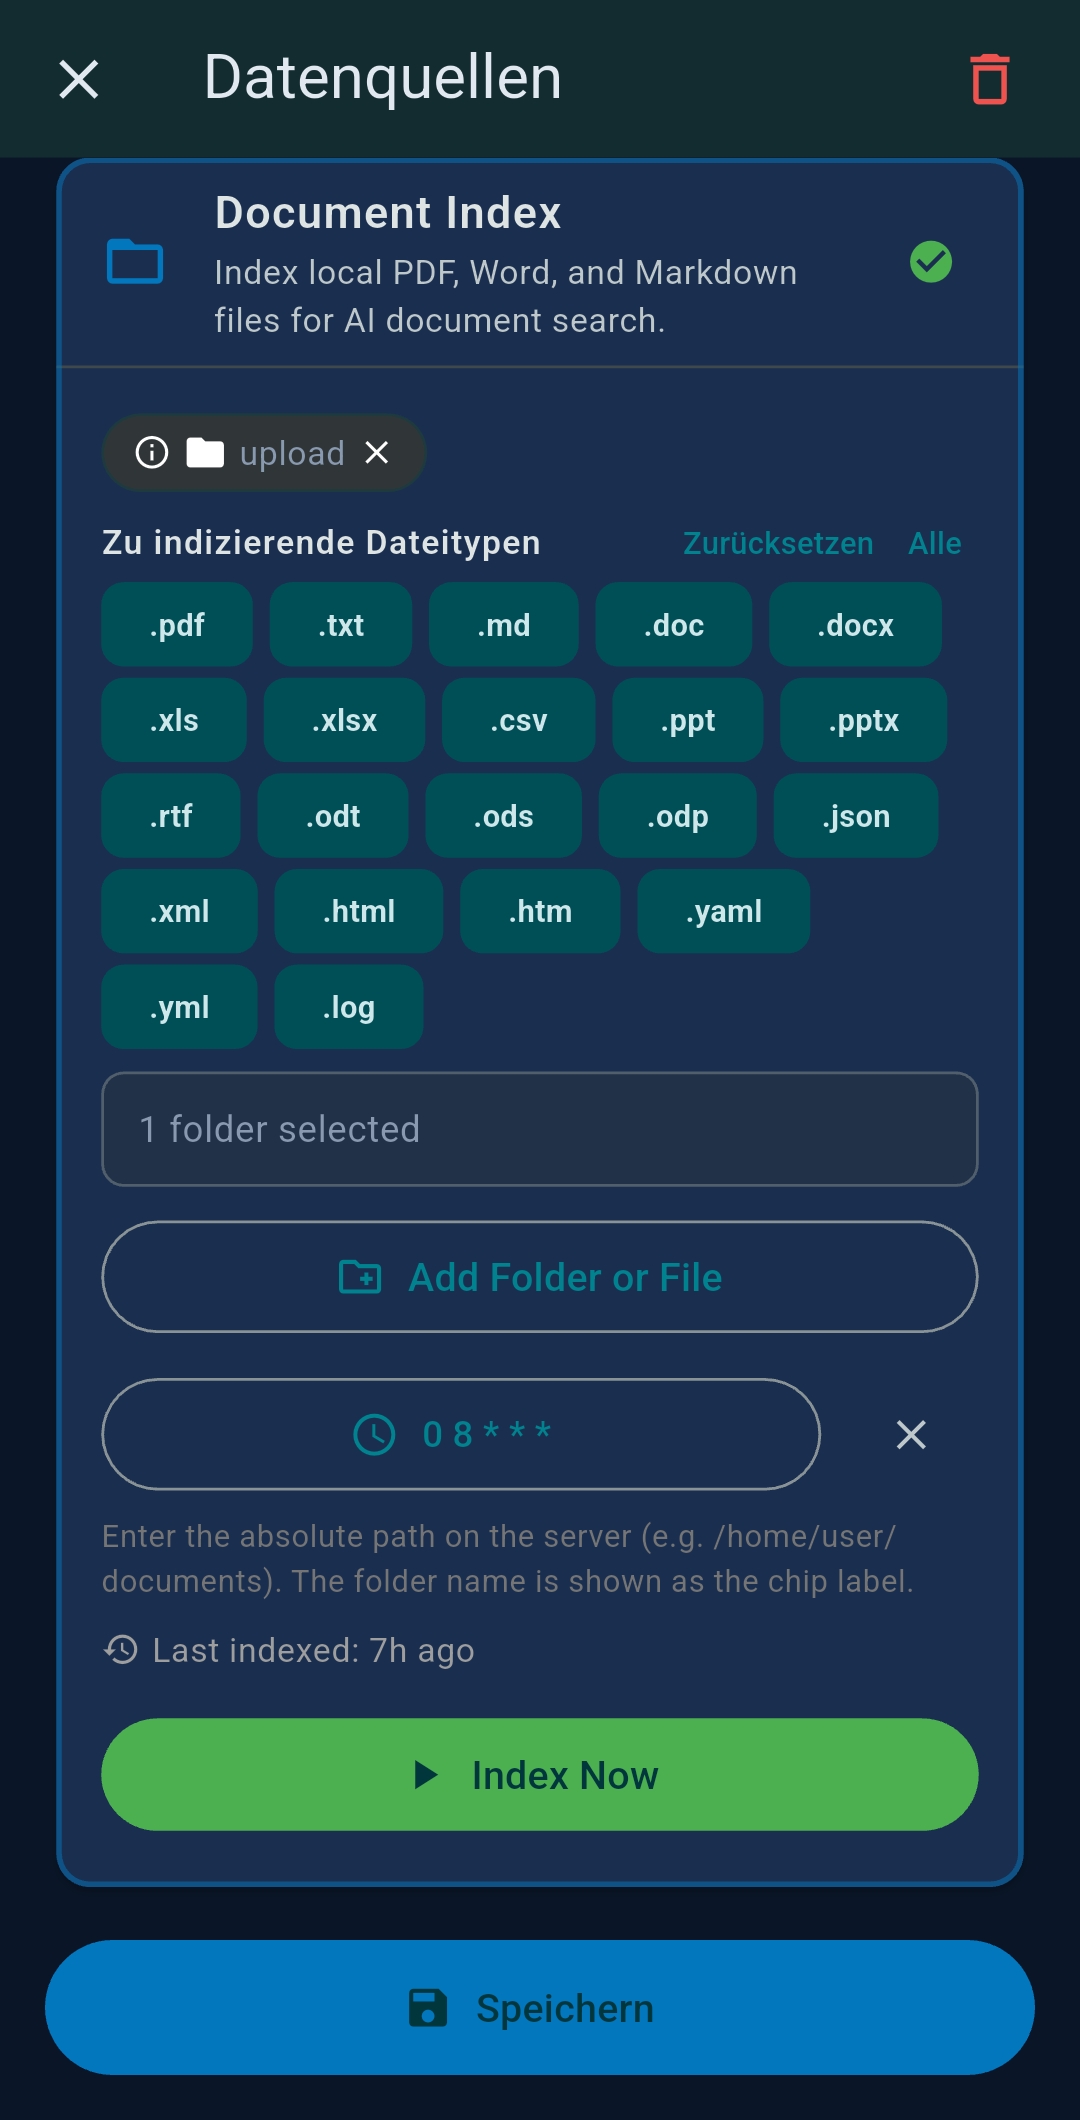
| Document Index | Local folder path for document indexing (PDF, DOCX, TXT…) |
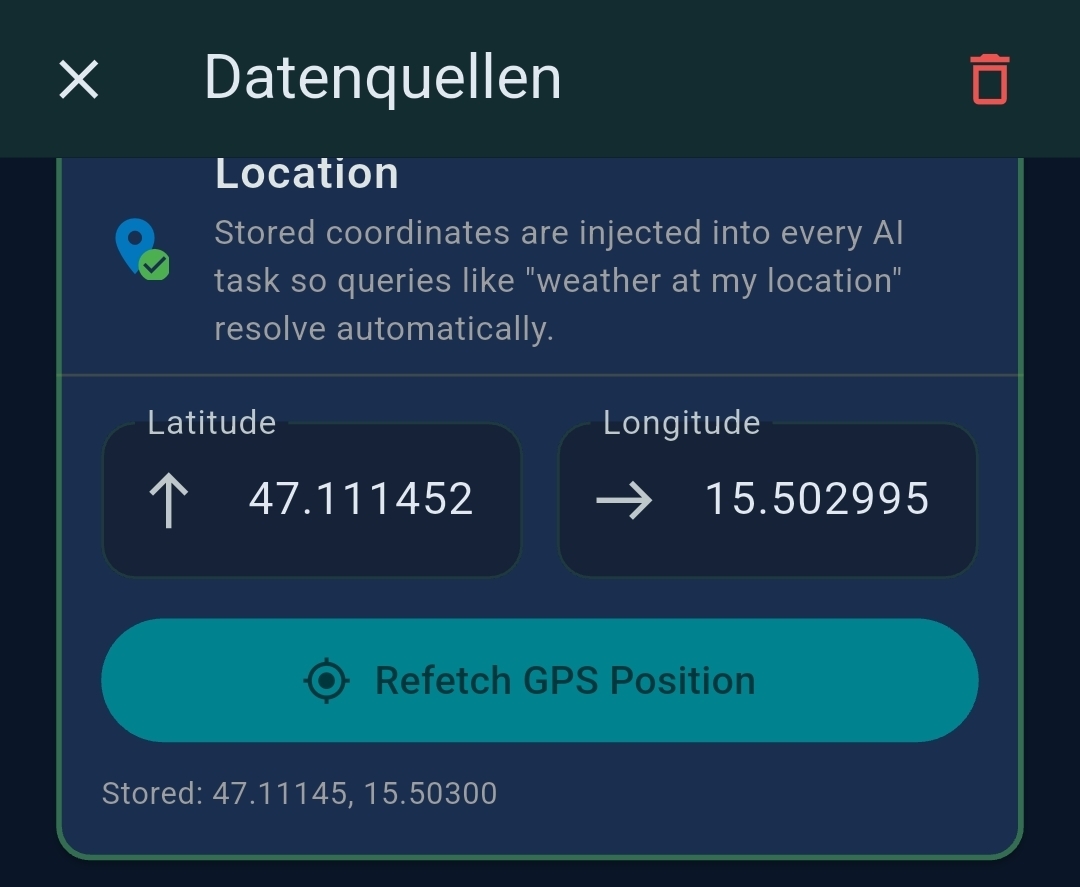
| Location | Device GPS / manual coordinates for location-aware tools |
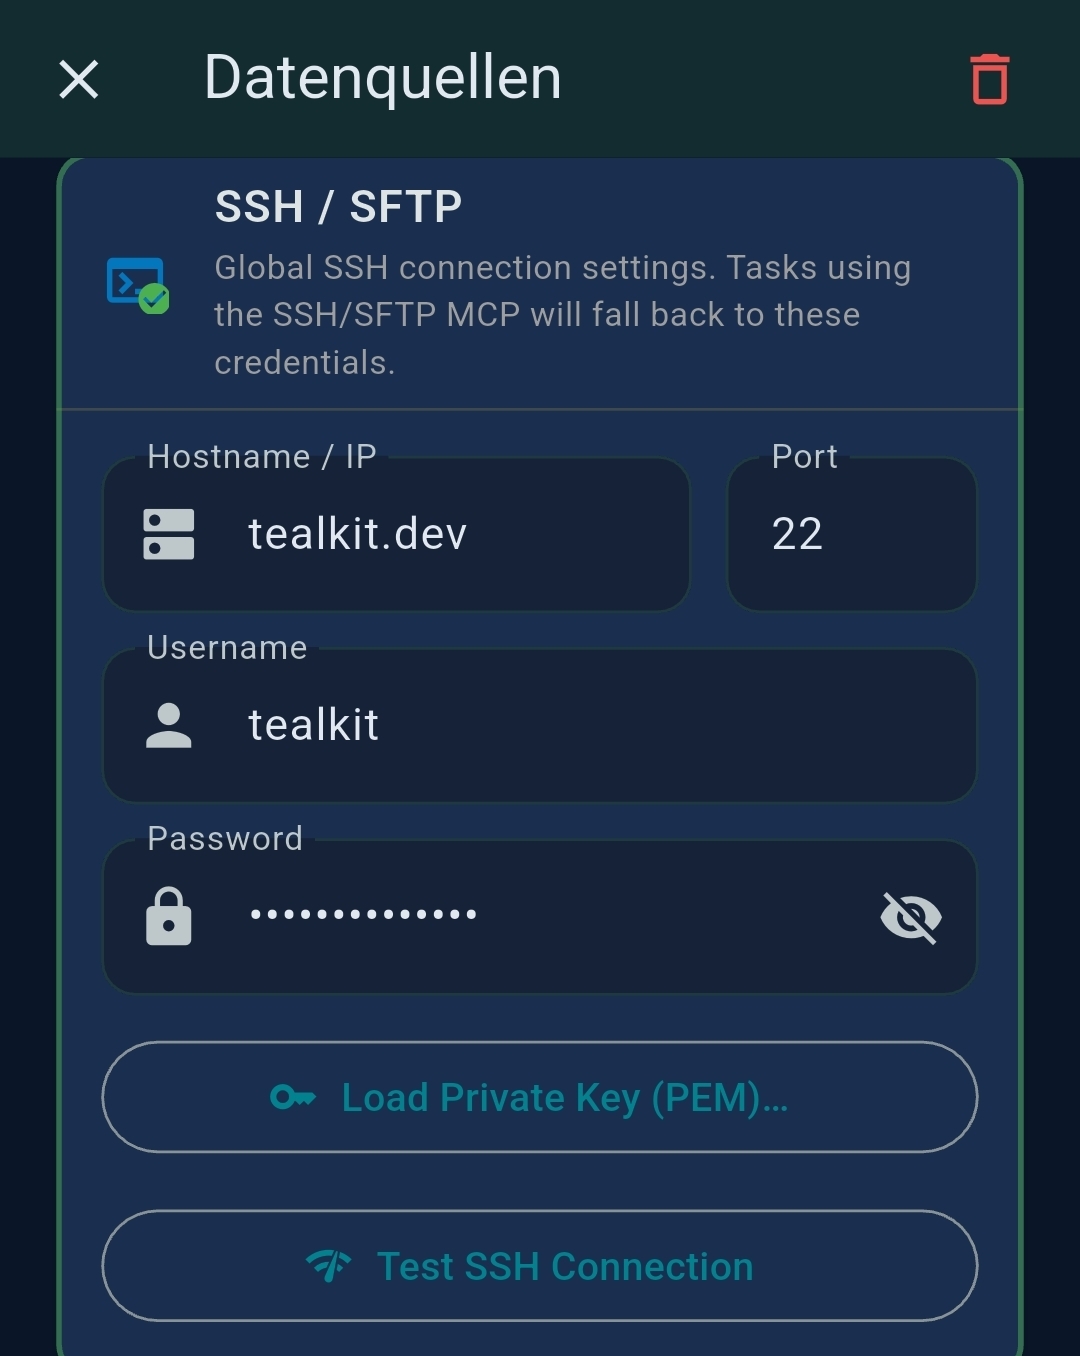
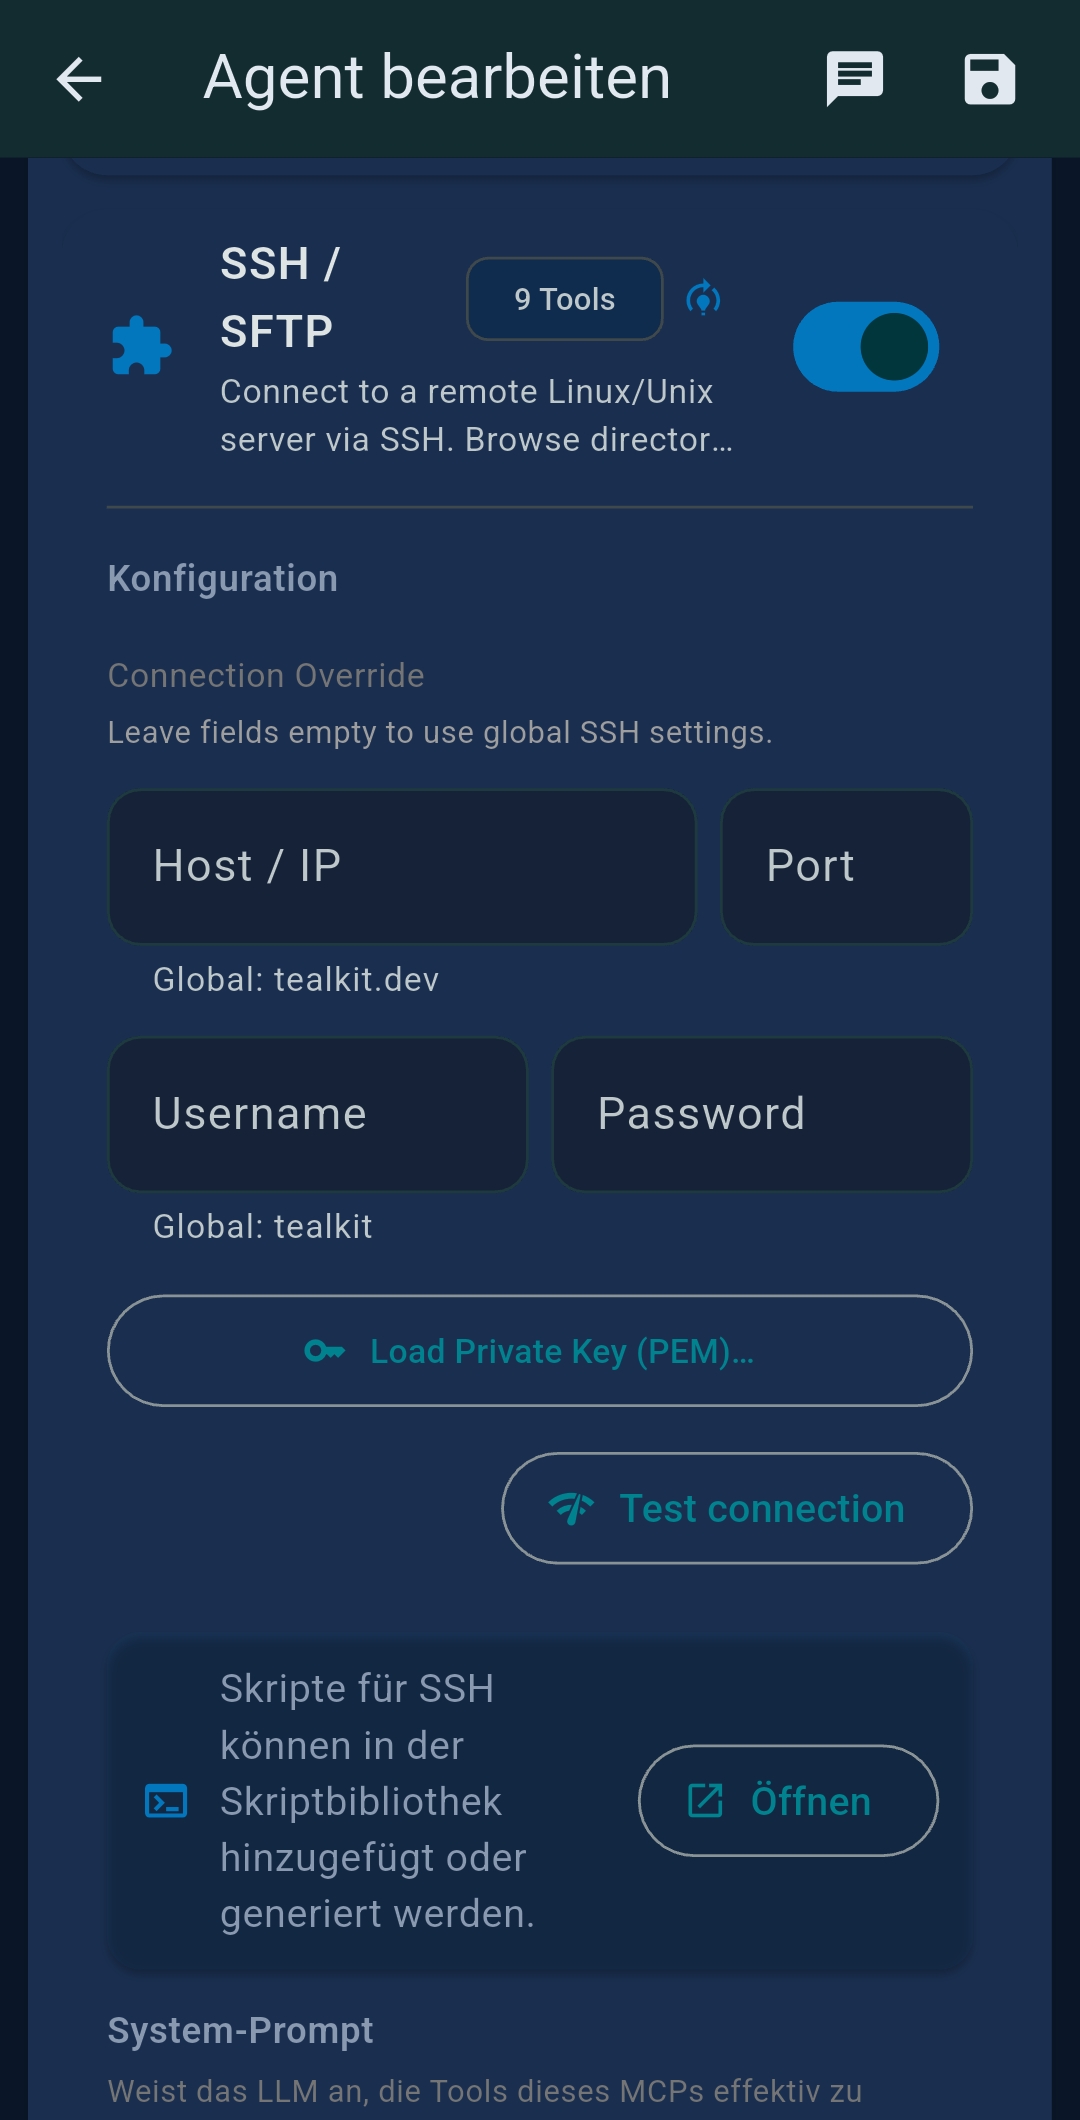
| SSH/SFTP | Hostname, port, user, key/password for remote server access |
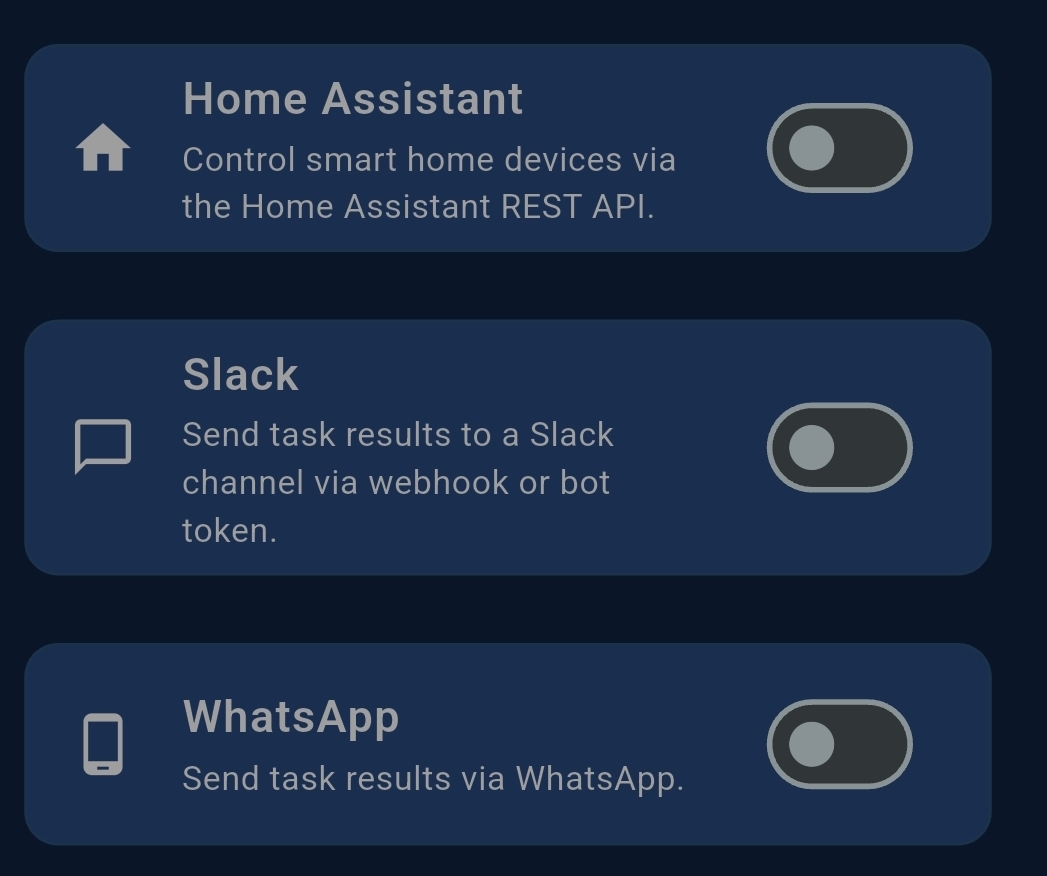
| Home Assistant | Base URL and long-lived access token for HA REST API |
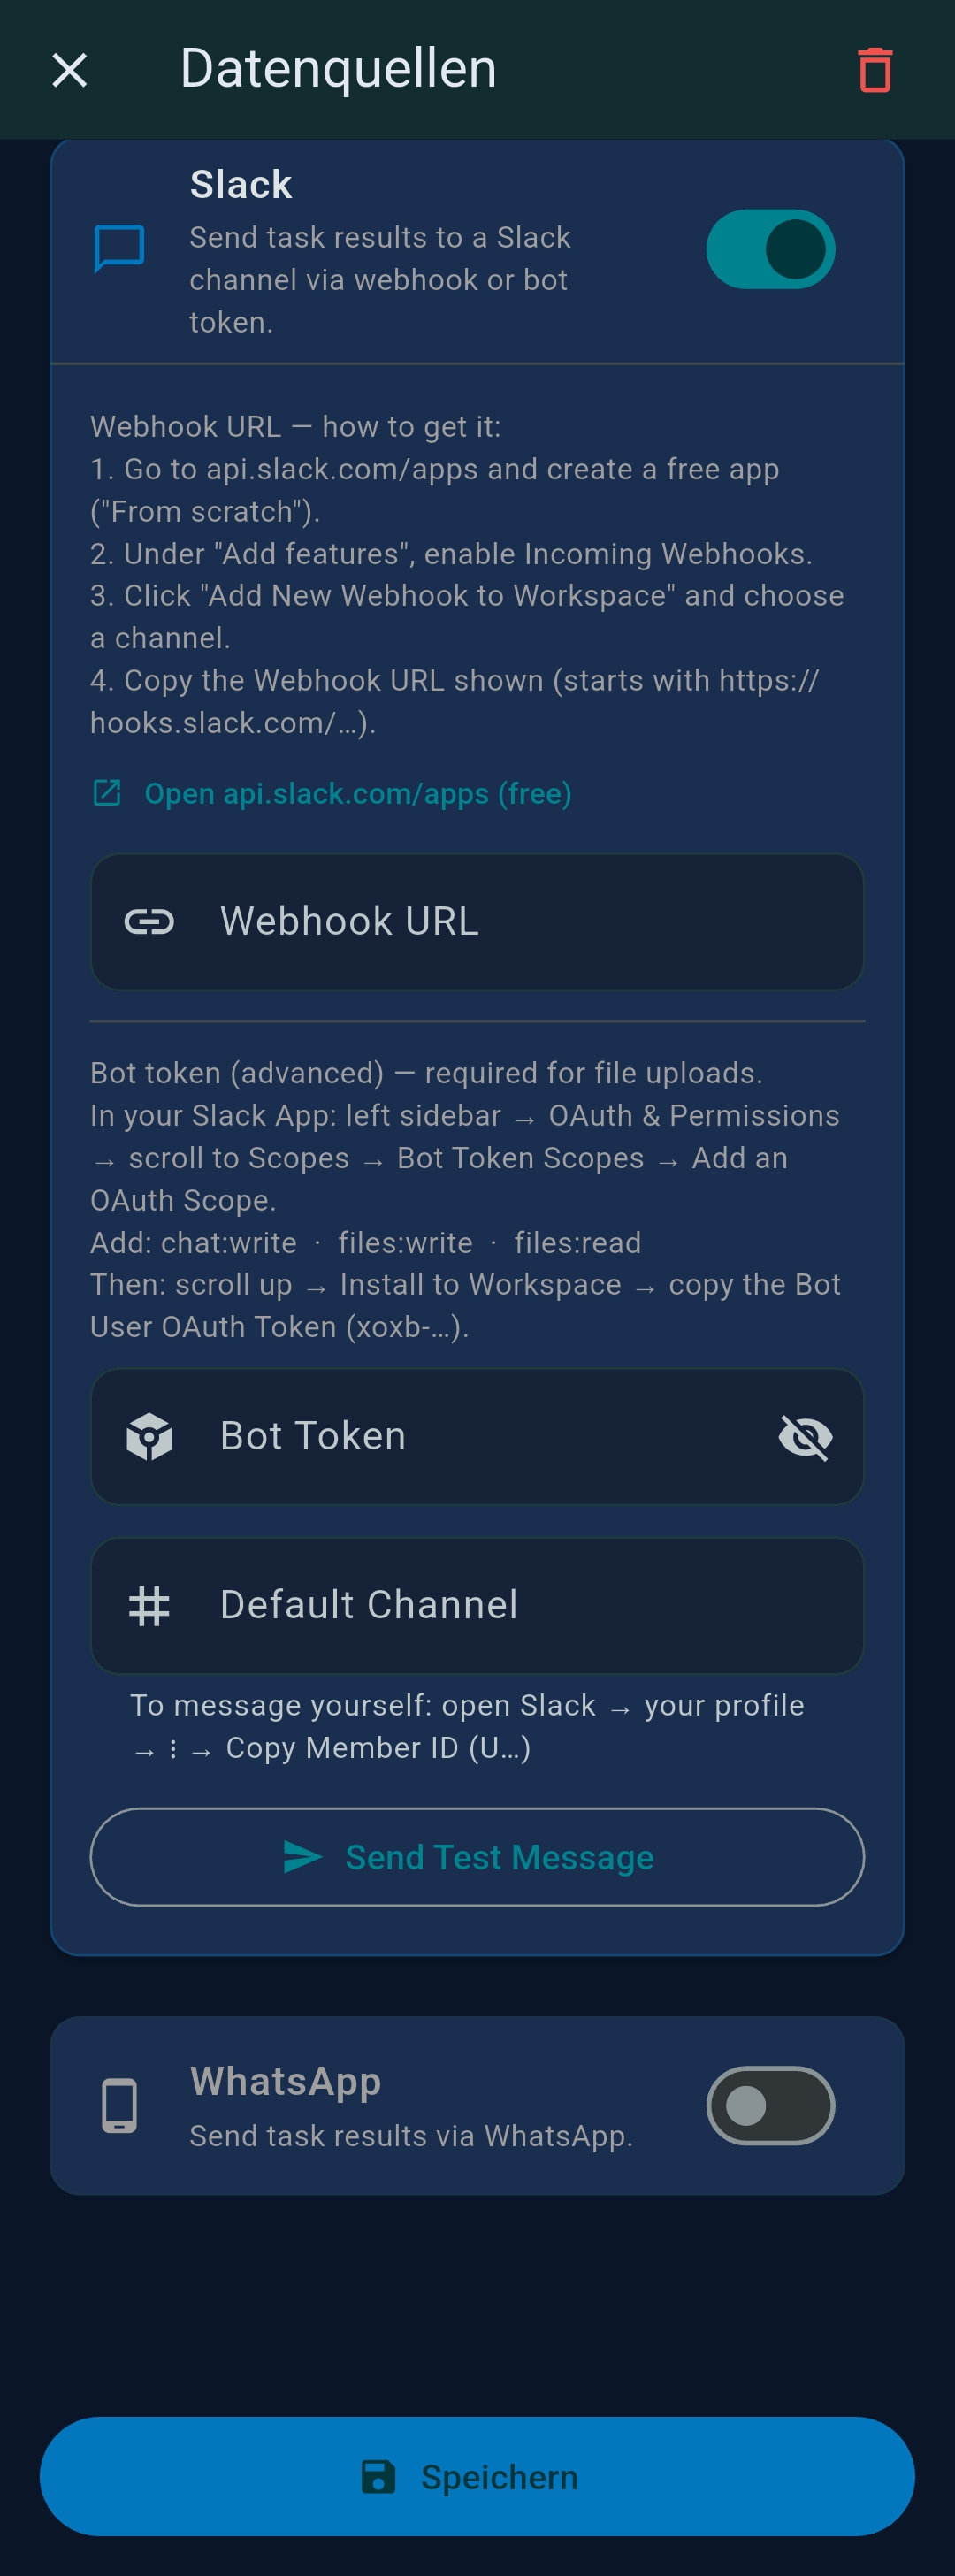
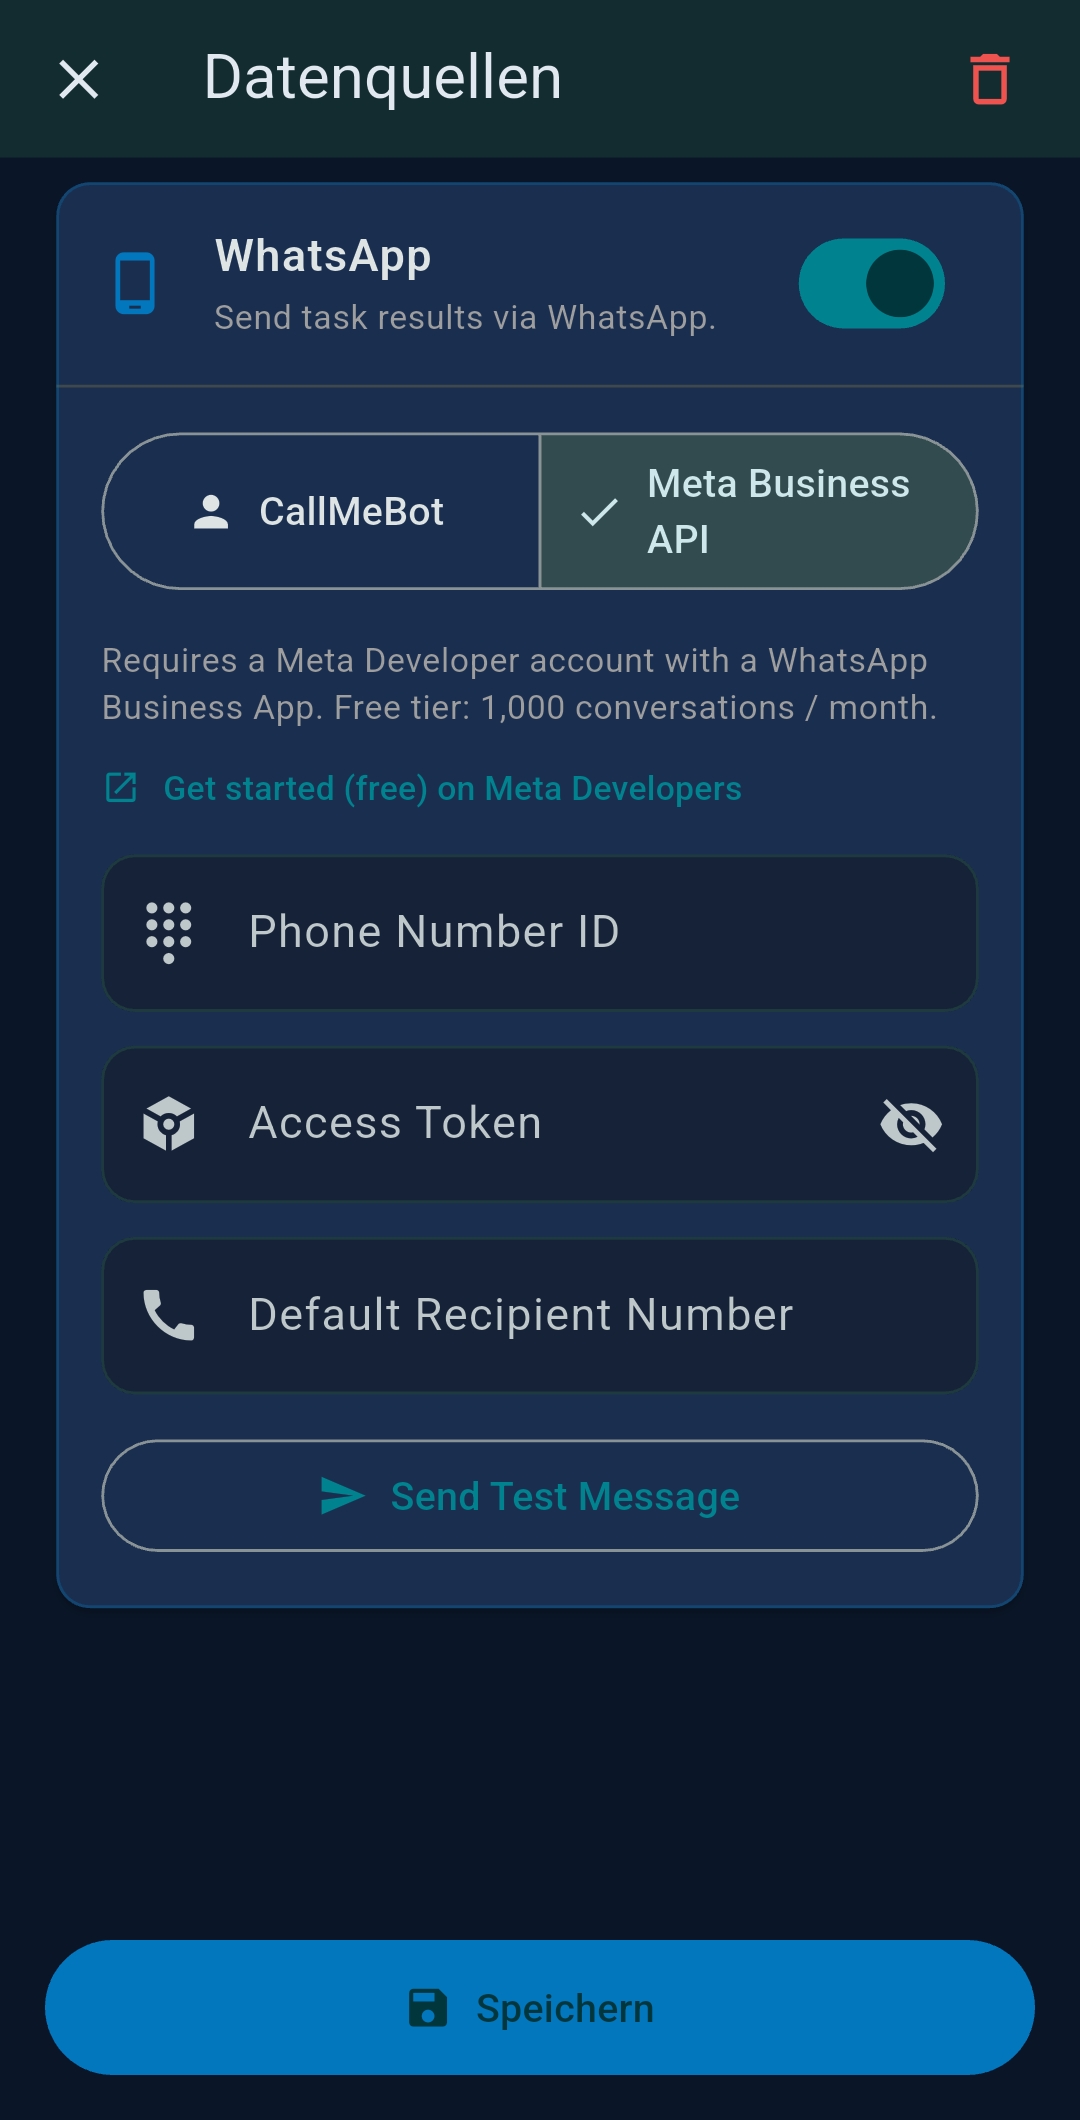
| WhatsApp Business API credentials for WhatsApp output channel |
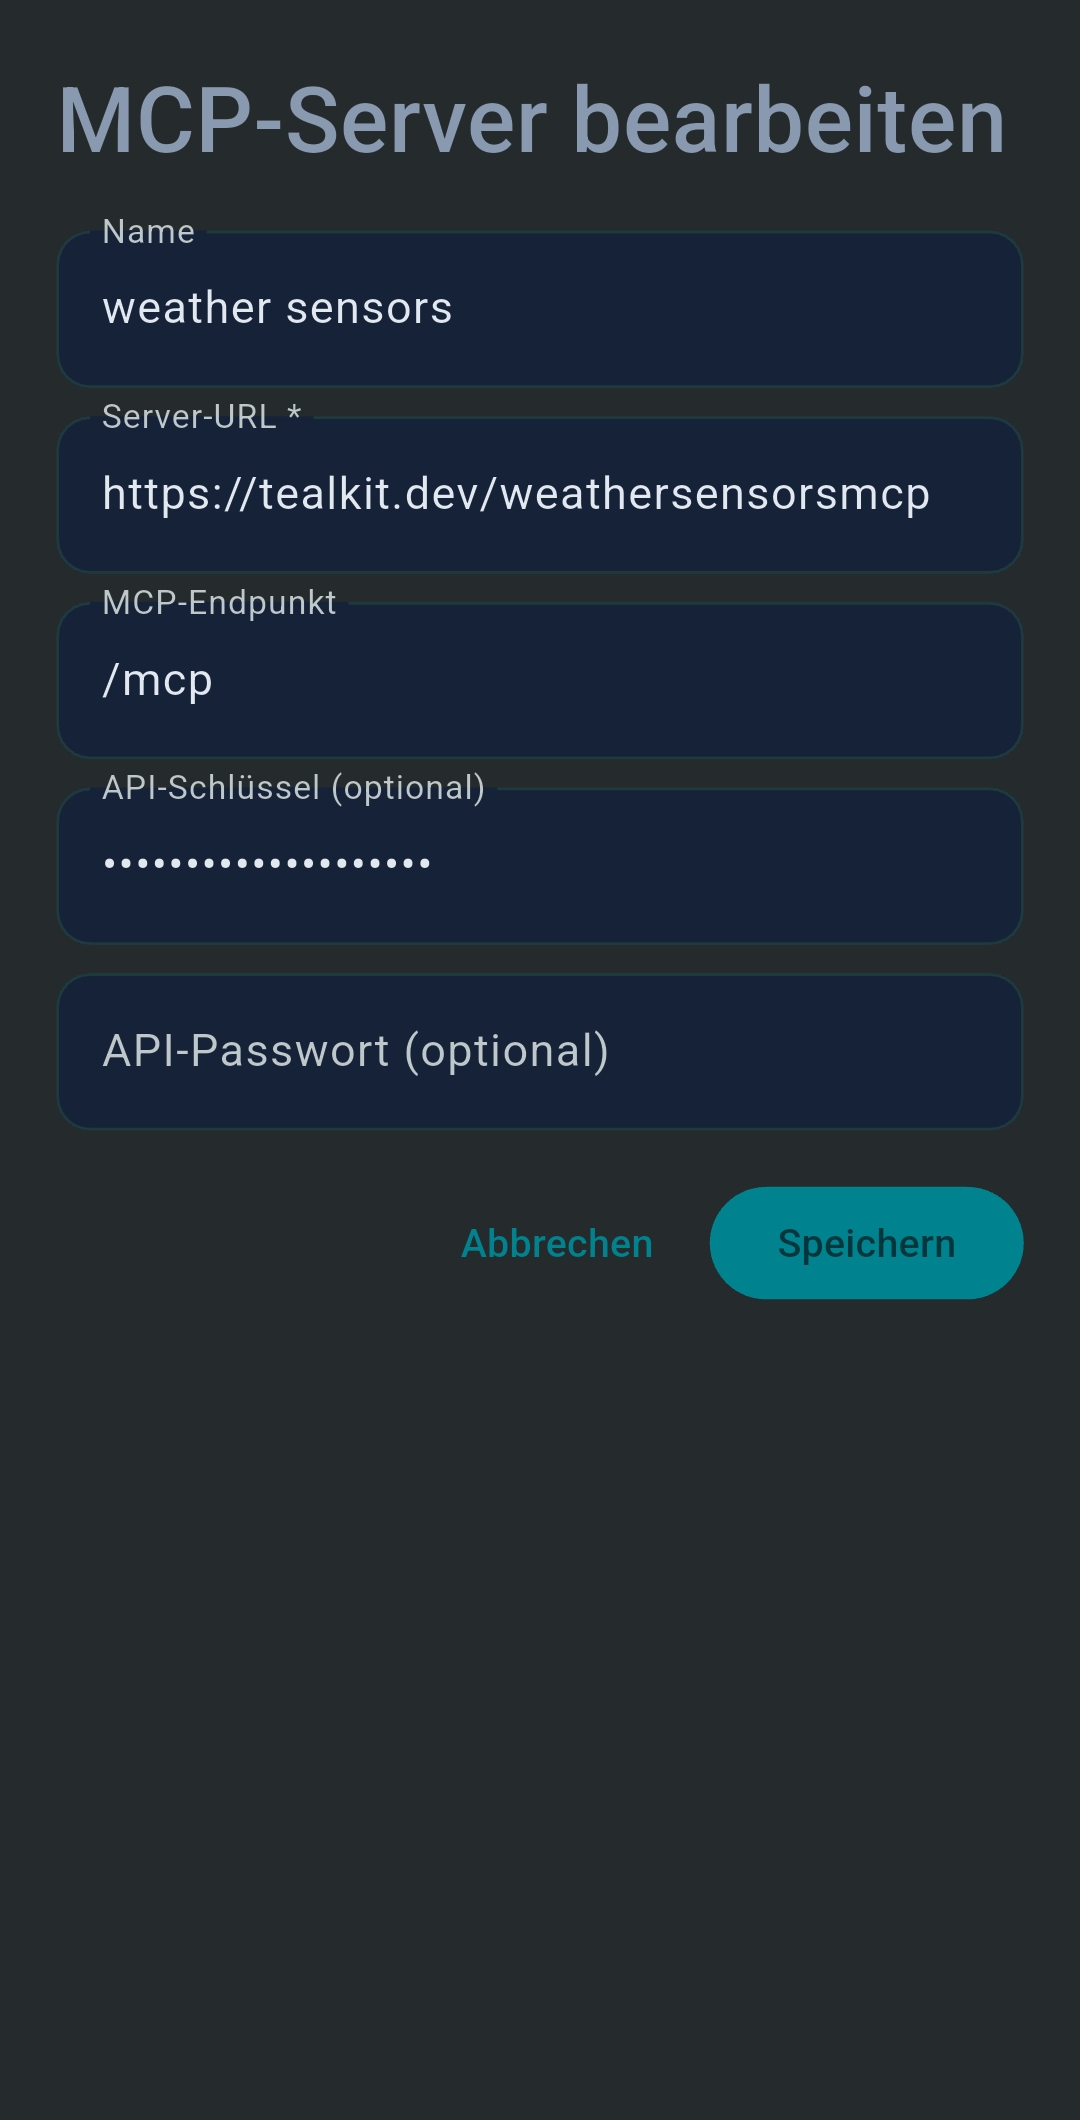
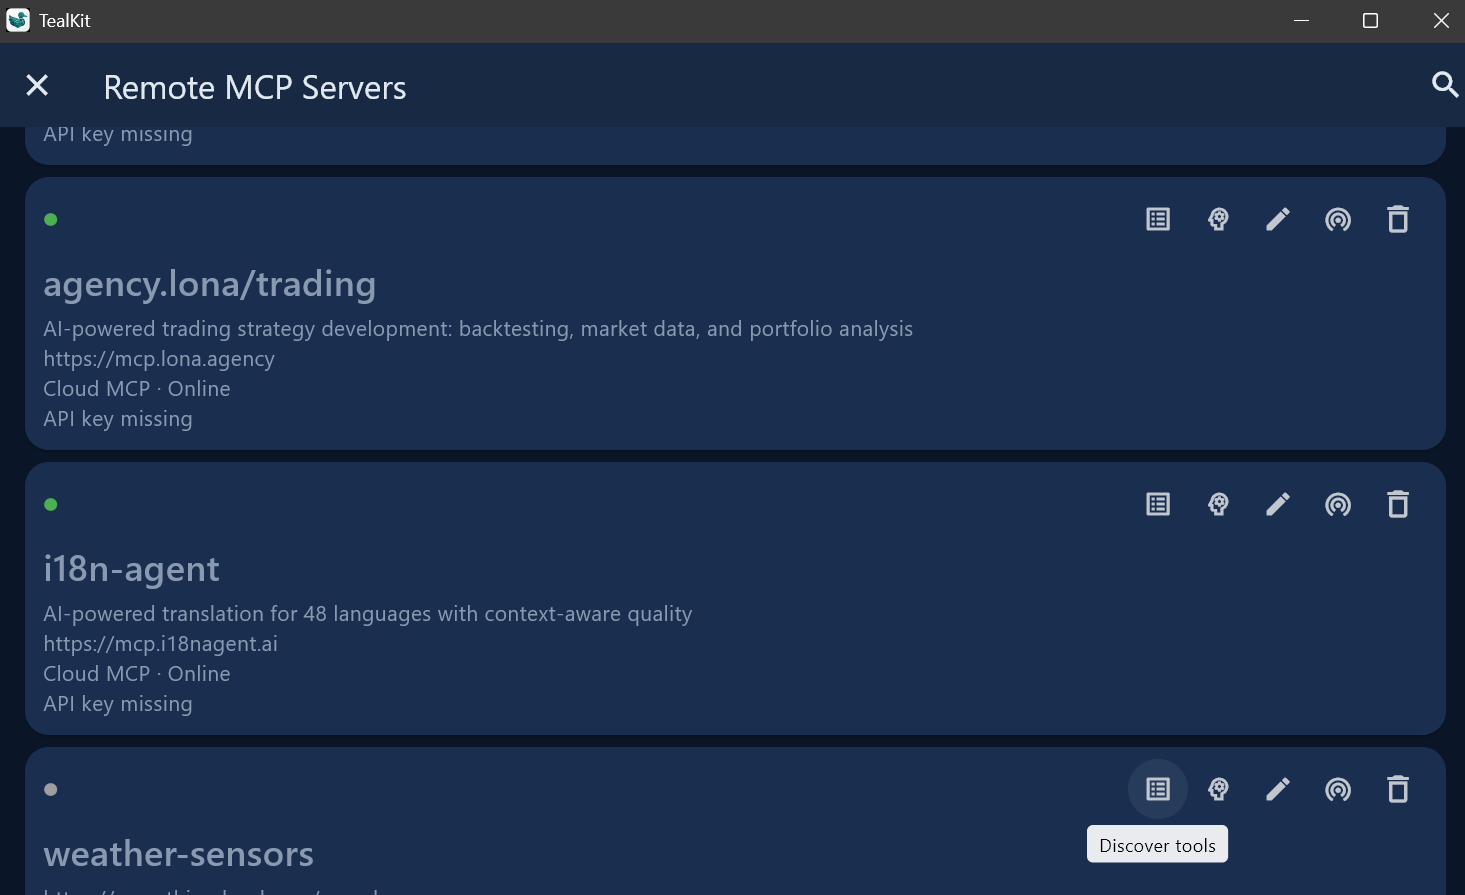
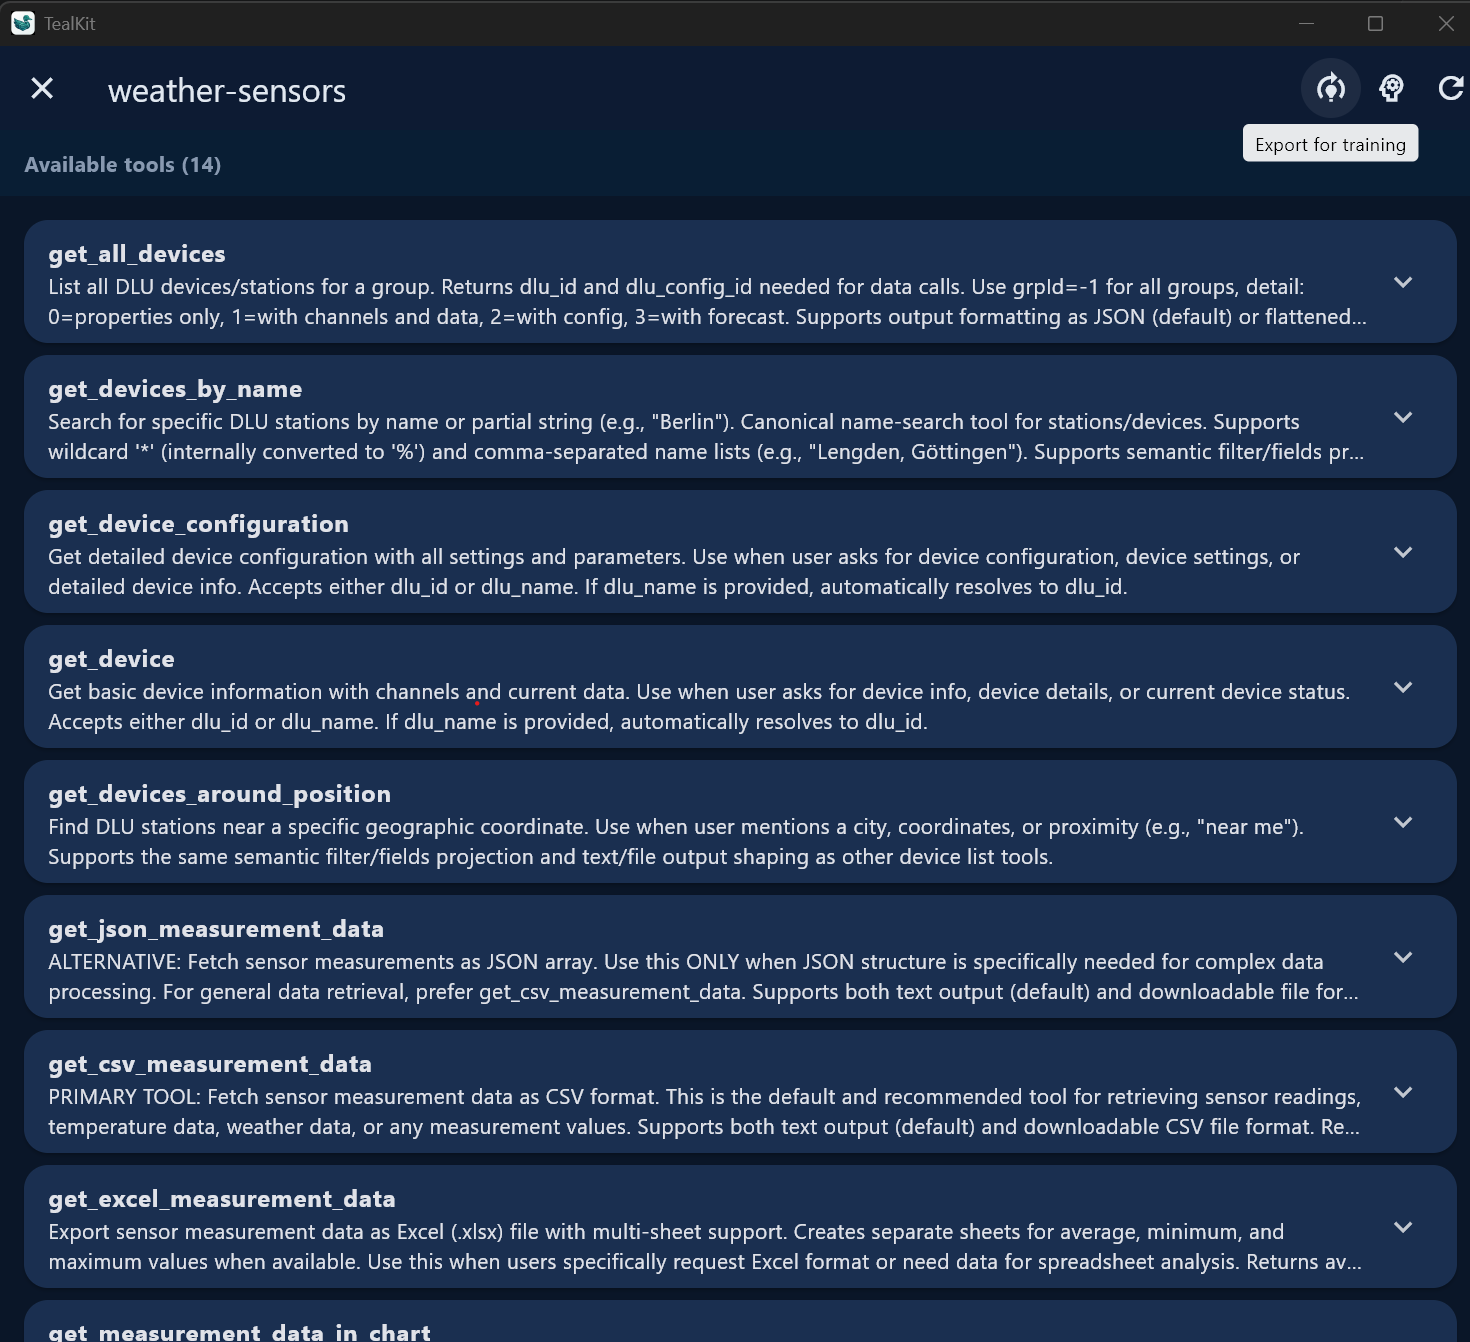
3.4 Remote MCP Servers
3.5 Scripts

SSH Shell Scripts
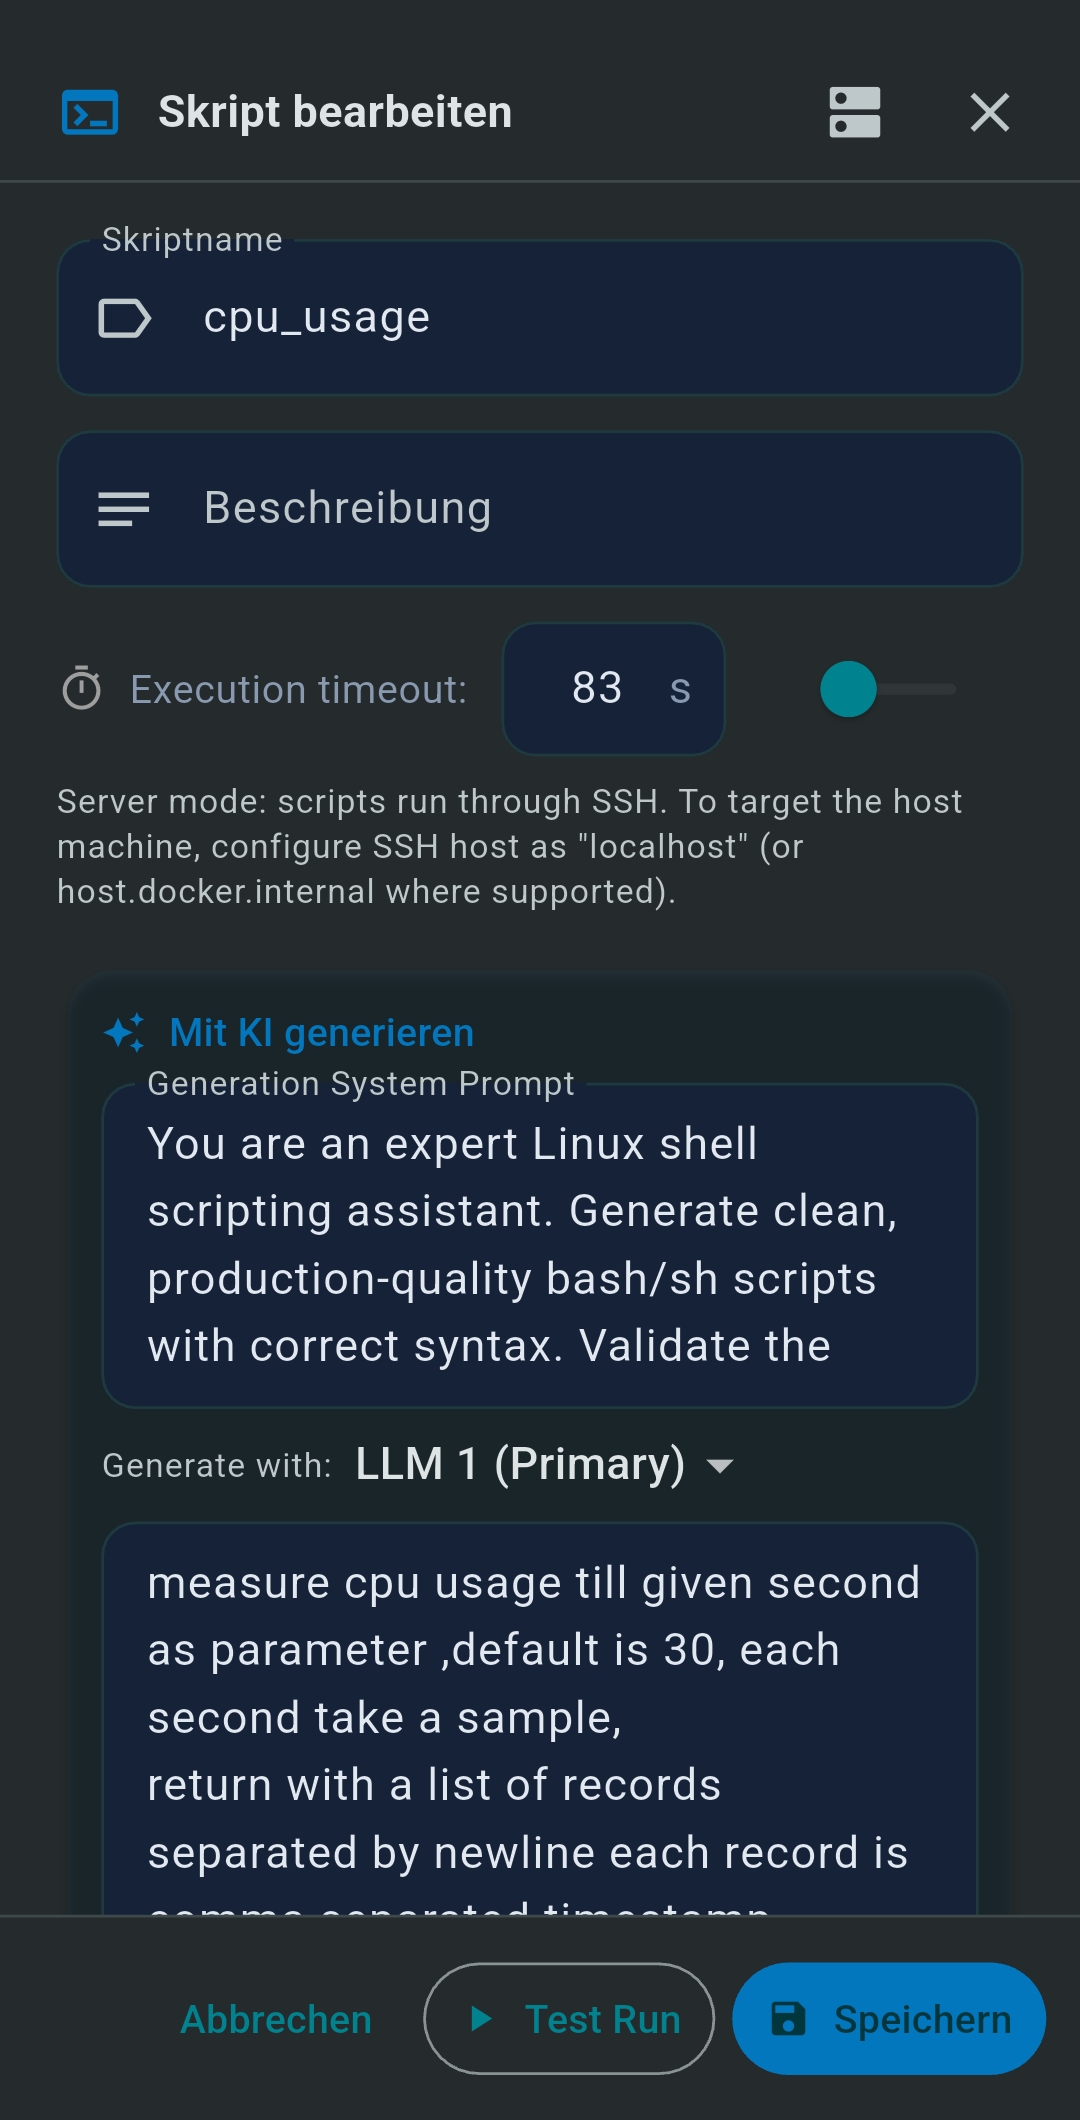
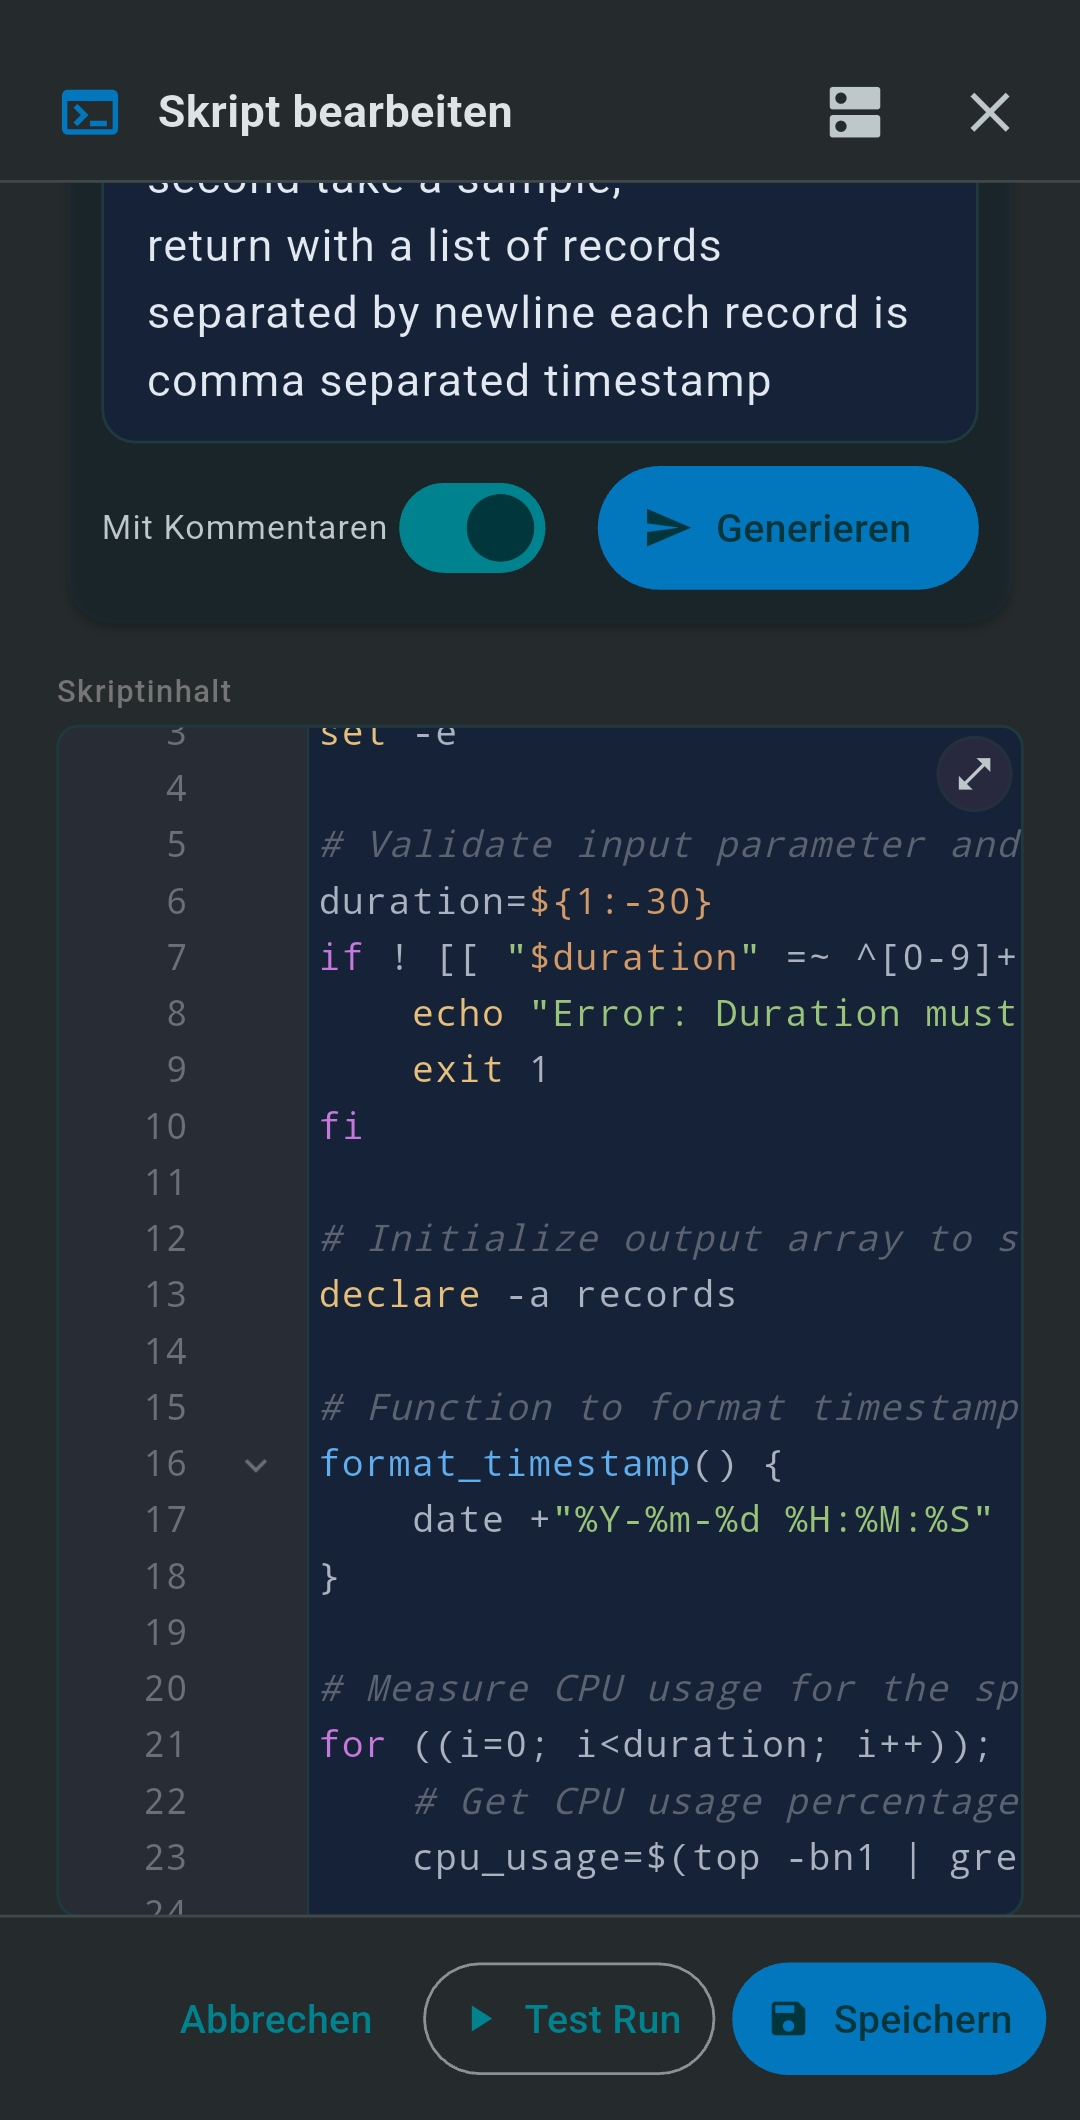
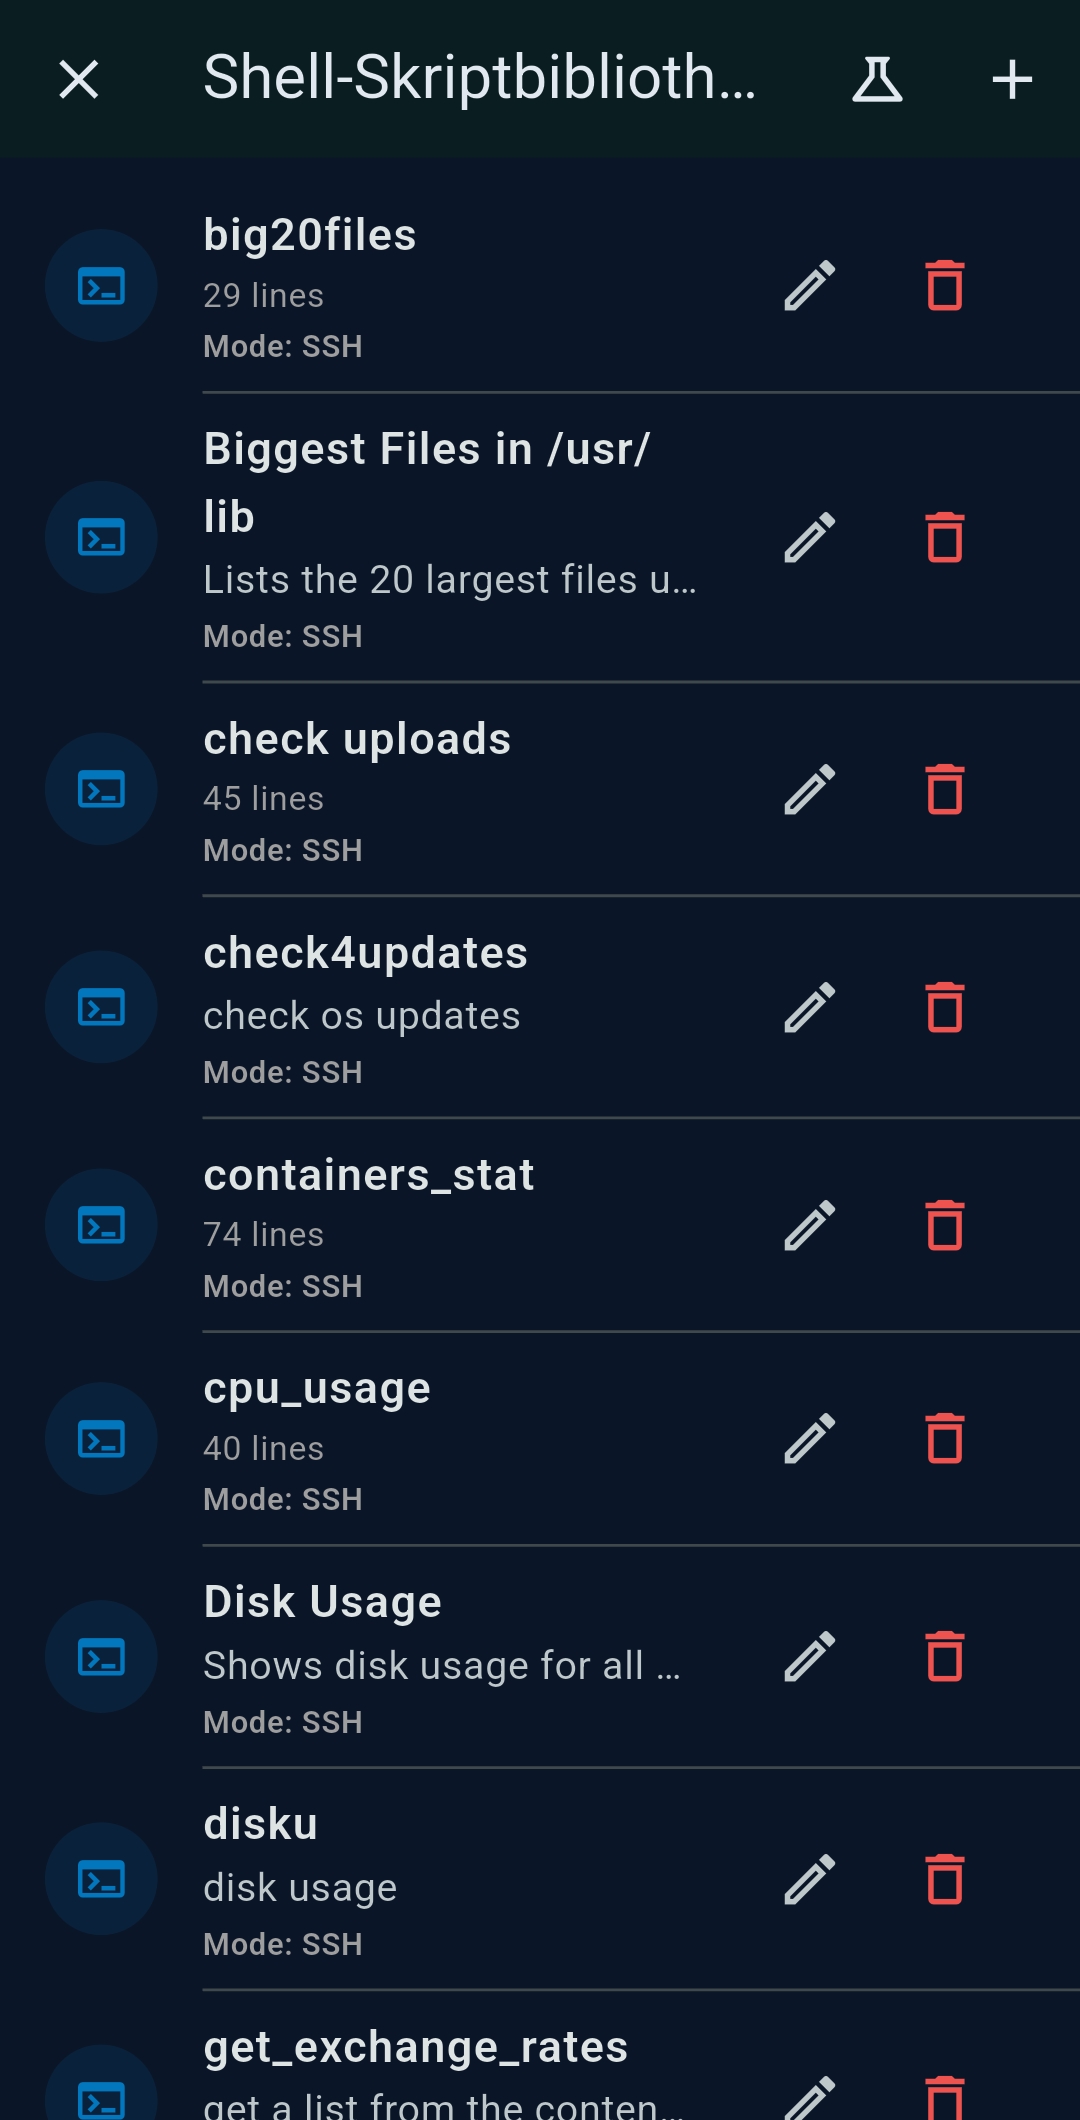
SSH Shell Scripts are Bash scripts stored in TealKit and executed on your remote SSH server. The AI generates the complete script from a plain-language description. Tap Test Run to execute via SSH and verify output before saving.
JavaScript Tools
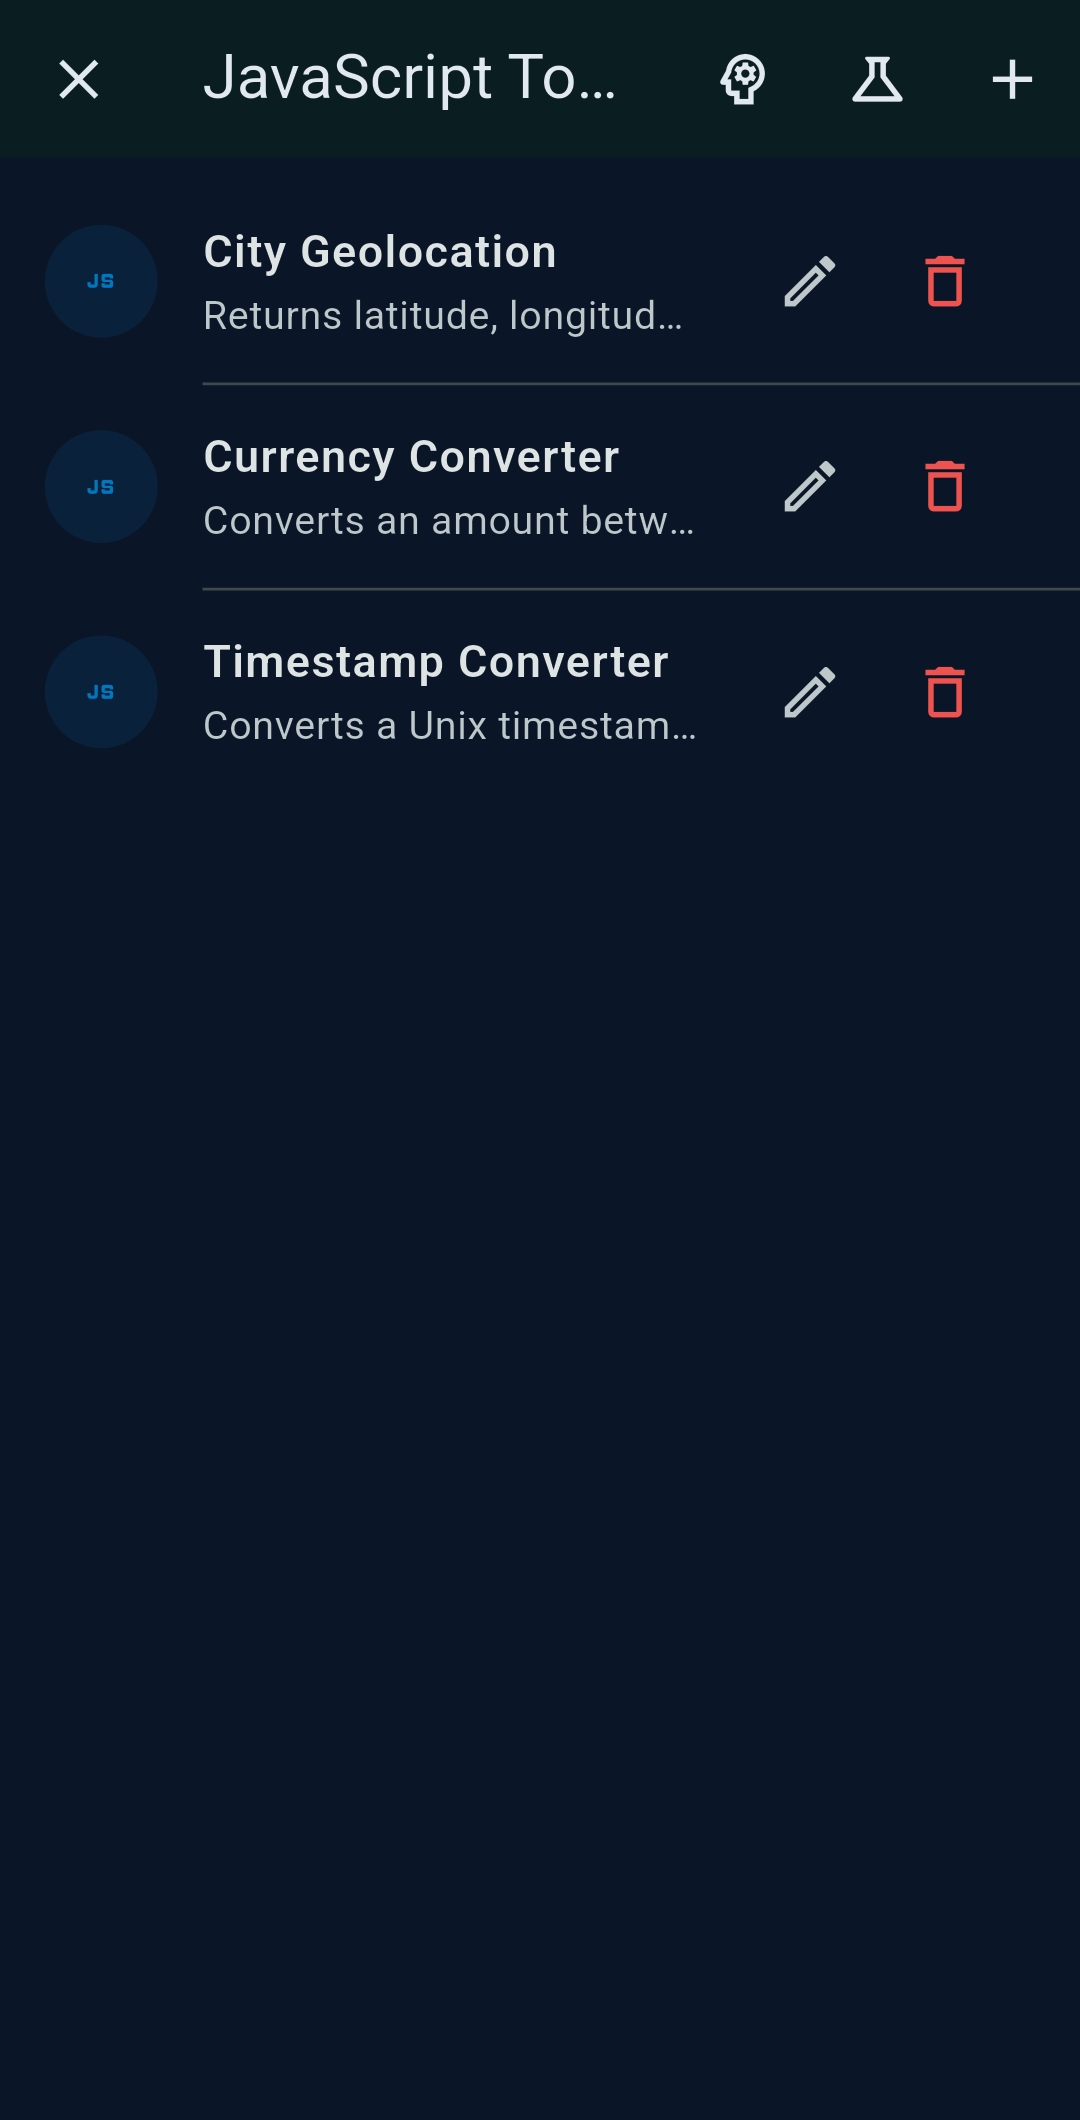
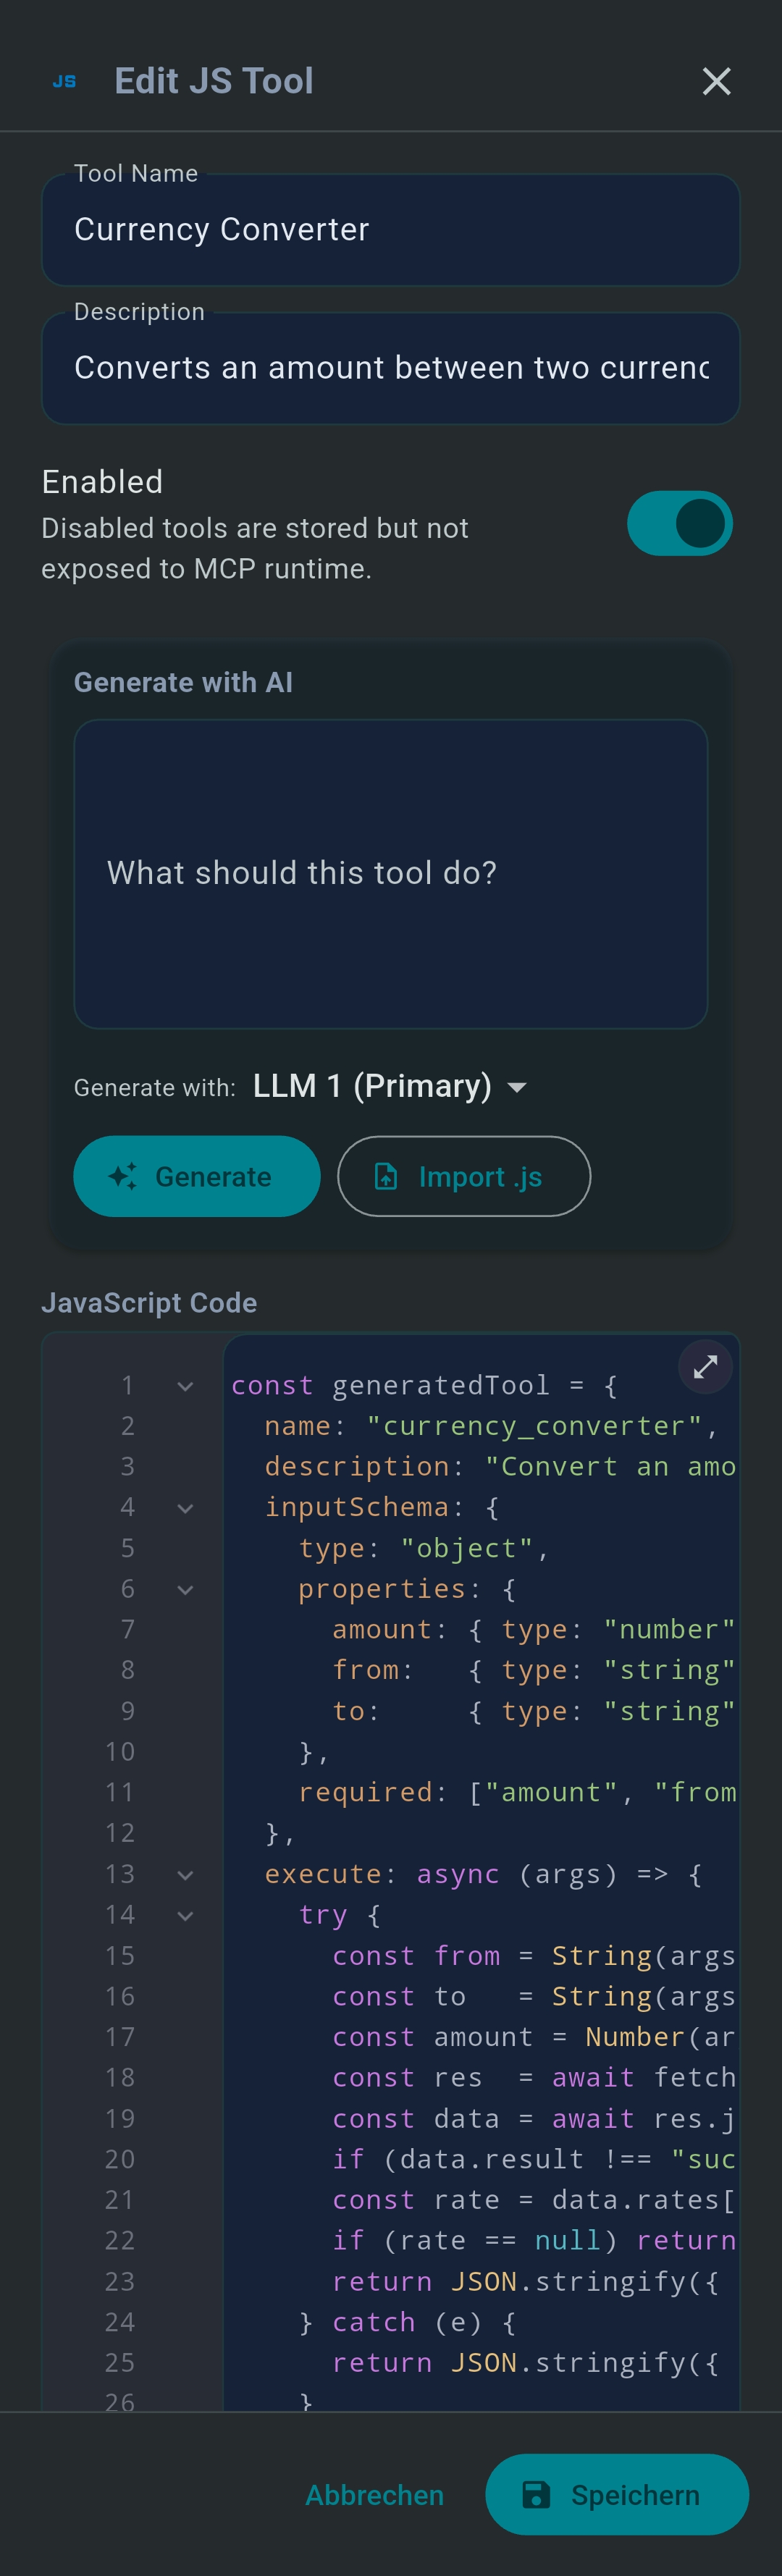
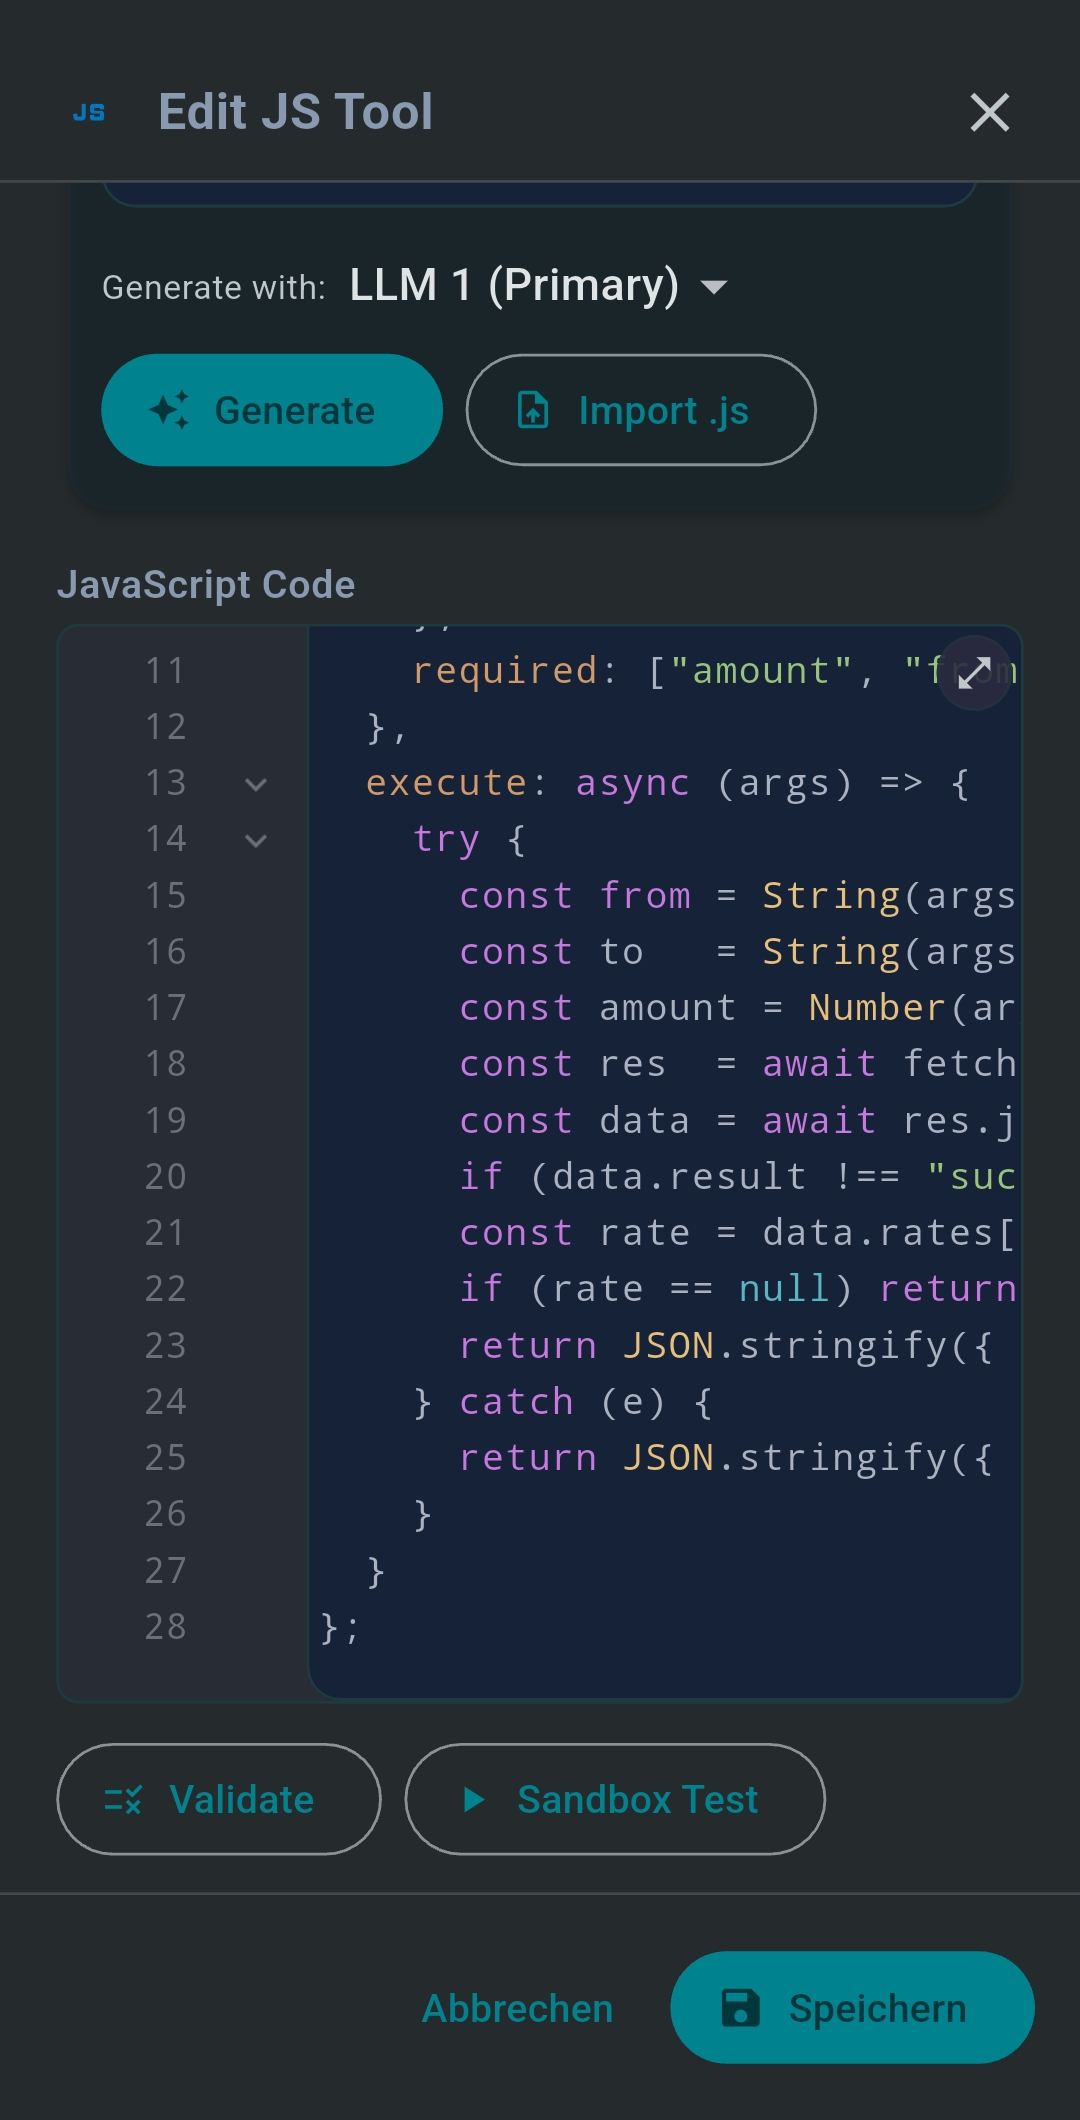
JavaScript Tools are lightweight custom MCP tools running in a secure on-device sandbox (QuickJS /
JavaScriptCore). Every tool must define a generatedTool object with name,
description, inputSchema, and execute: async (args) => {…}.
Limits: max 64 KB script, 256 KB response, 8 s timeout. fetch() is available; require,
import, fs, process are forbidden.
Desktop: Python MCP Tool Generator
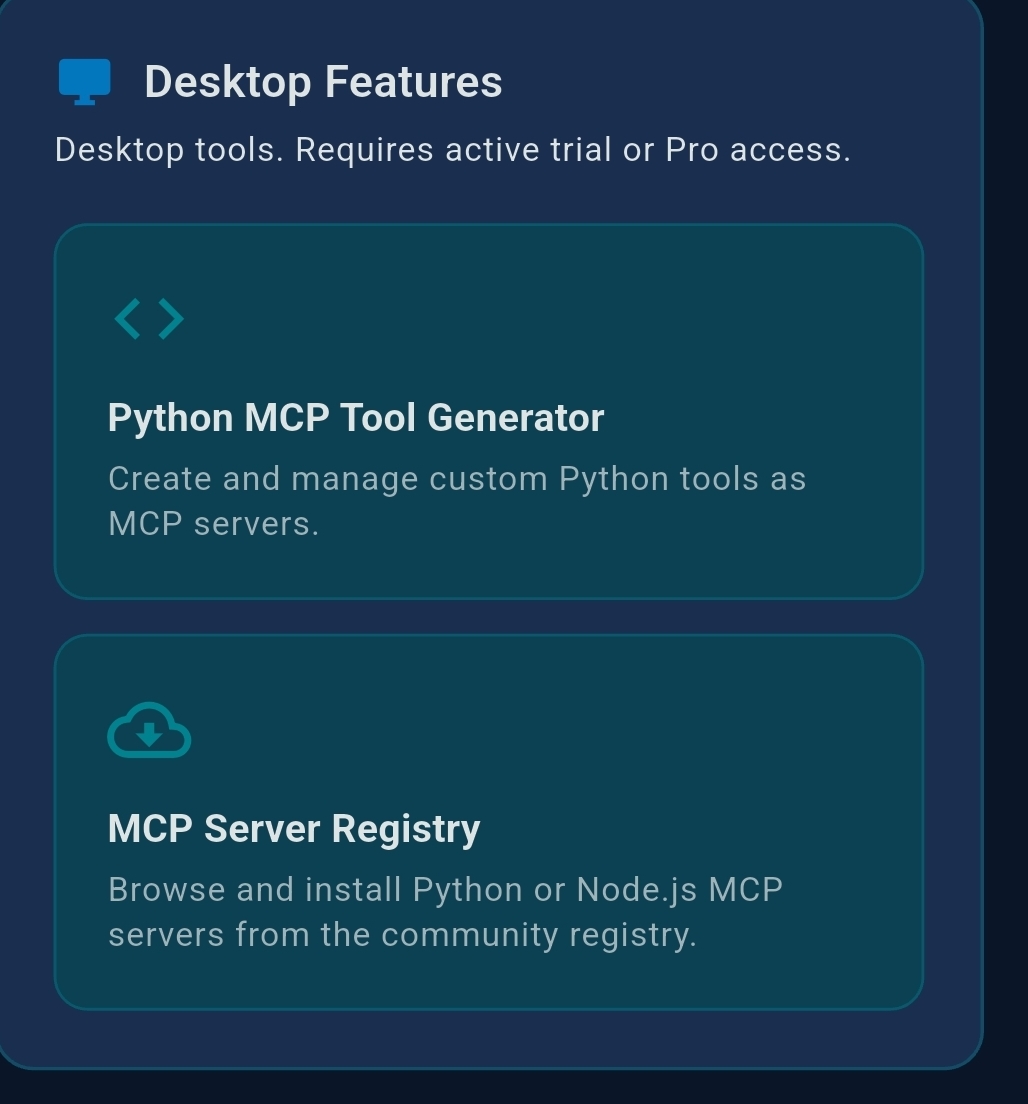
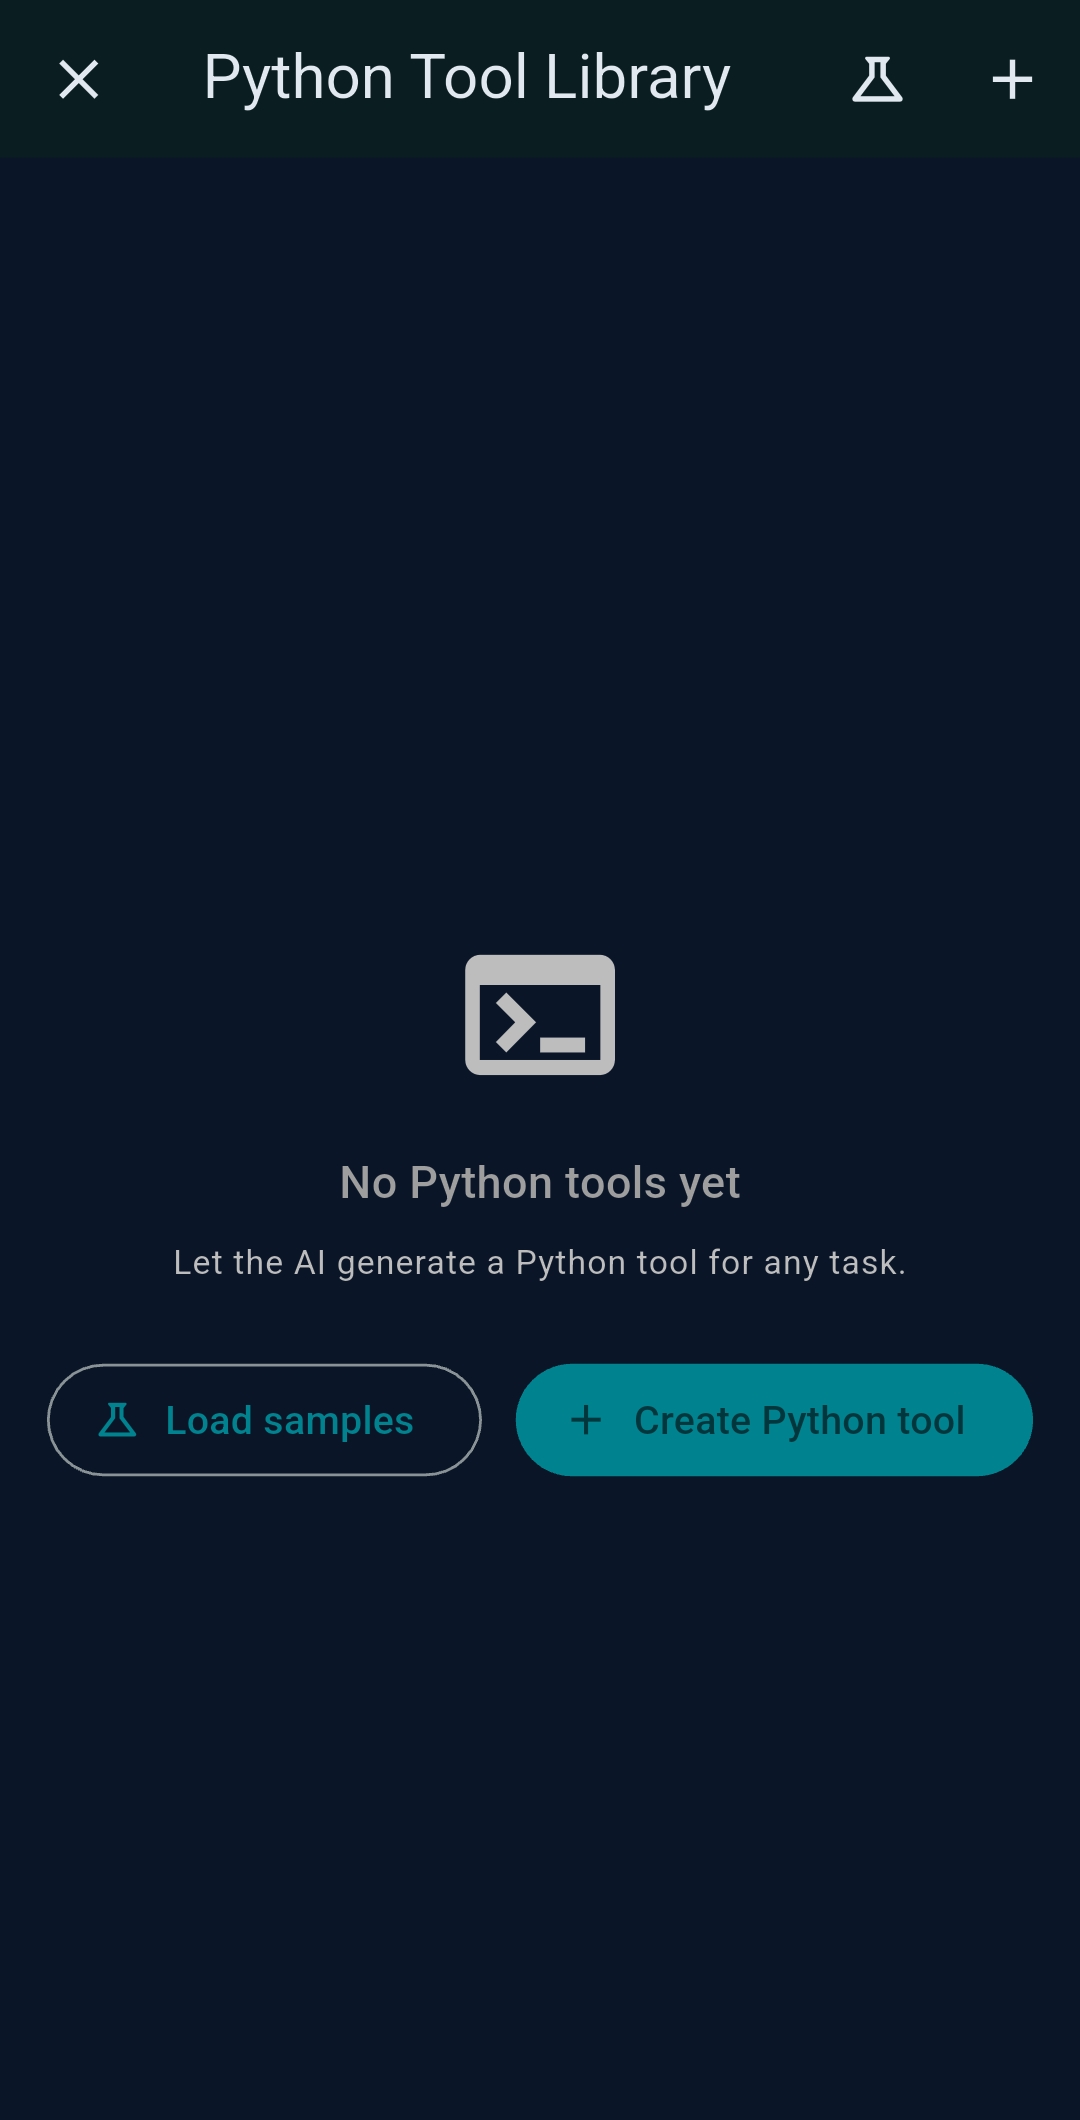
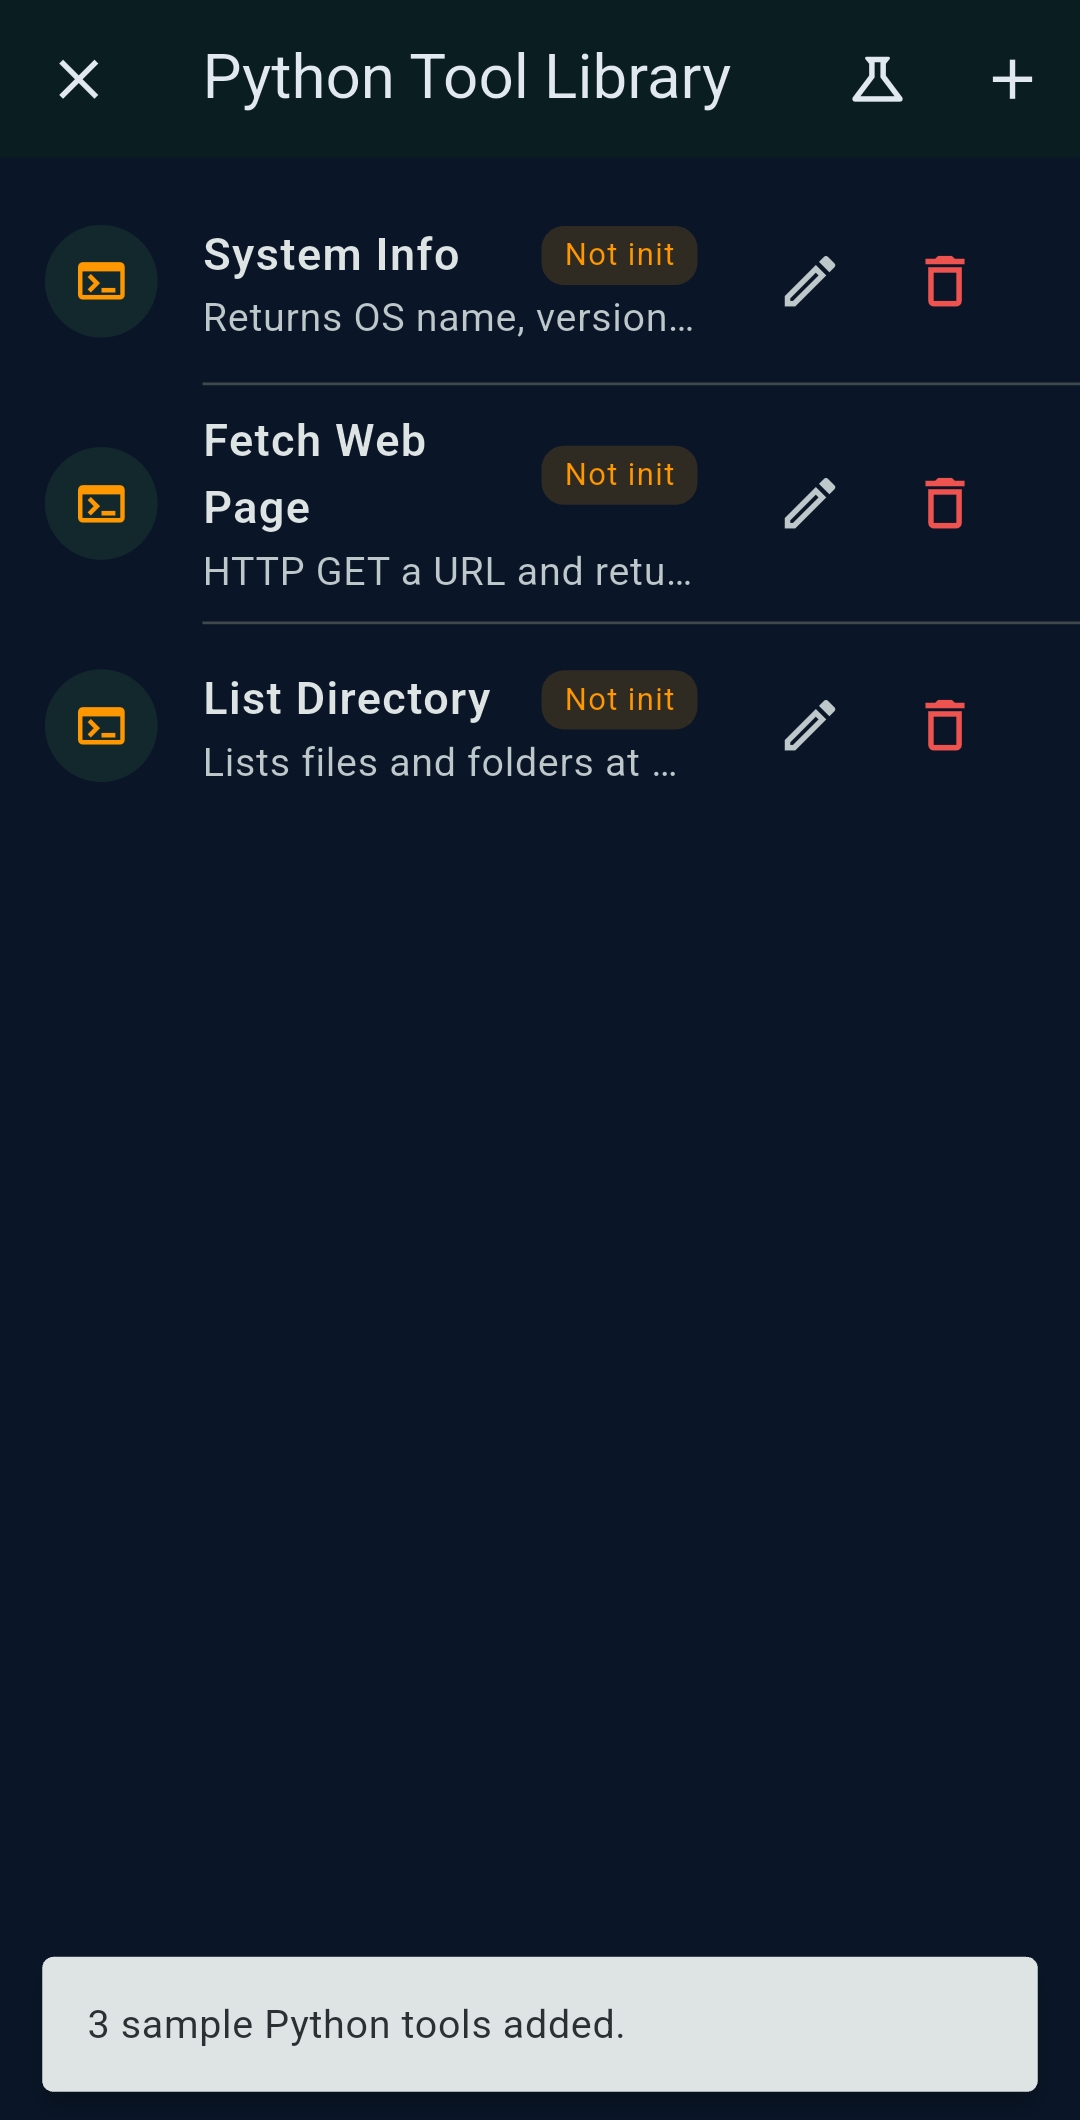
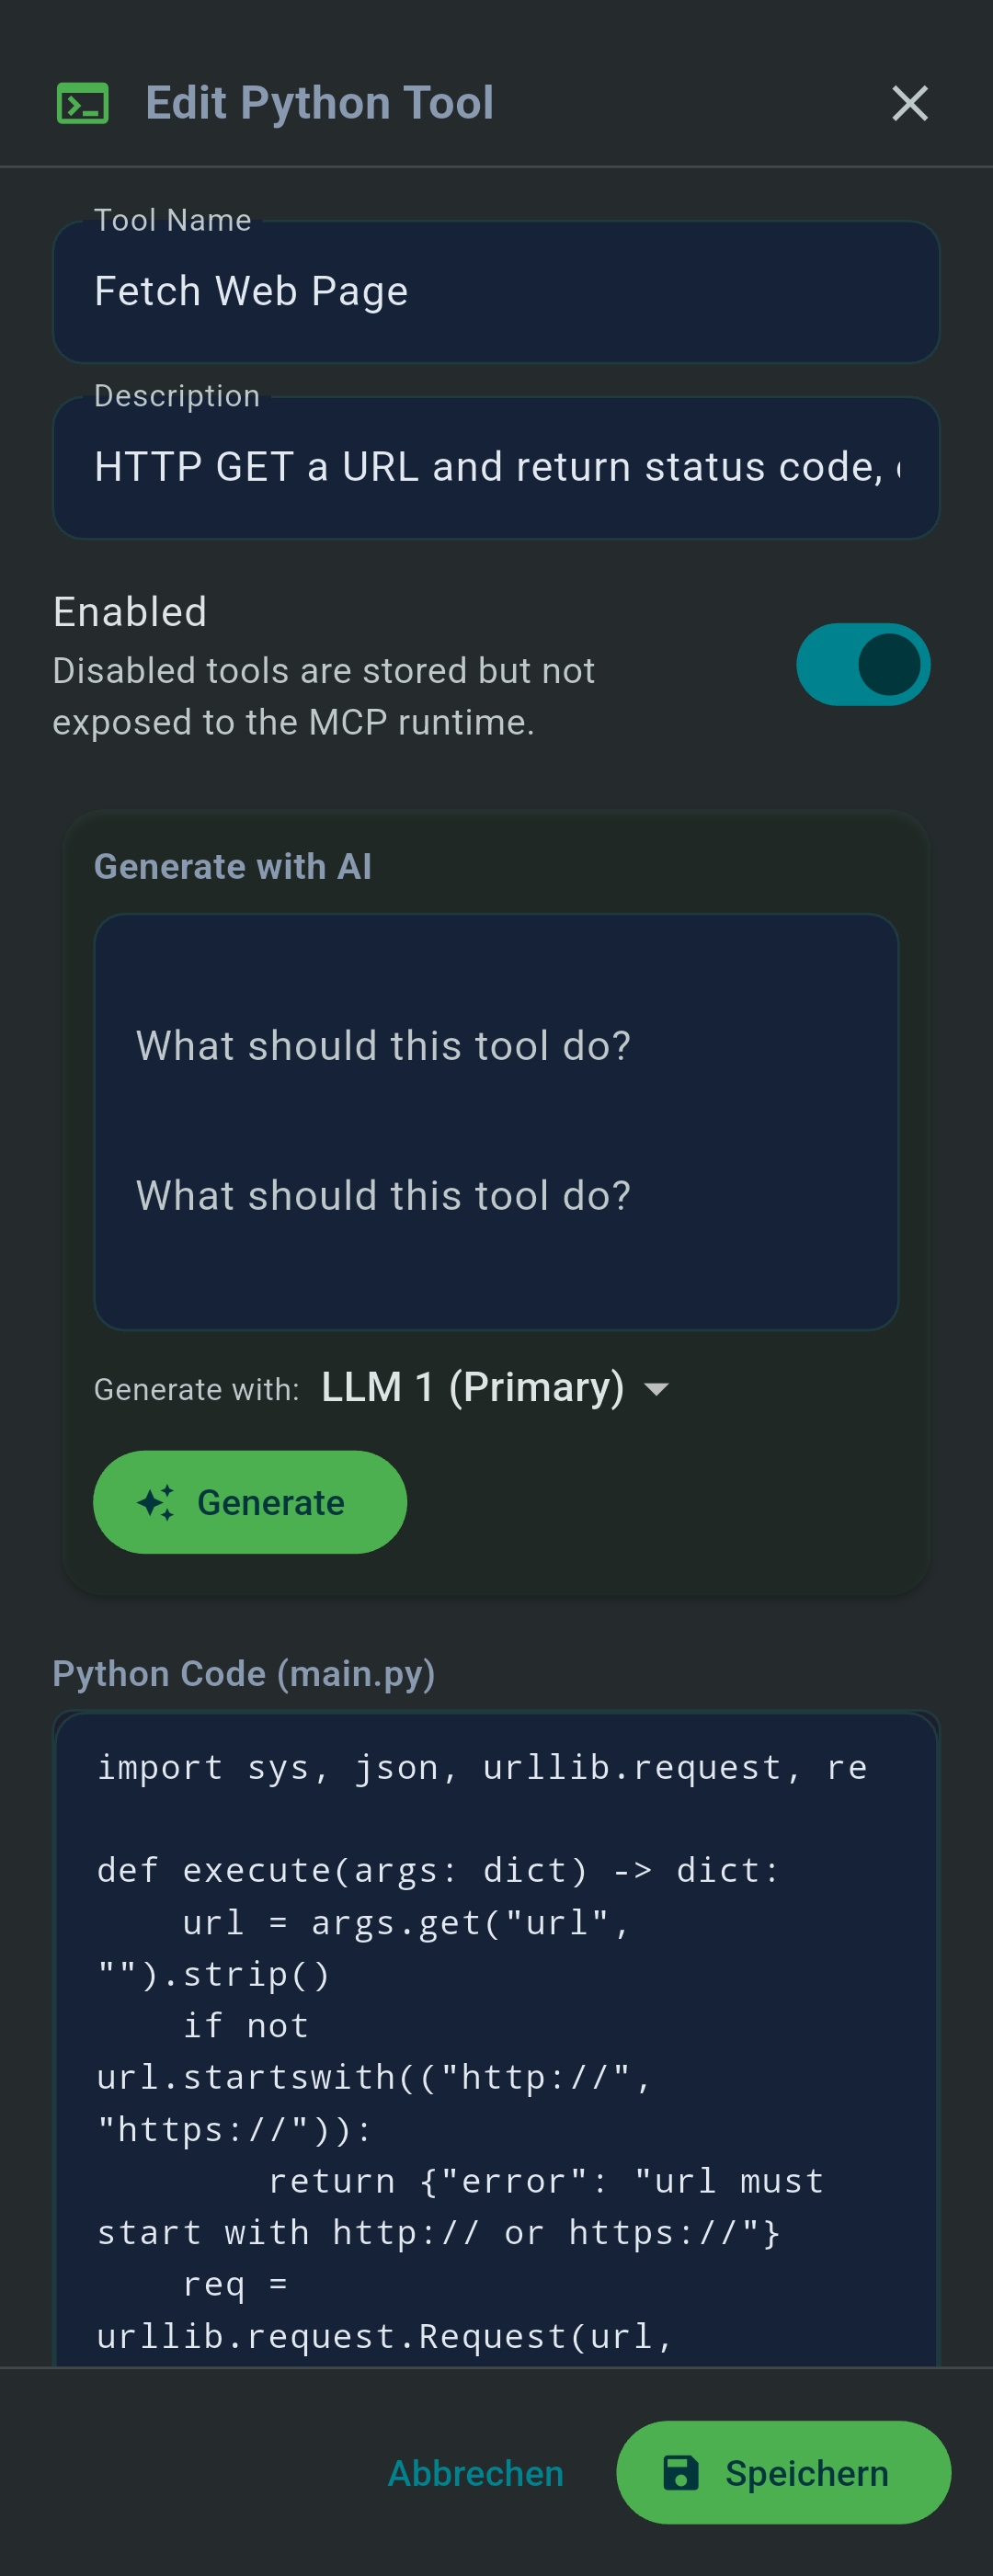
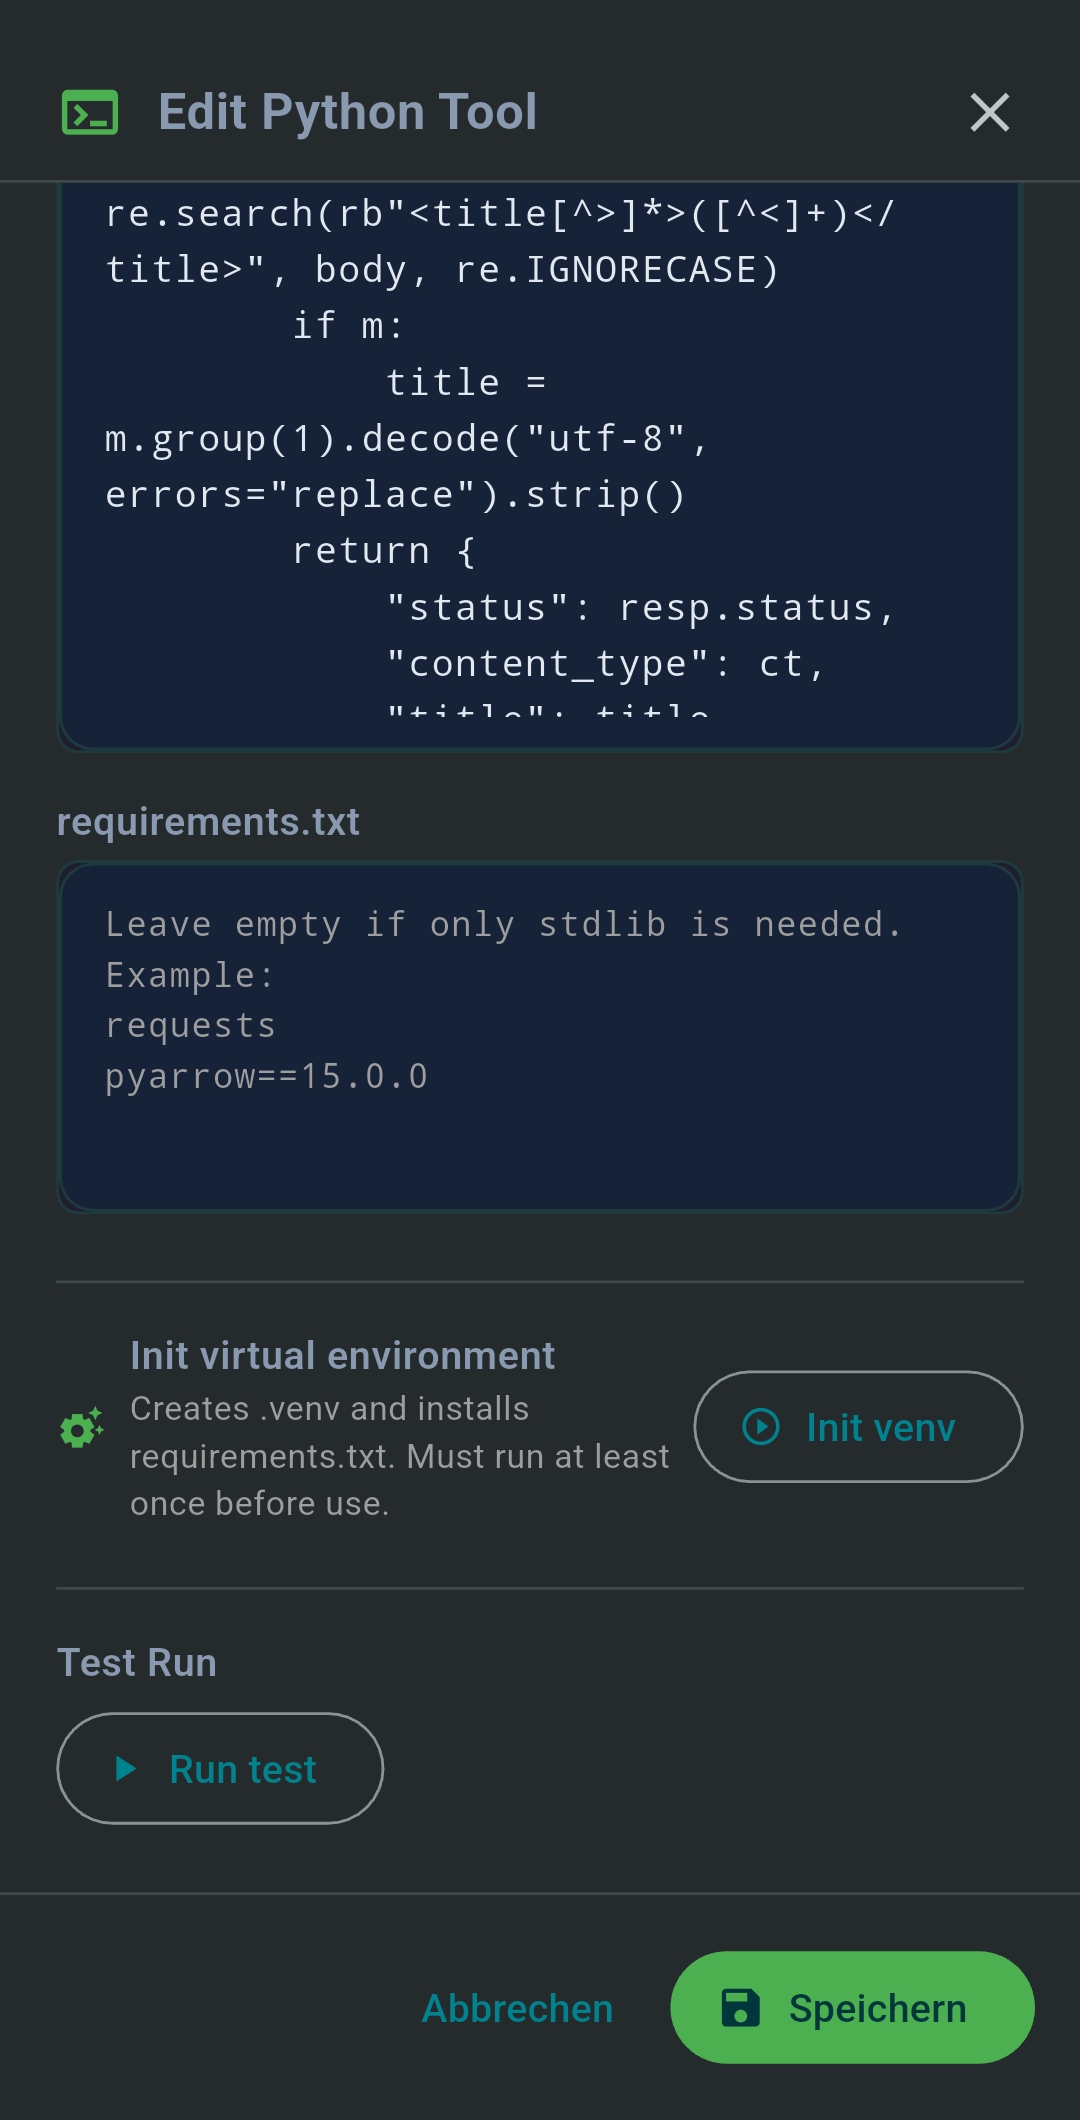
On Windows and Linux, the Python MCP Tool Generator creates fully managed Python MCP server tools running in an
isolated .venv. Specify packages in requirements.txt, tap Init venv
once, then Run Test to verify output.
Desktop: MCP Server Registry
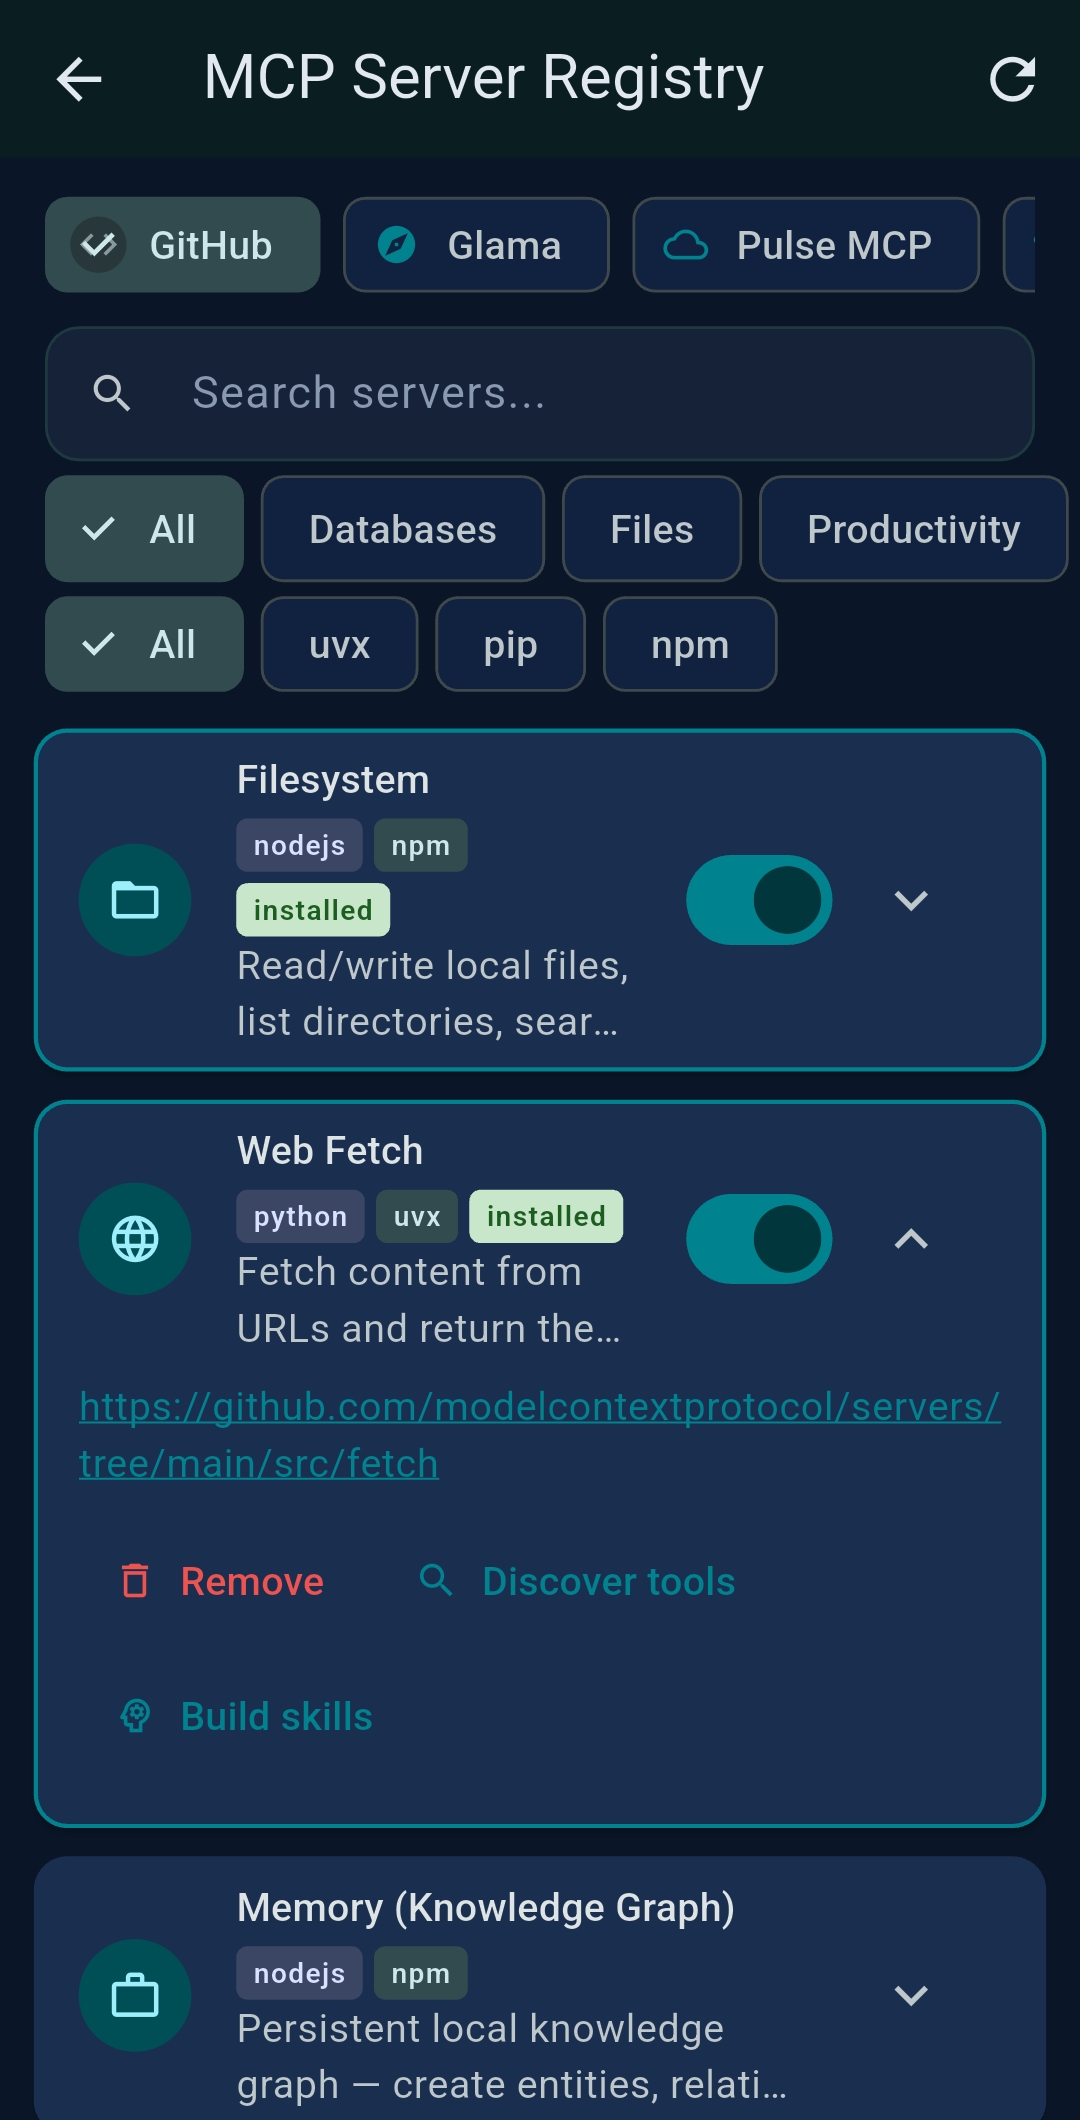
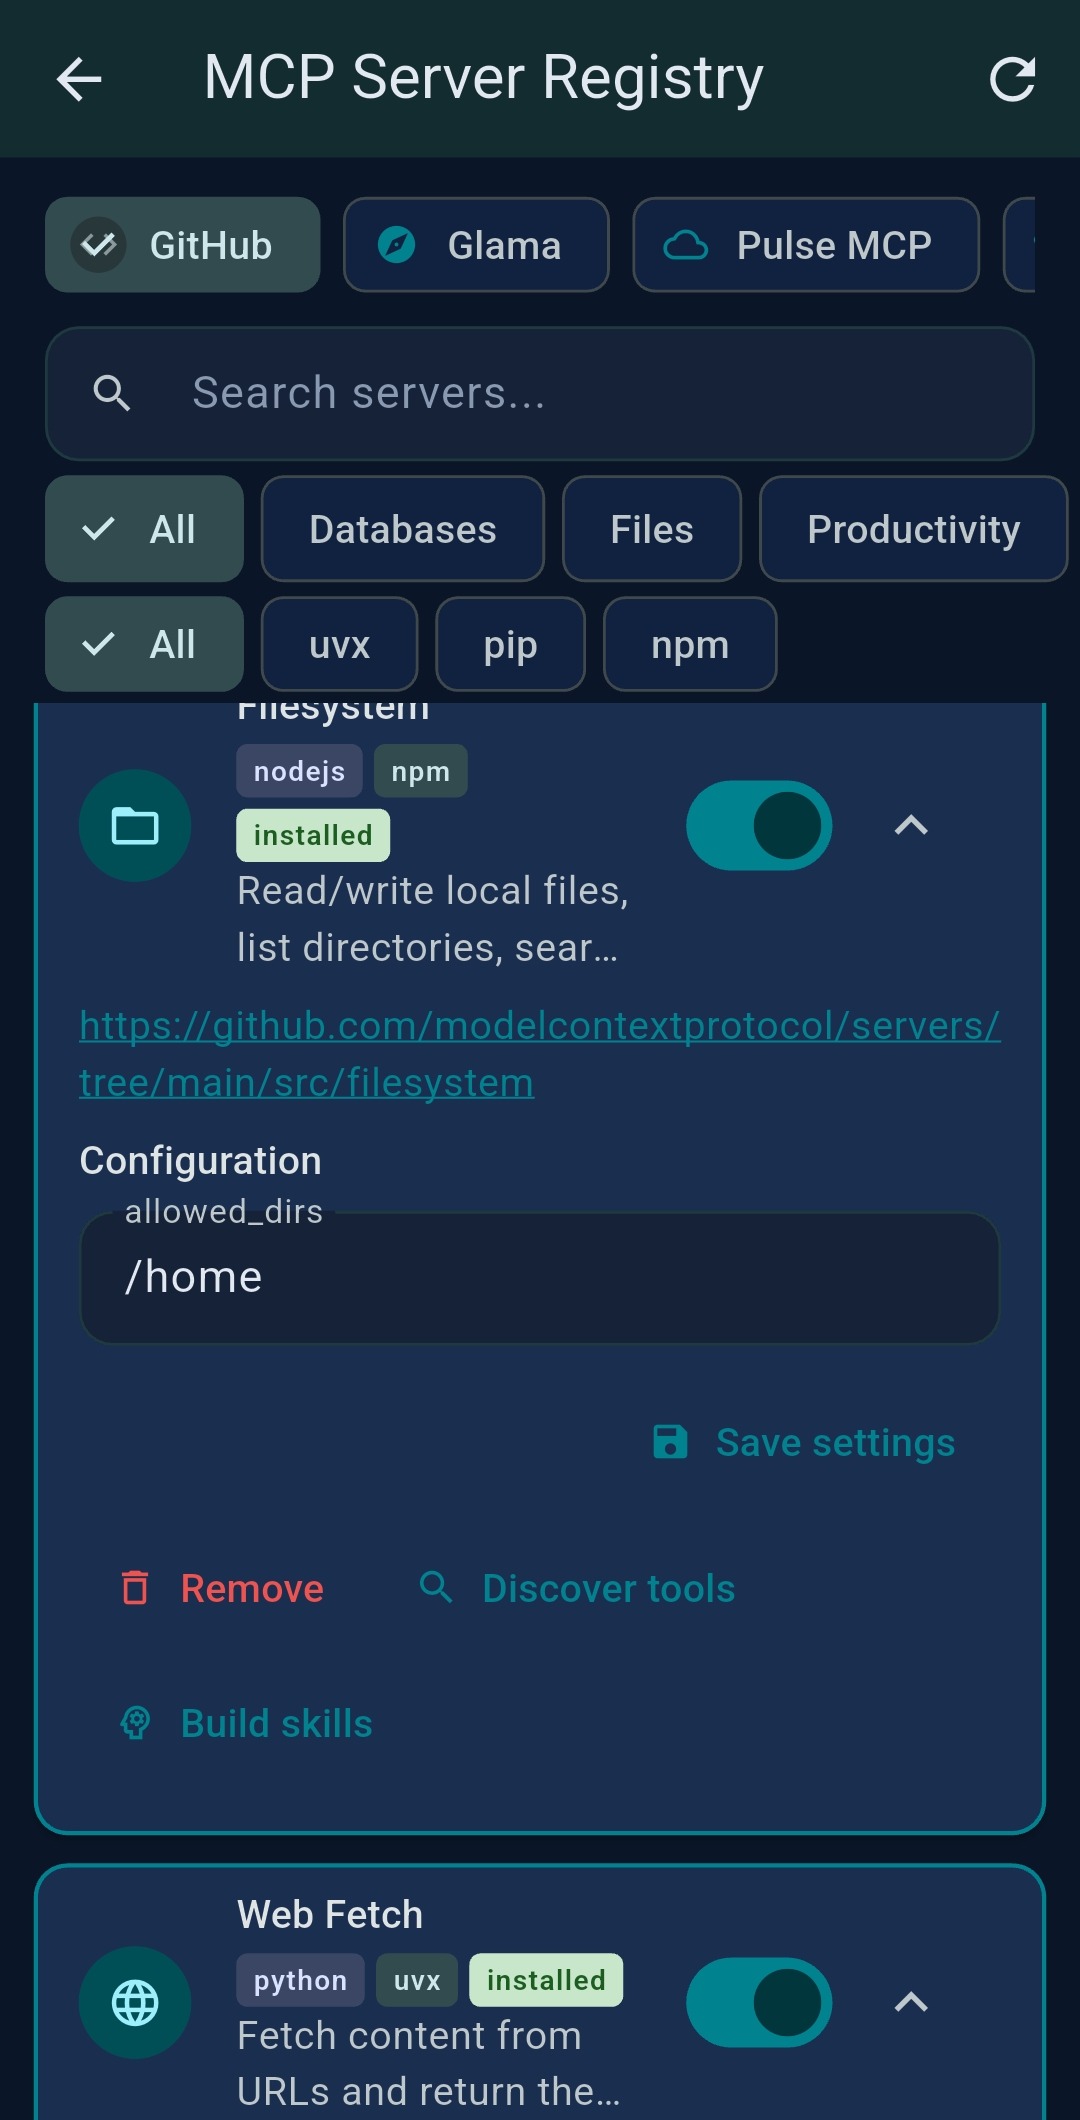
Install Python and Node.js MCP servers locally with a single tap. TealKit runs npm install -g,
uvx, or pip in the background. Tabs: GitHub (curated),
Glama, PulseMCP.
uvx — included
with TealKit.Desktop: PowerShell Scripts (Windows only)
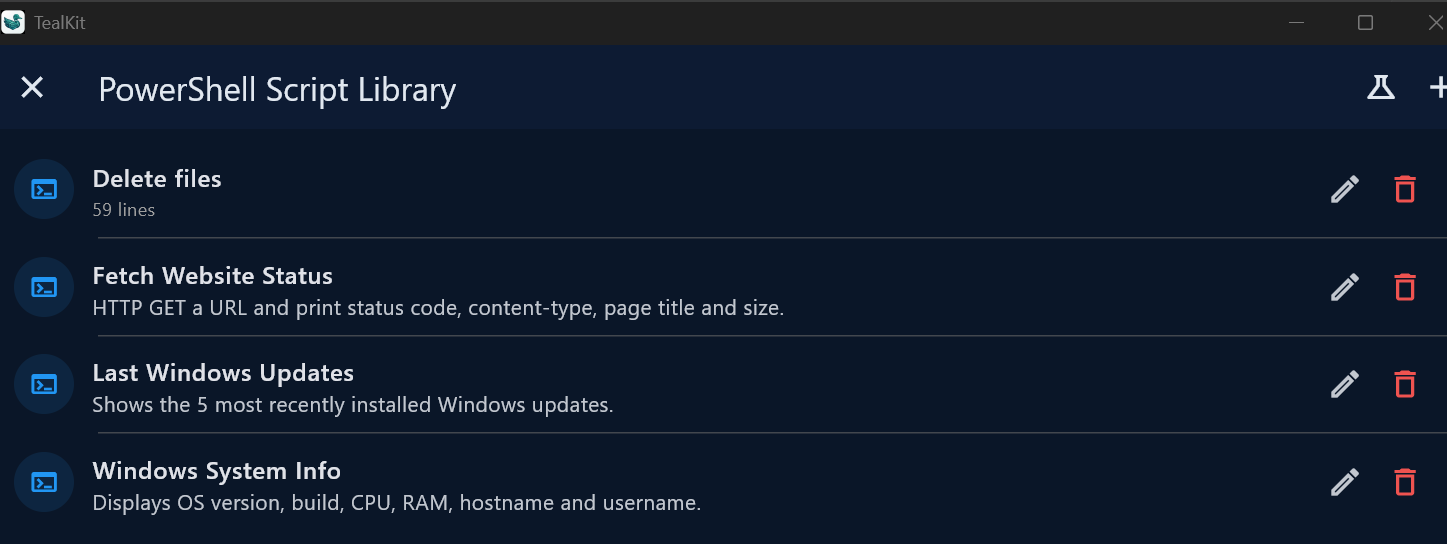
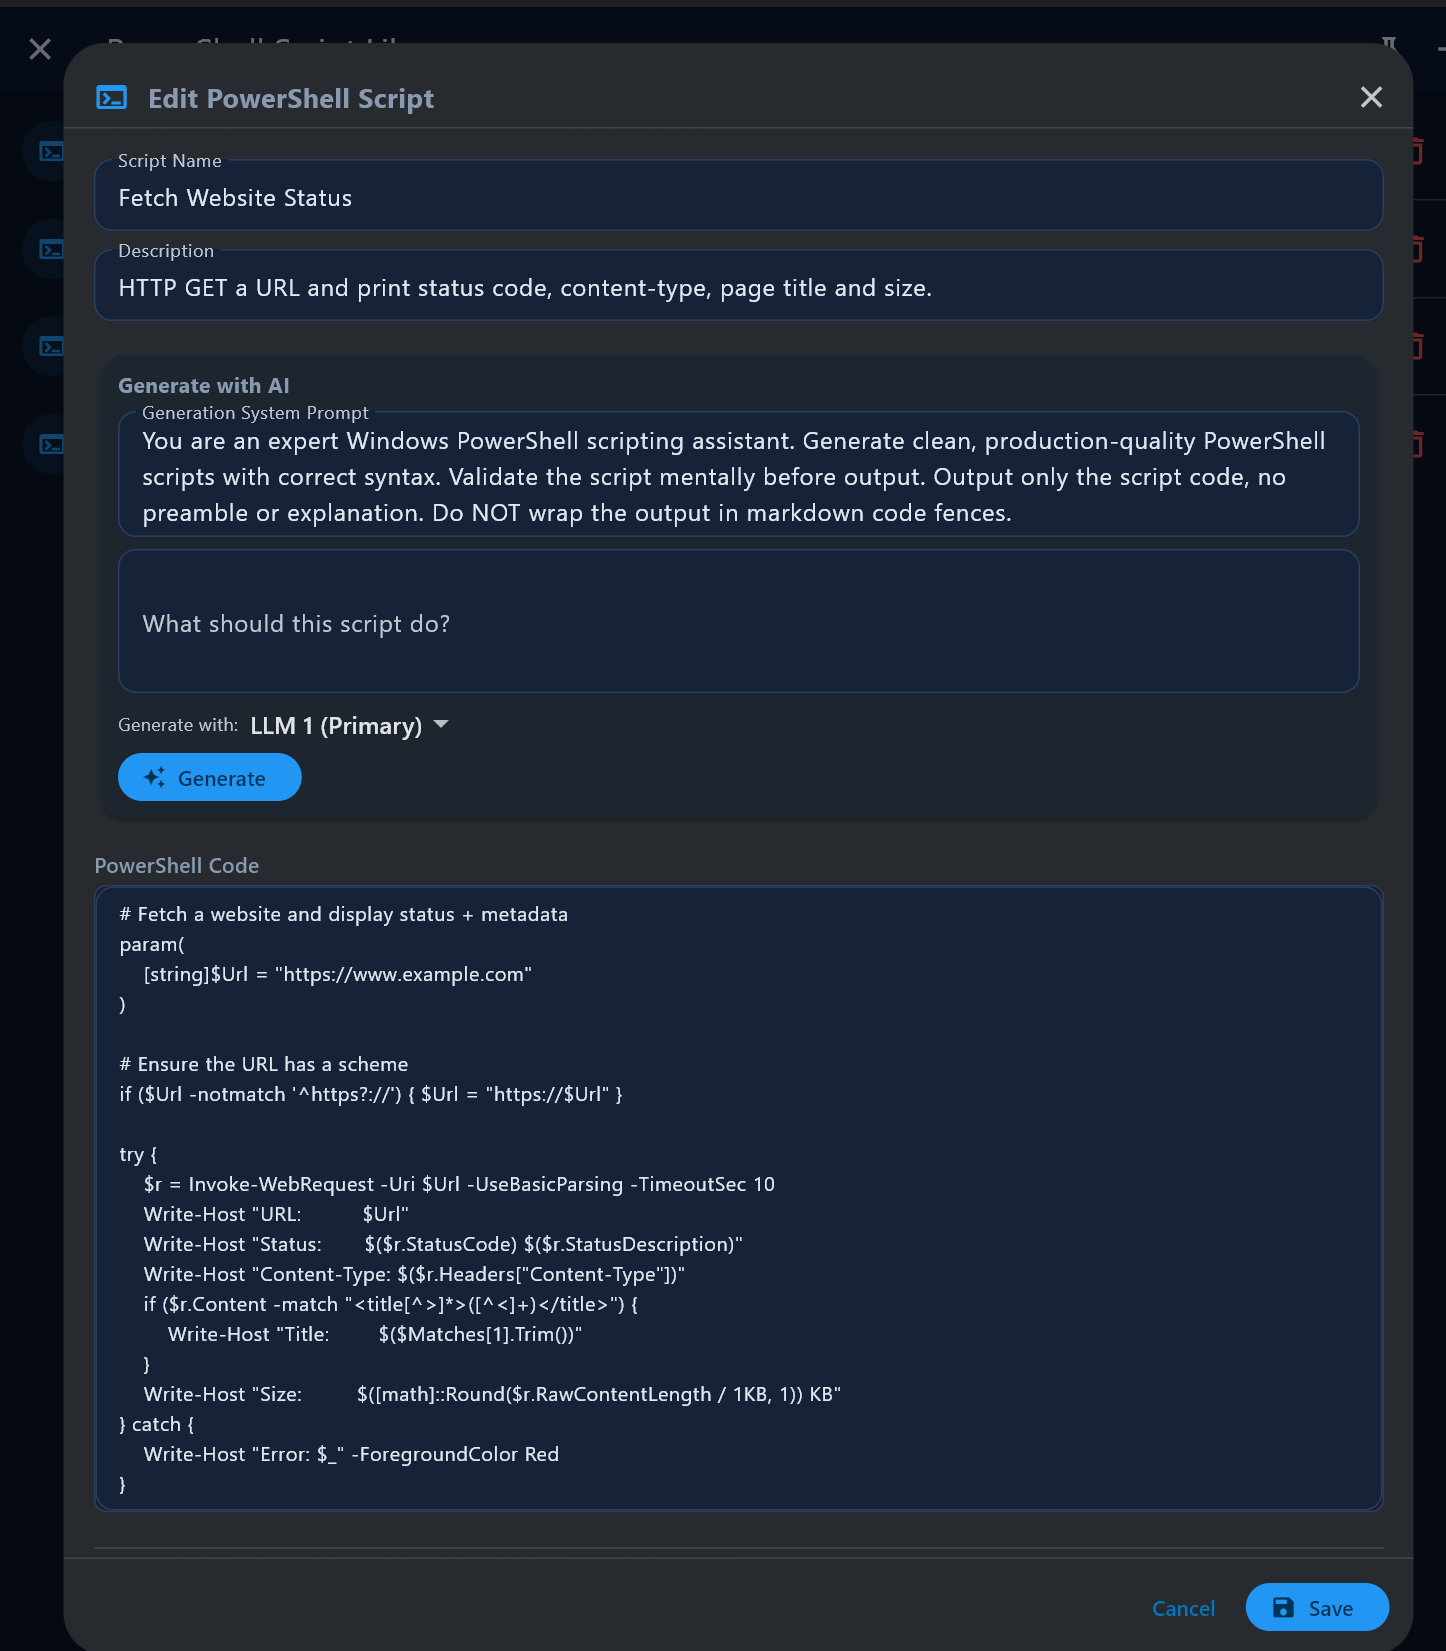
On Windows, the PowerShell Tool Library manages .ps1 scripts executed locally via the
ps_bridge MCP server. Built-in samples: Windows System Info, Last Windows
Updates, Fetch Website Status.
3.6 Tool Skills

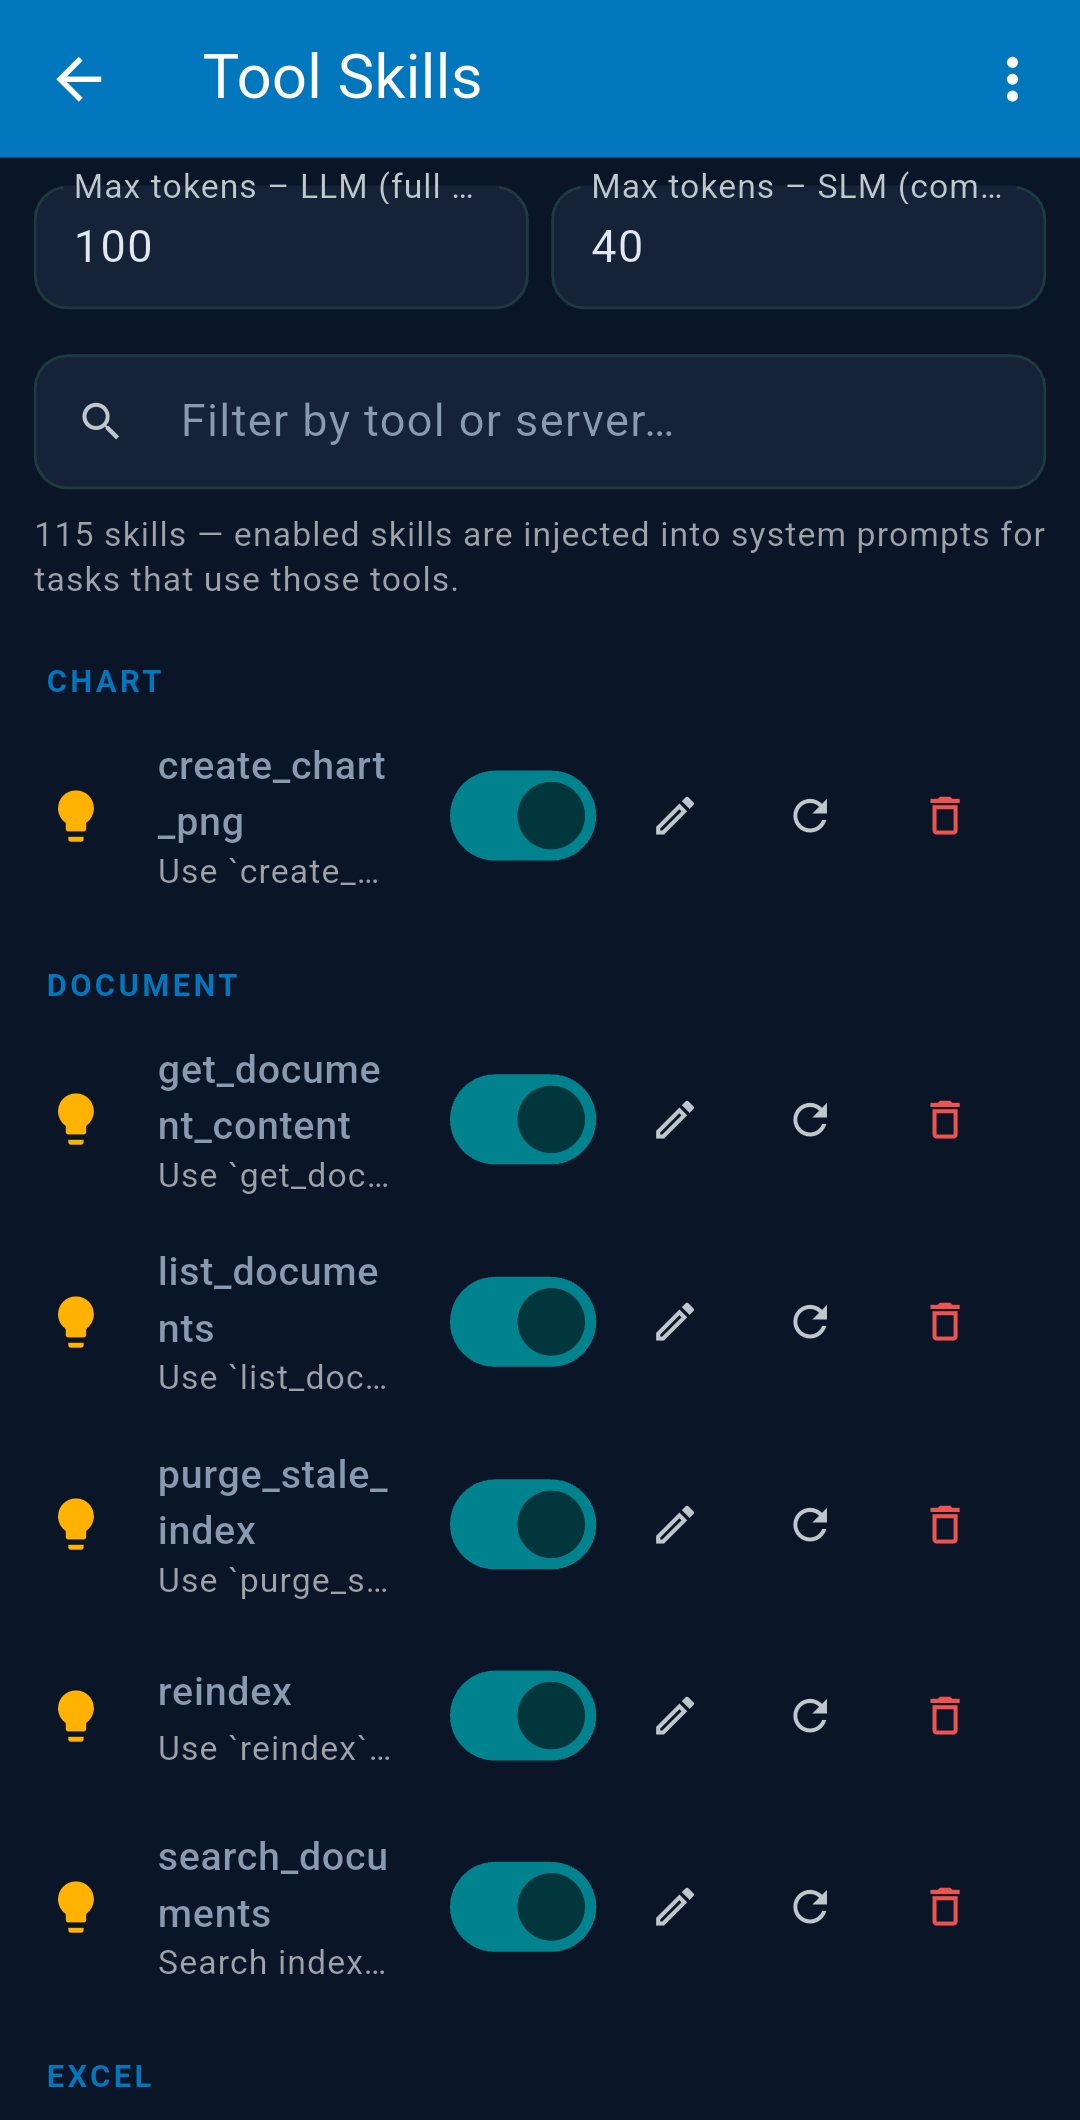
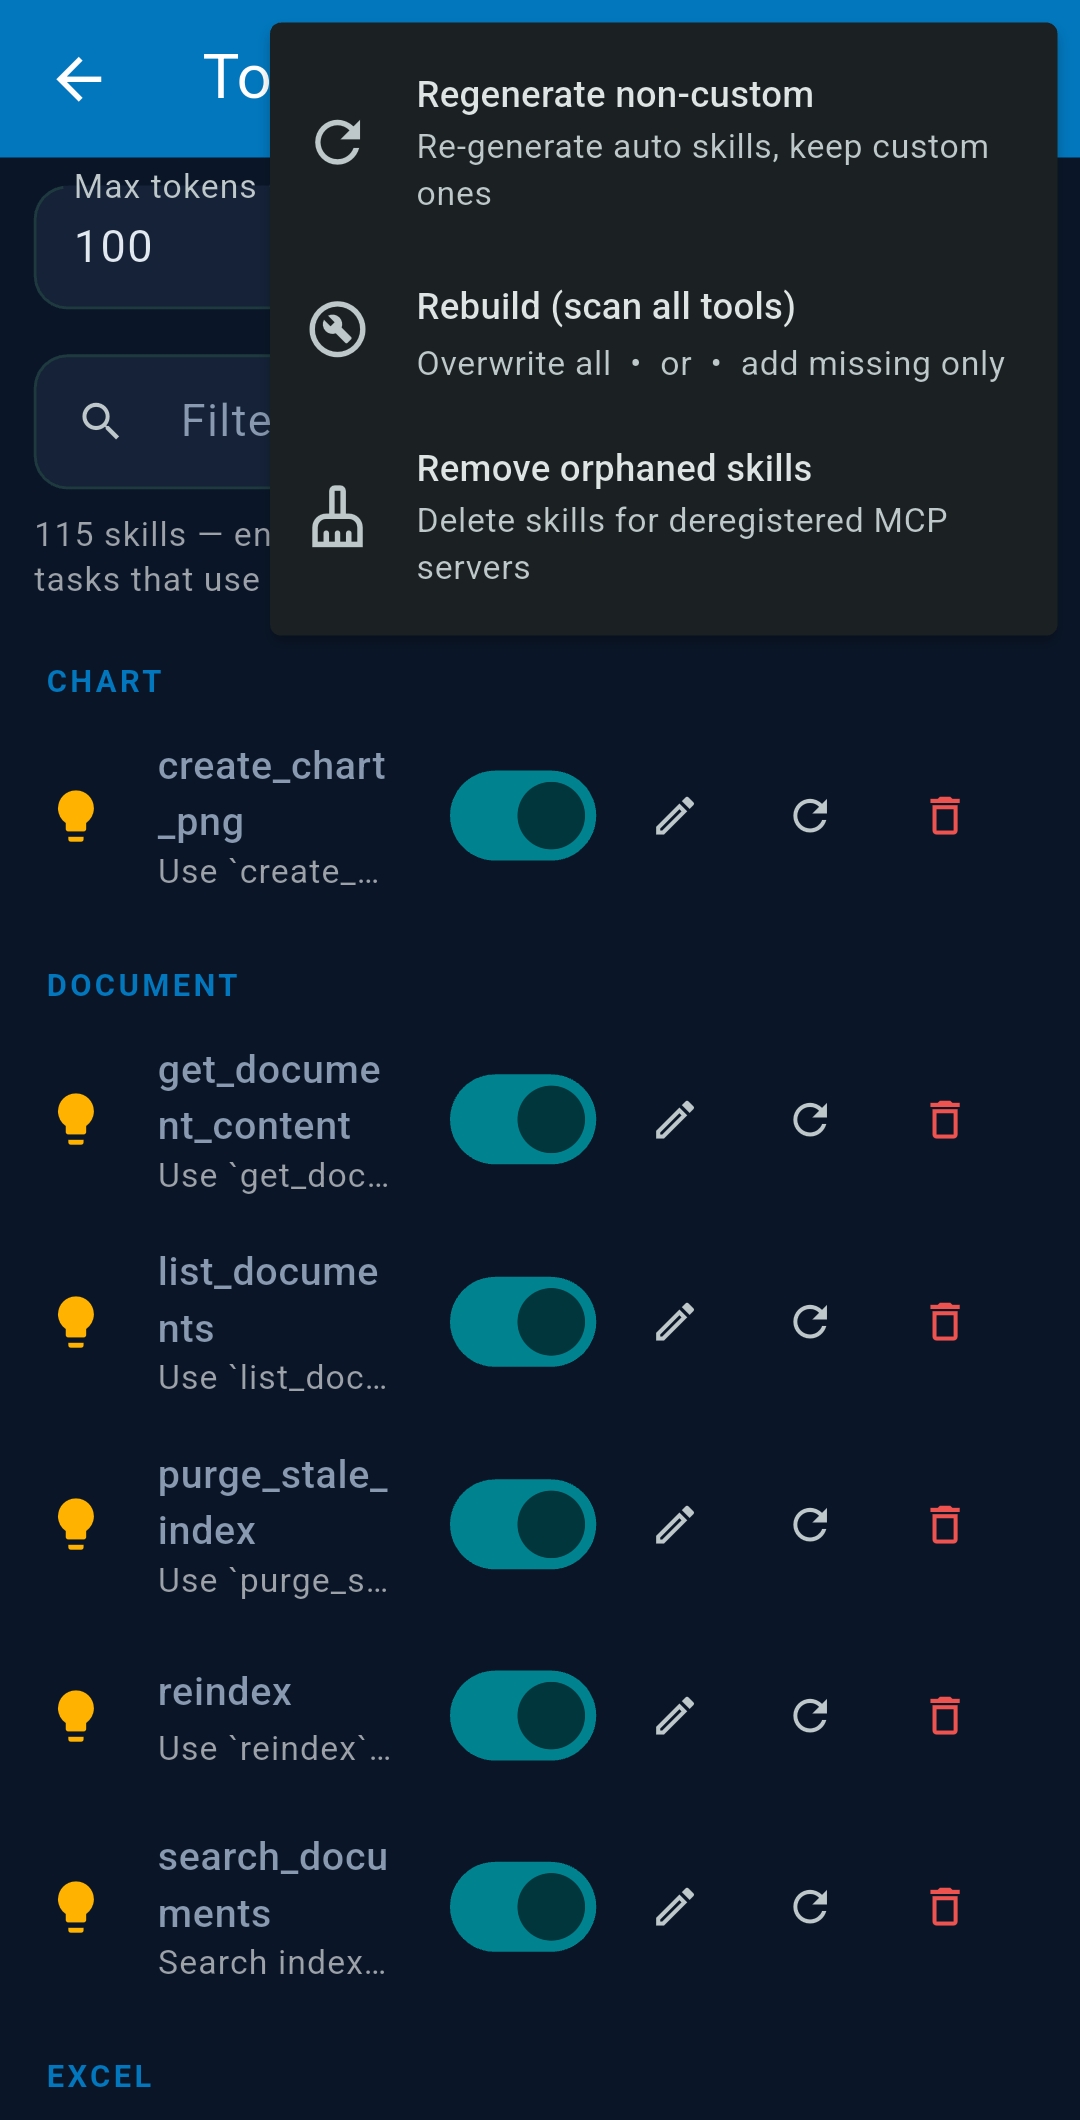
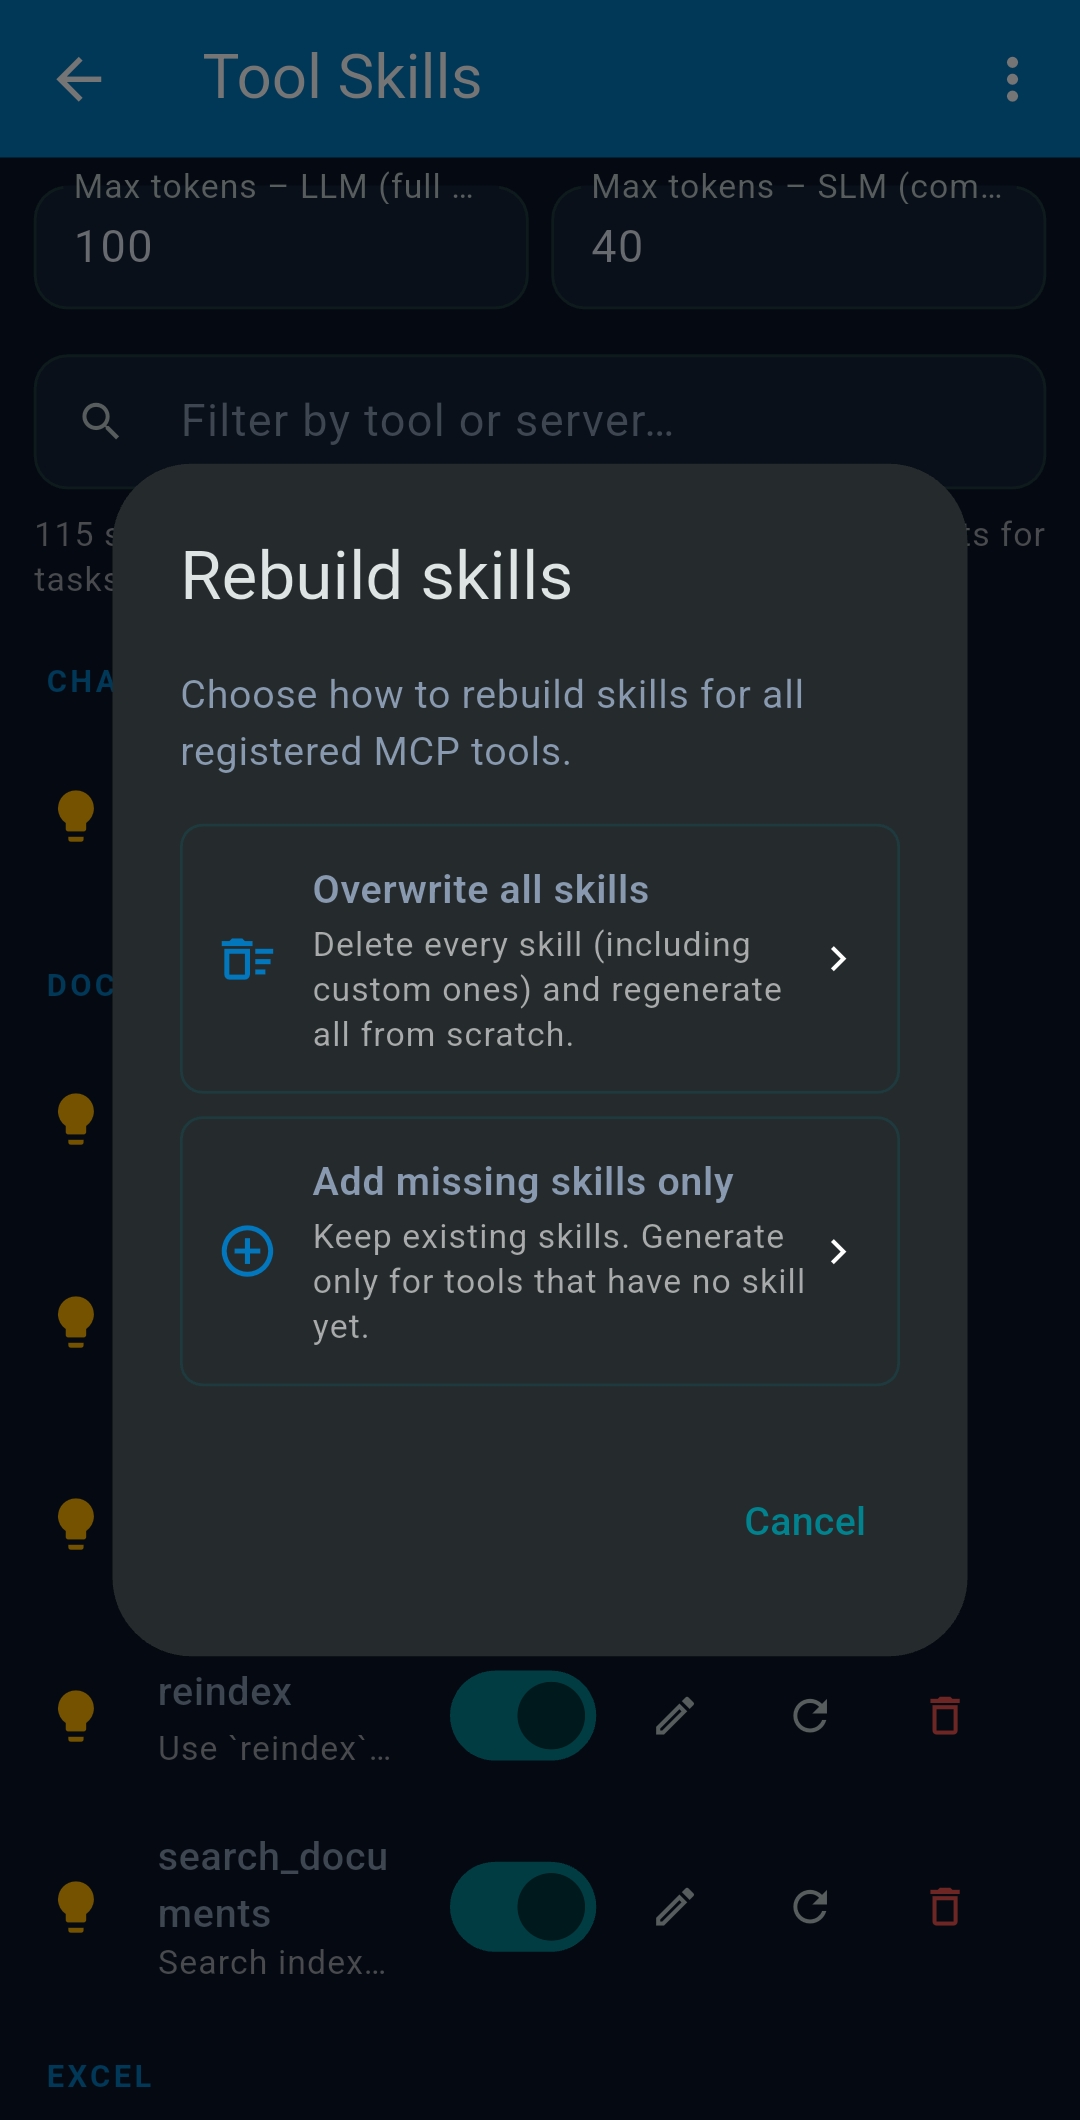
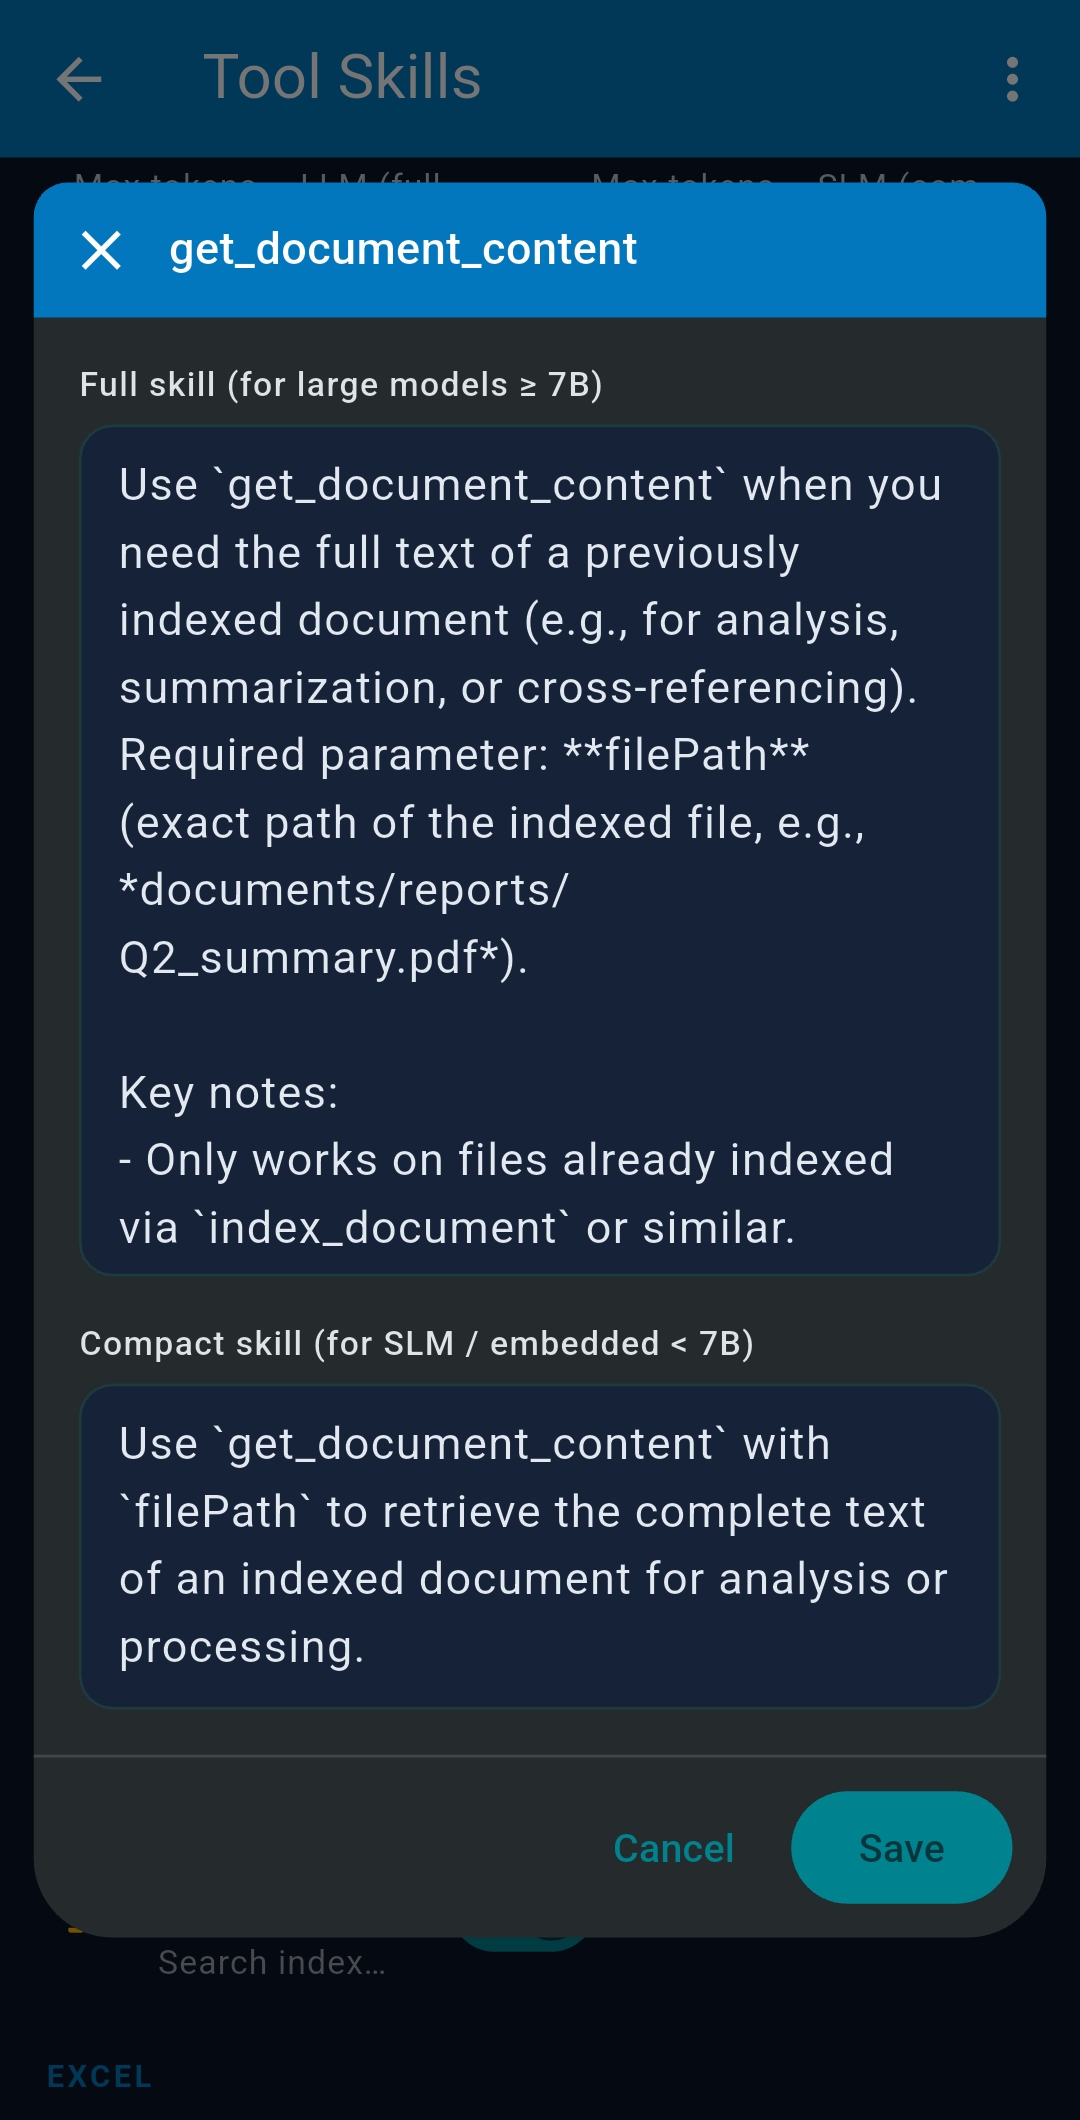
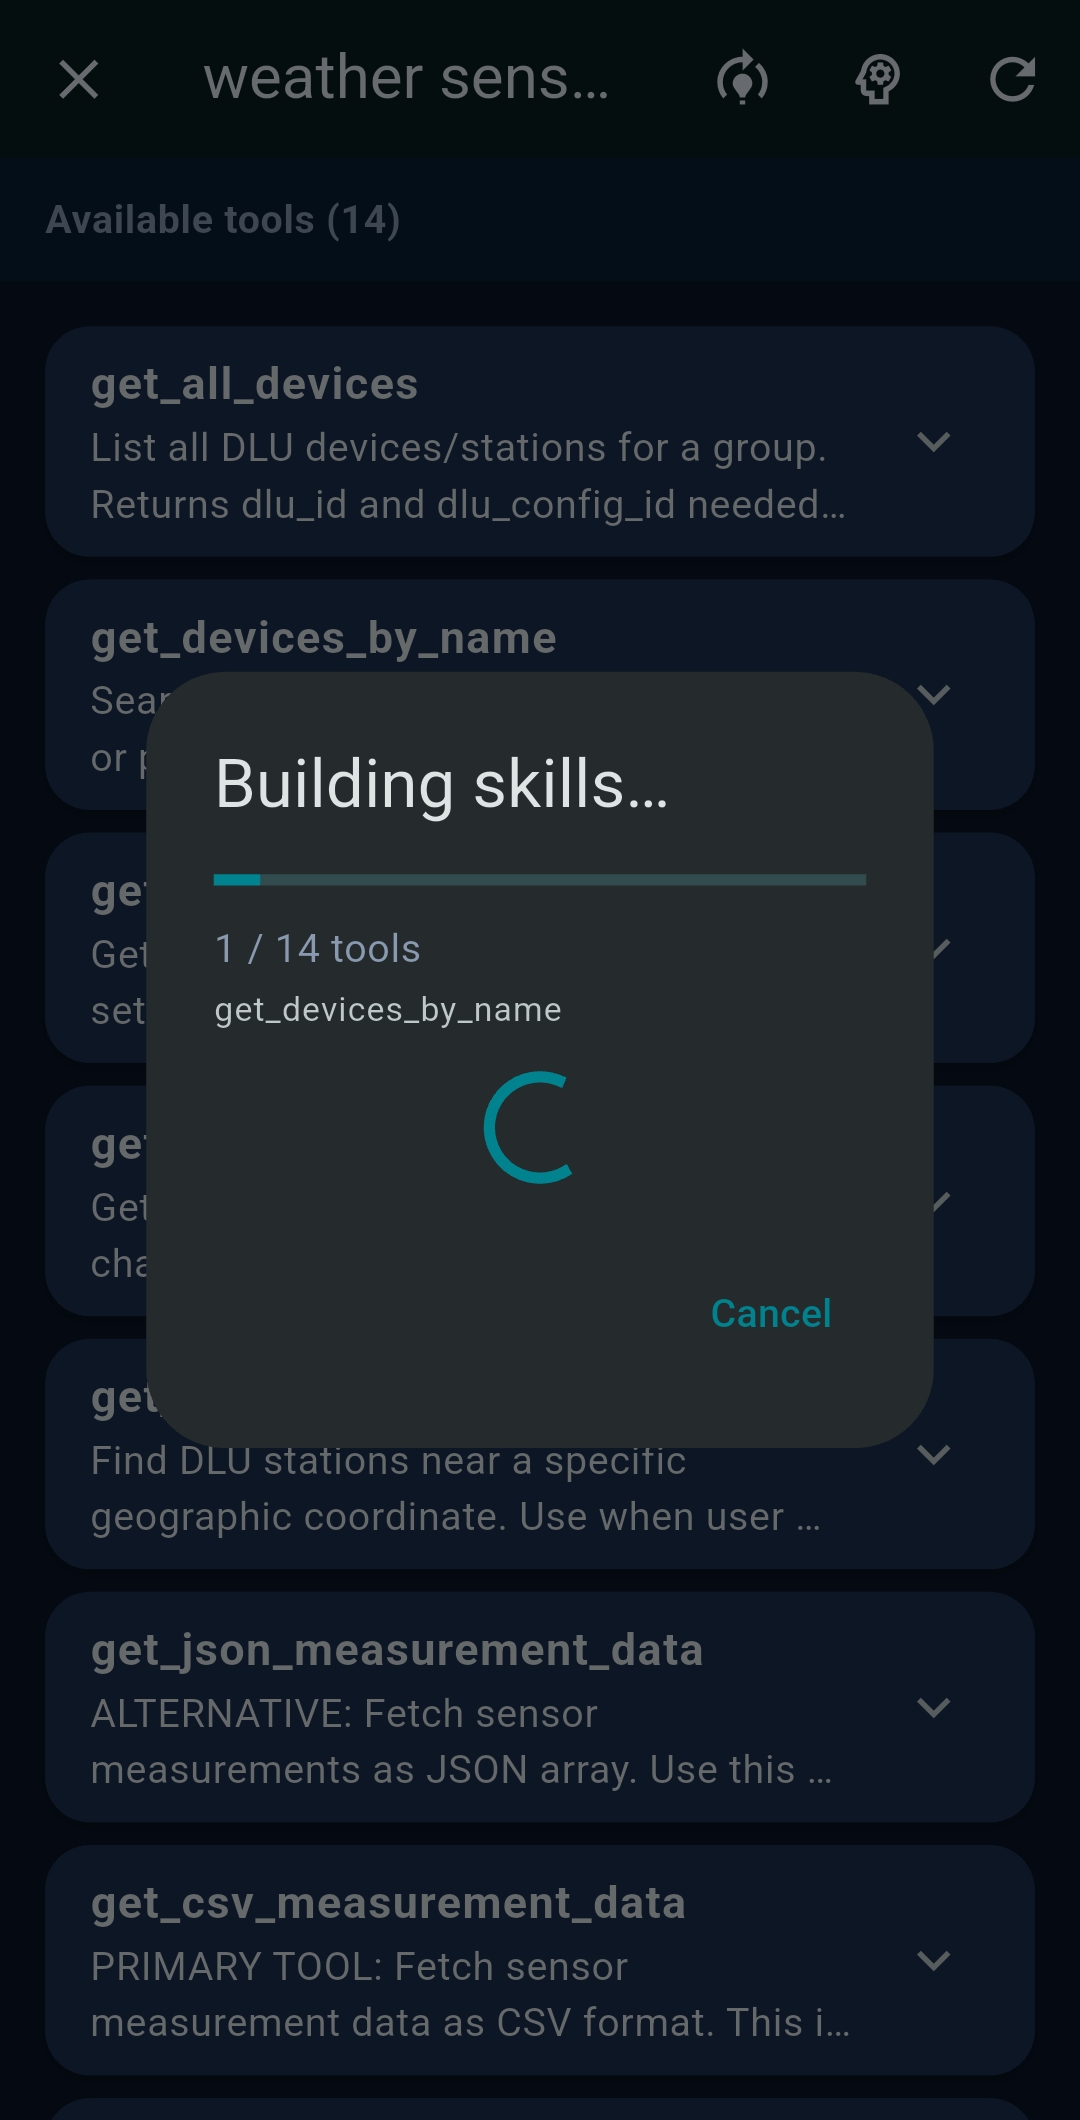
Tool Skills are AI-generated usage guides for each MCP tool, automatically created when you first configure an LLM and injected into system prompts to improve tool-use accuracy. Enable/disable per tool. Set Max tokens LLM and Max tokens SLM to control inclusion. Tap refresh to regenerate; tap edit to refine manually.
3.7 General & Vault
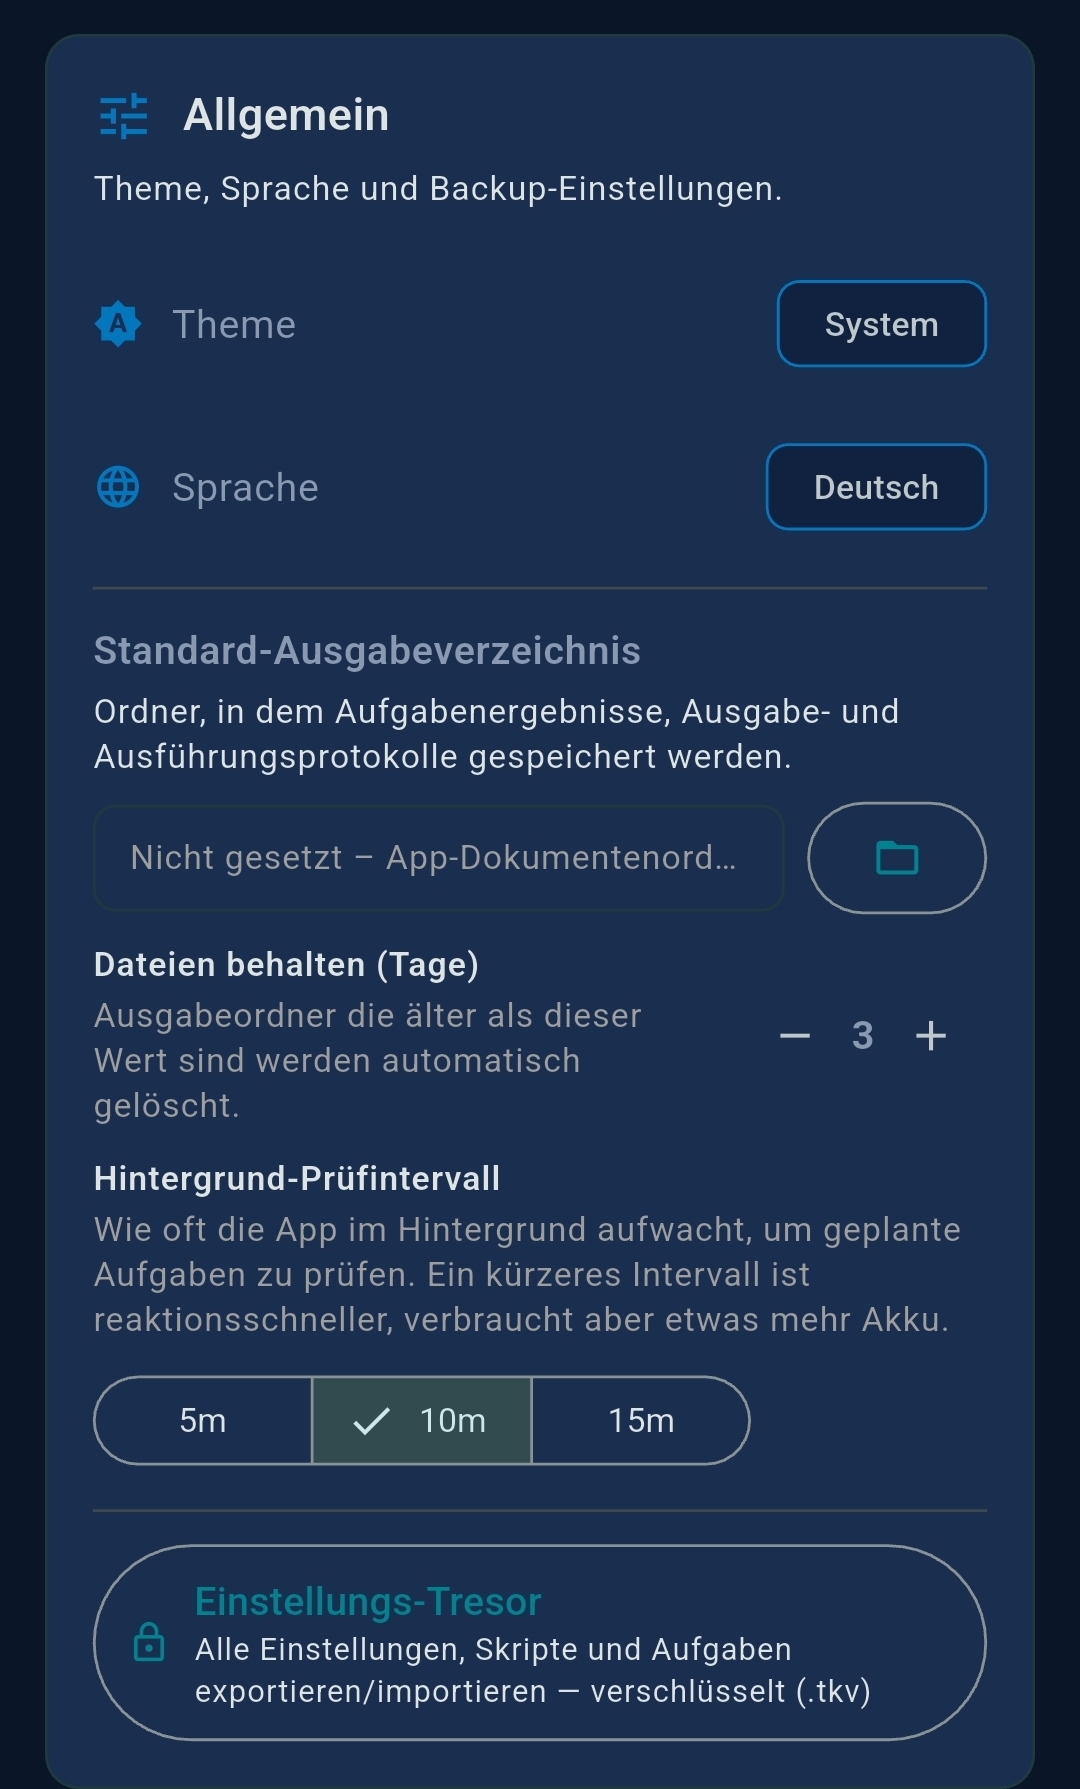
- Background check interval — 5 / 10 / 15 min; default 10 min
- Language — English or German
- Theme — System / Light / Dark
- Output Directory — custom folder for agent output files
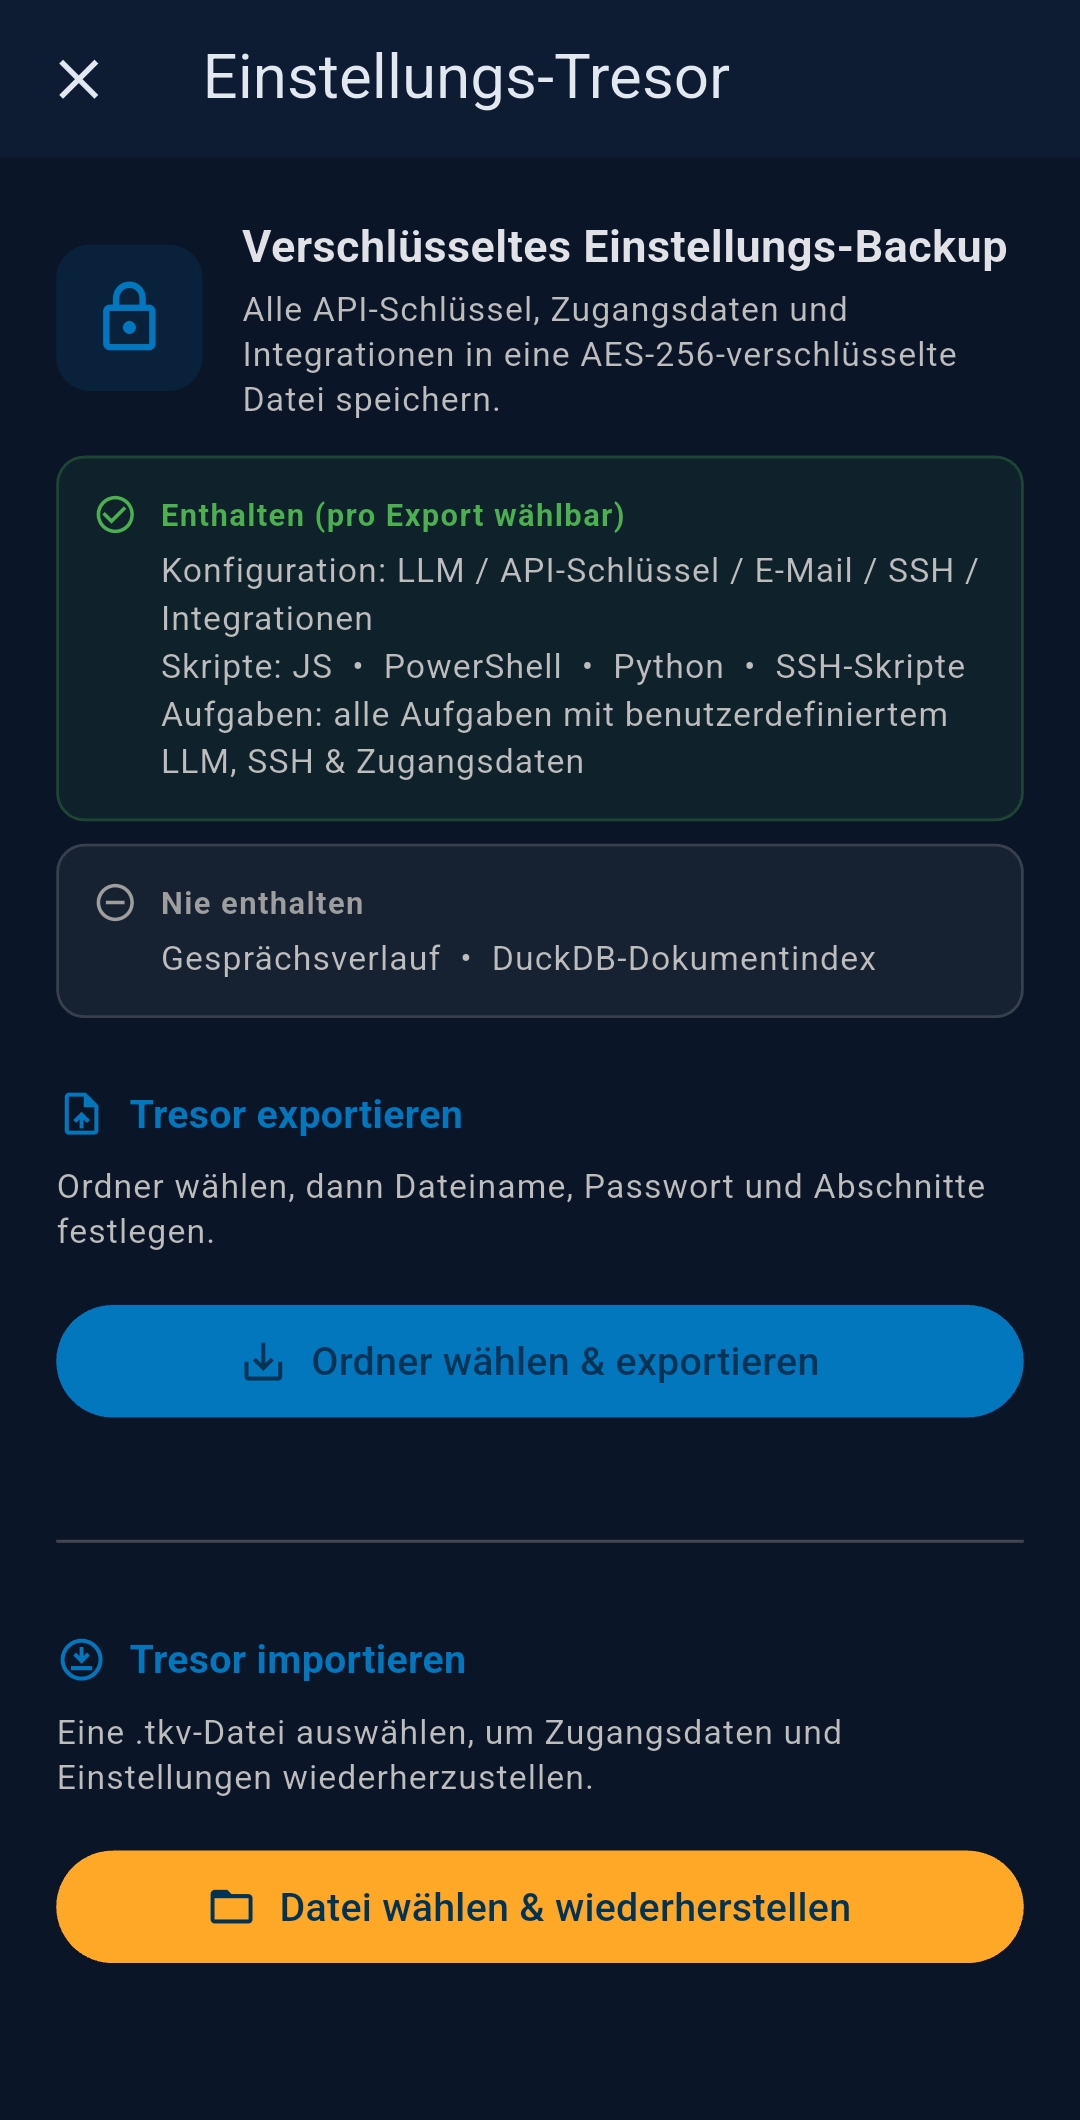
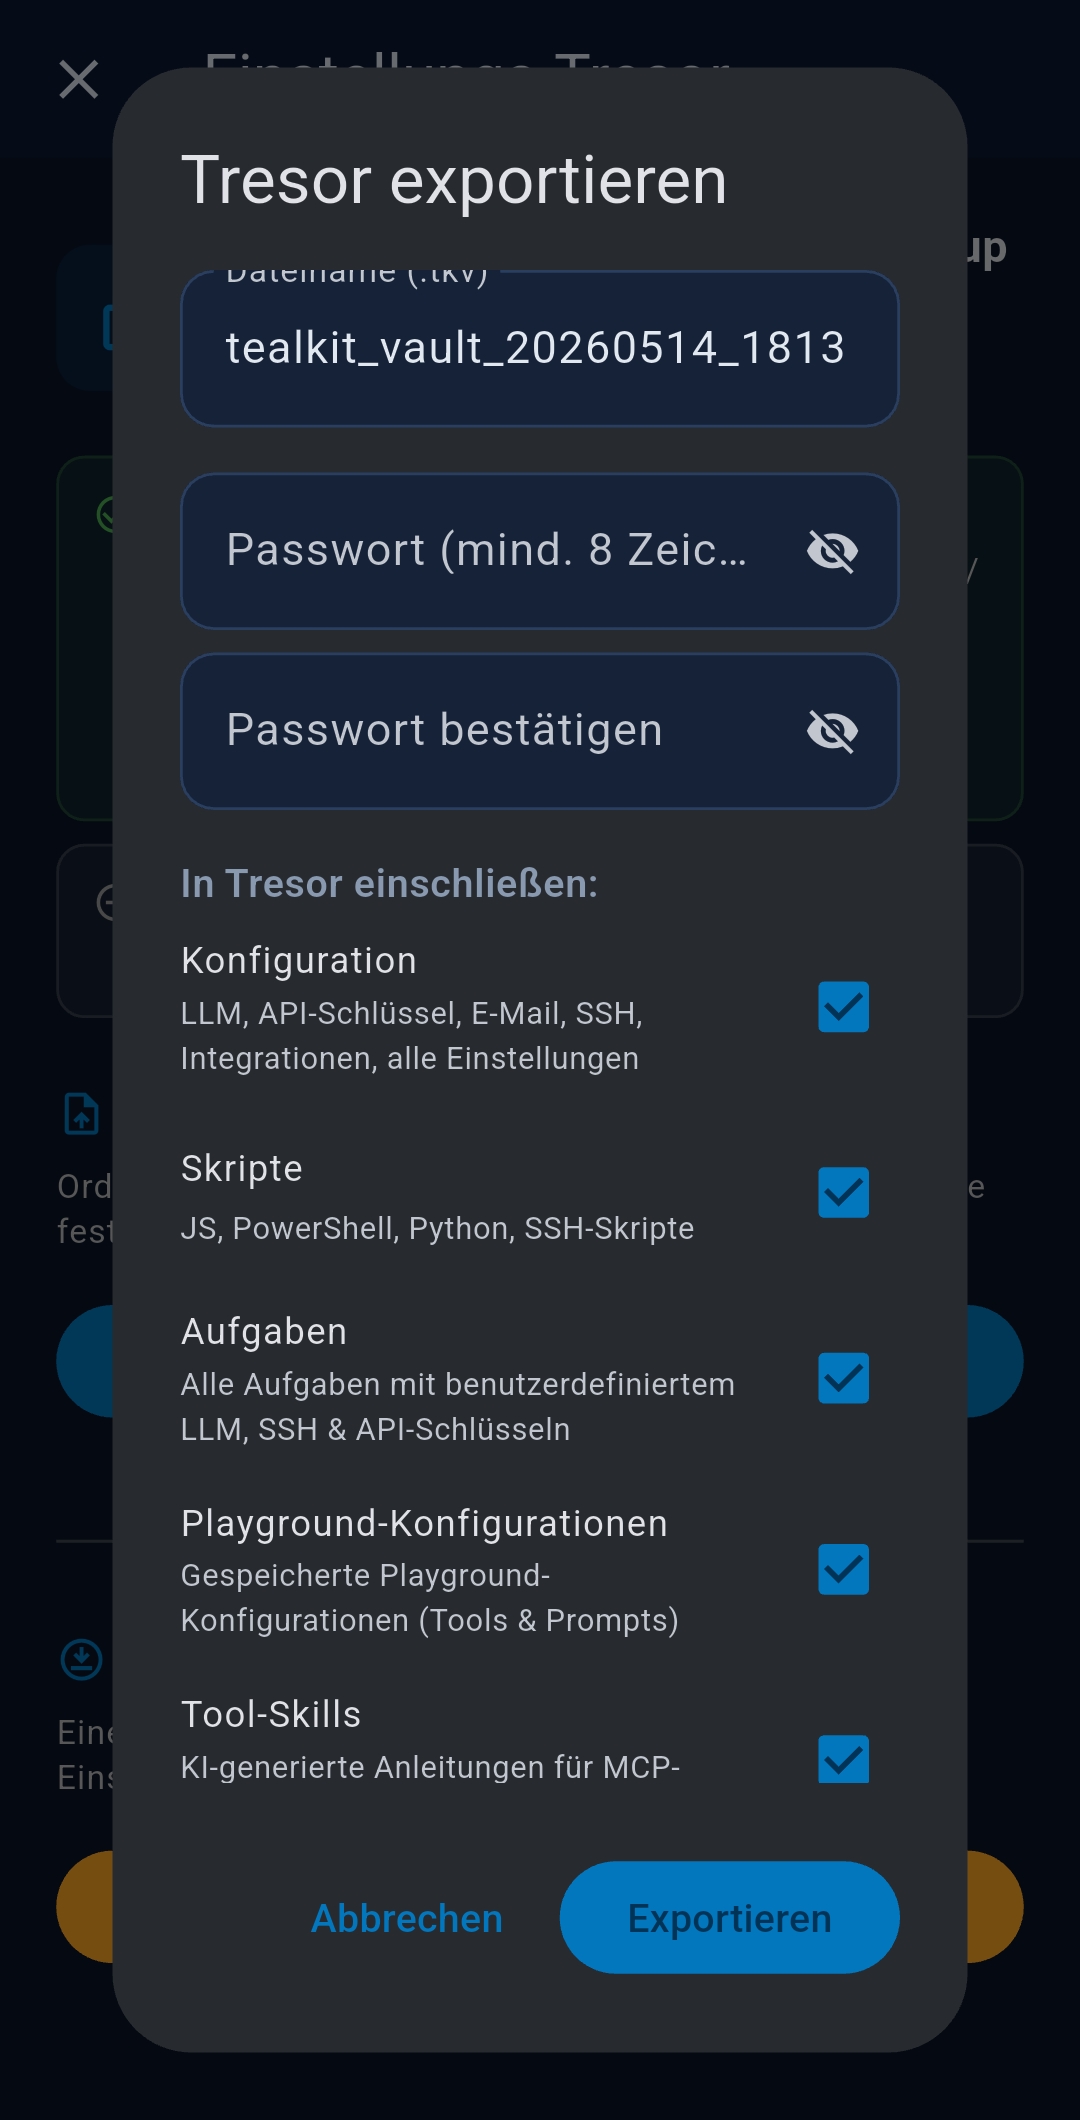
- Backup & Restore — export/import encrypted vault file
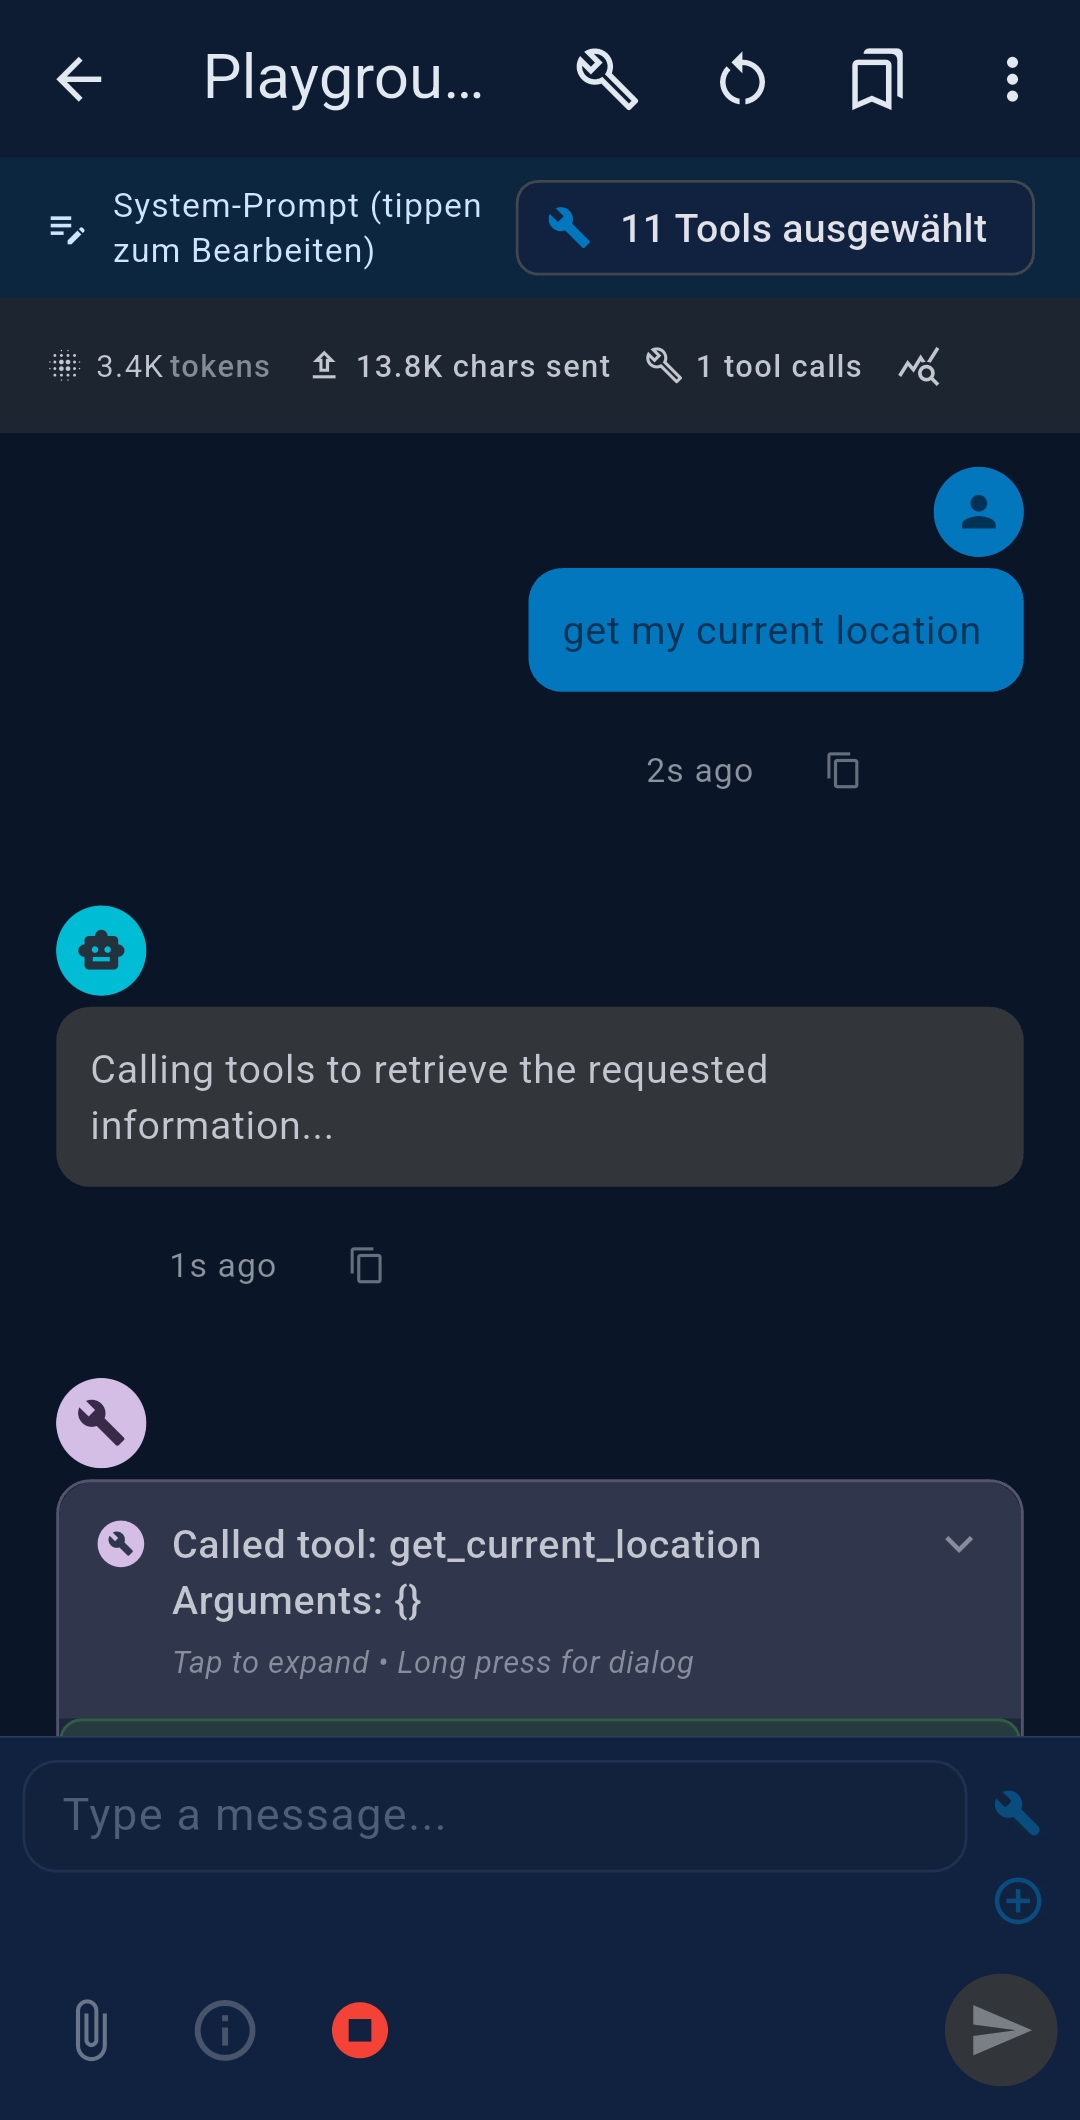
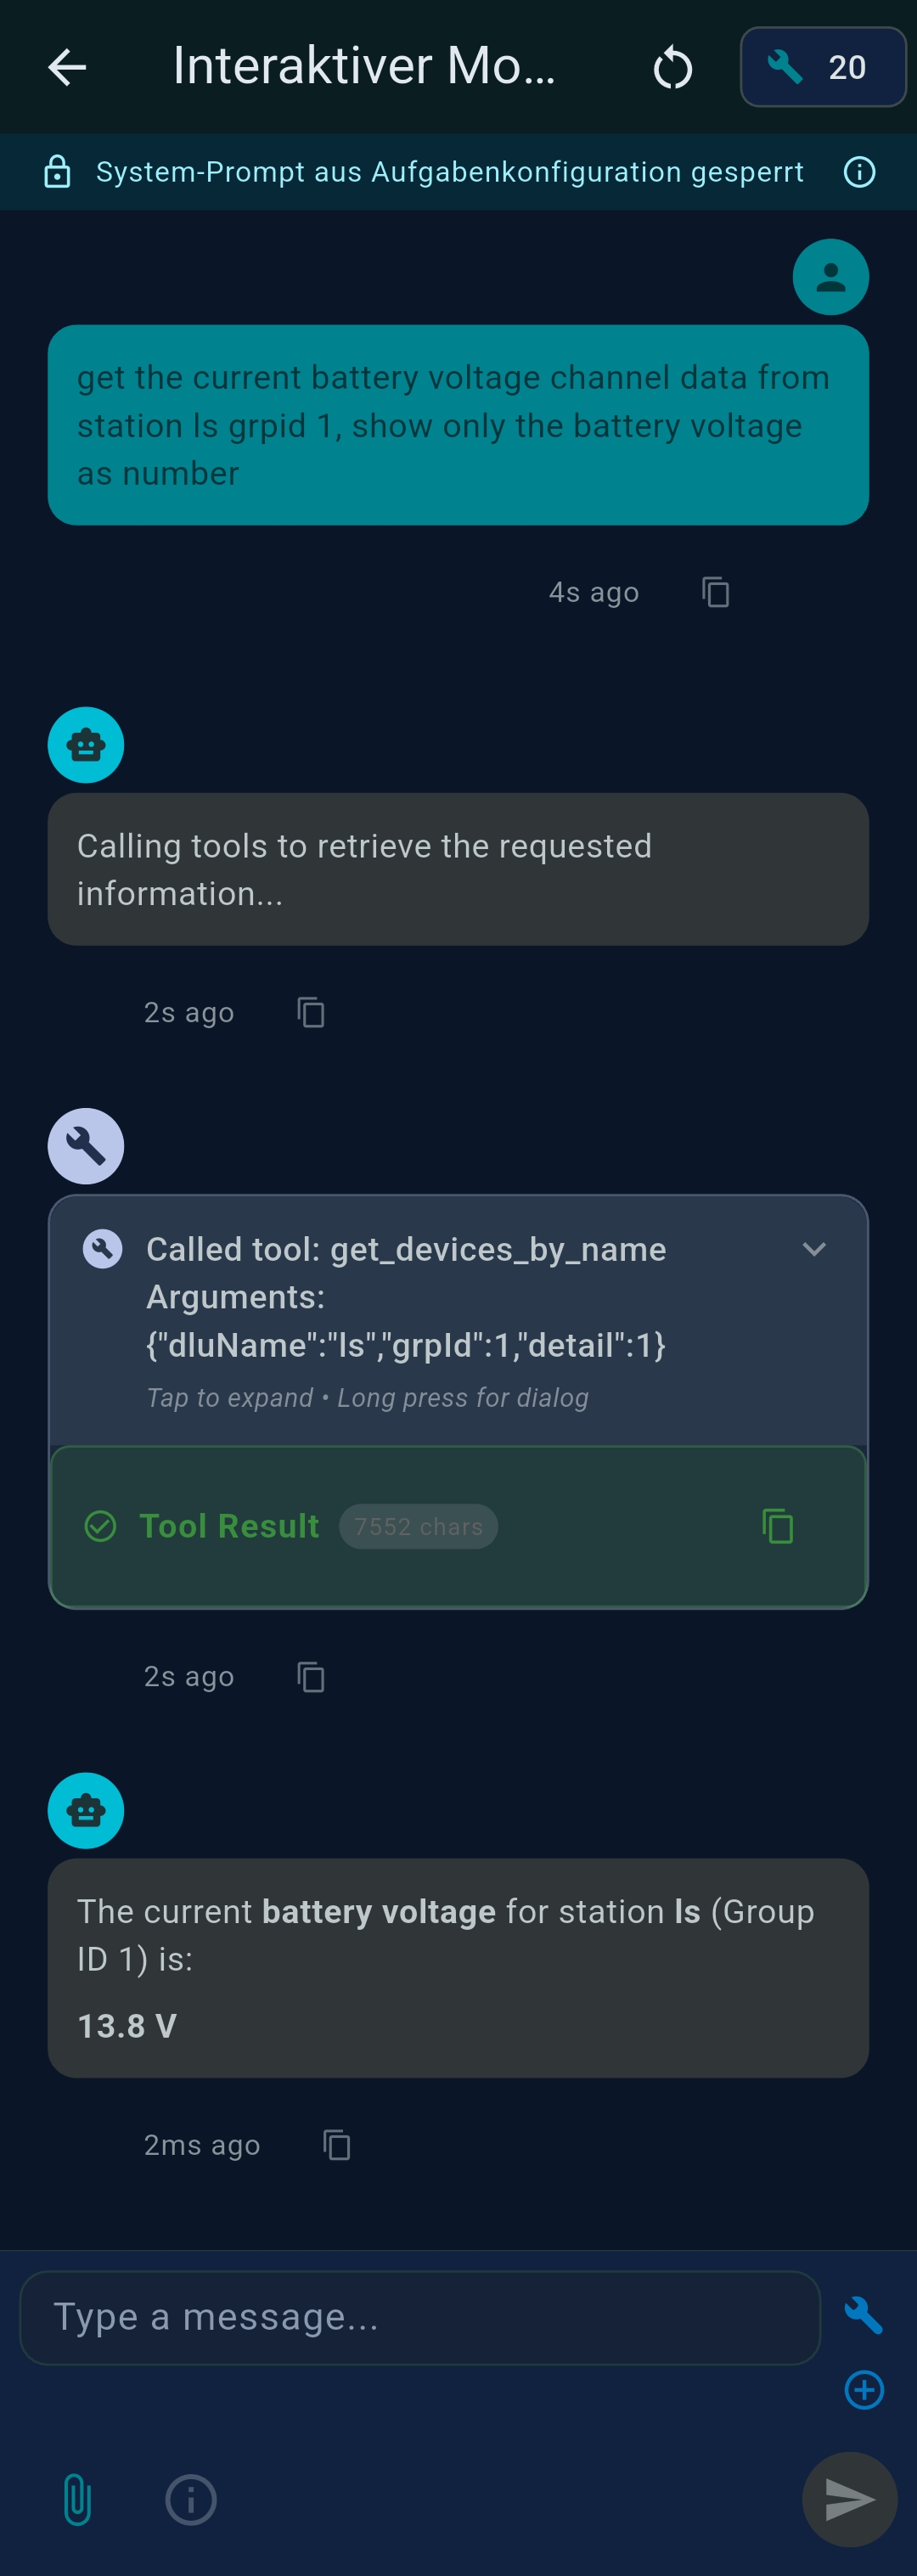
4 Playground
The Playground is an interactive chat for testing prompts, tools, and system prompts before turning them into automated agents.
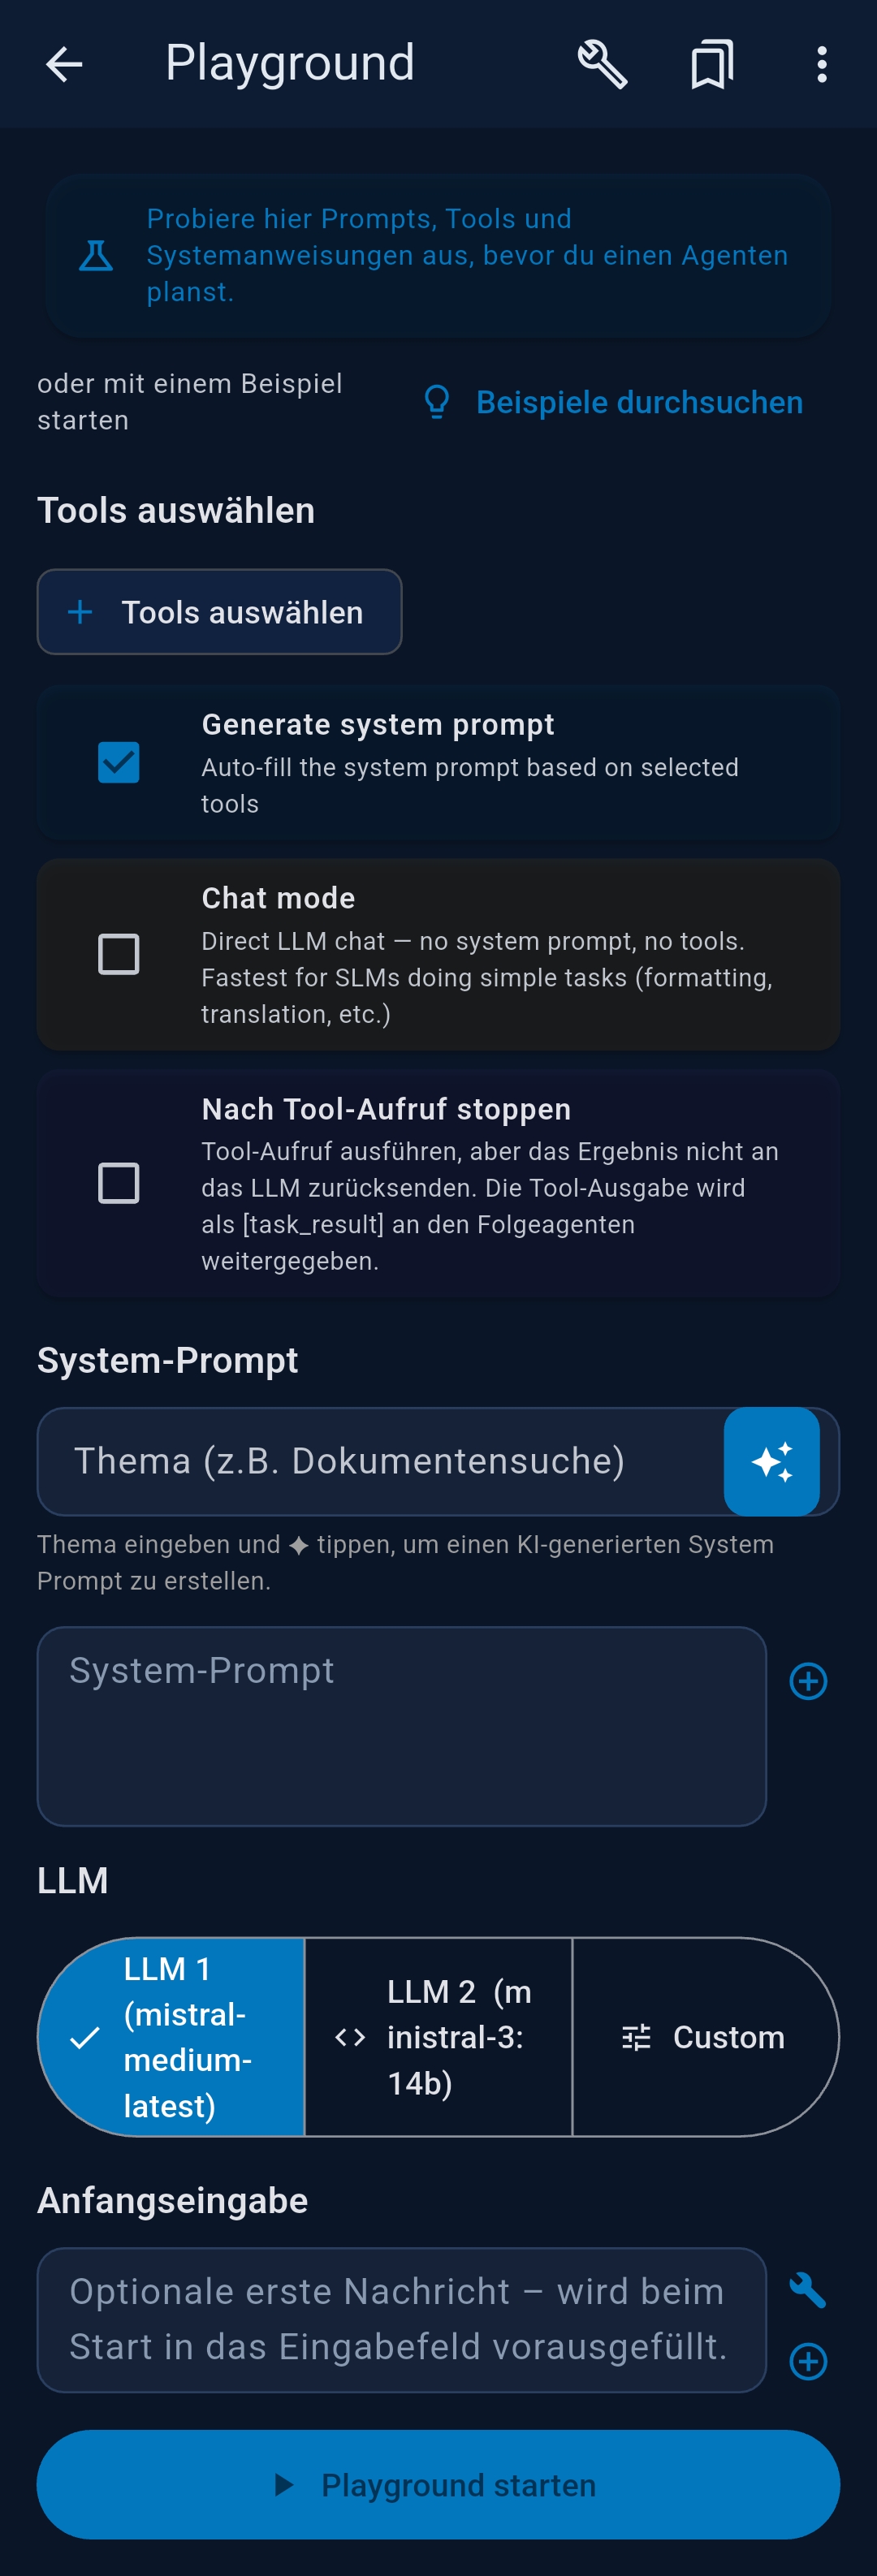


Configuration options
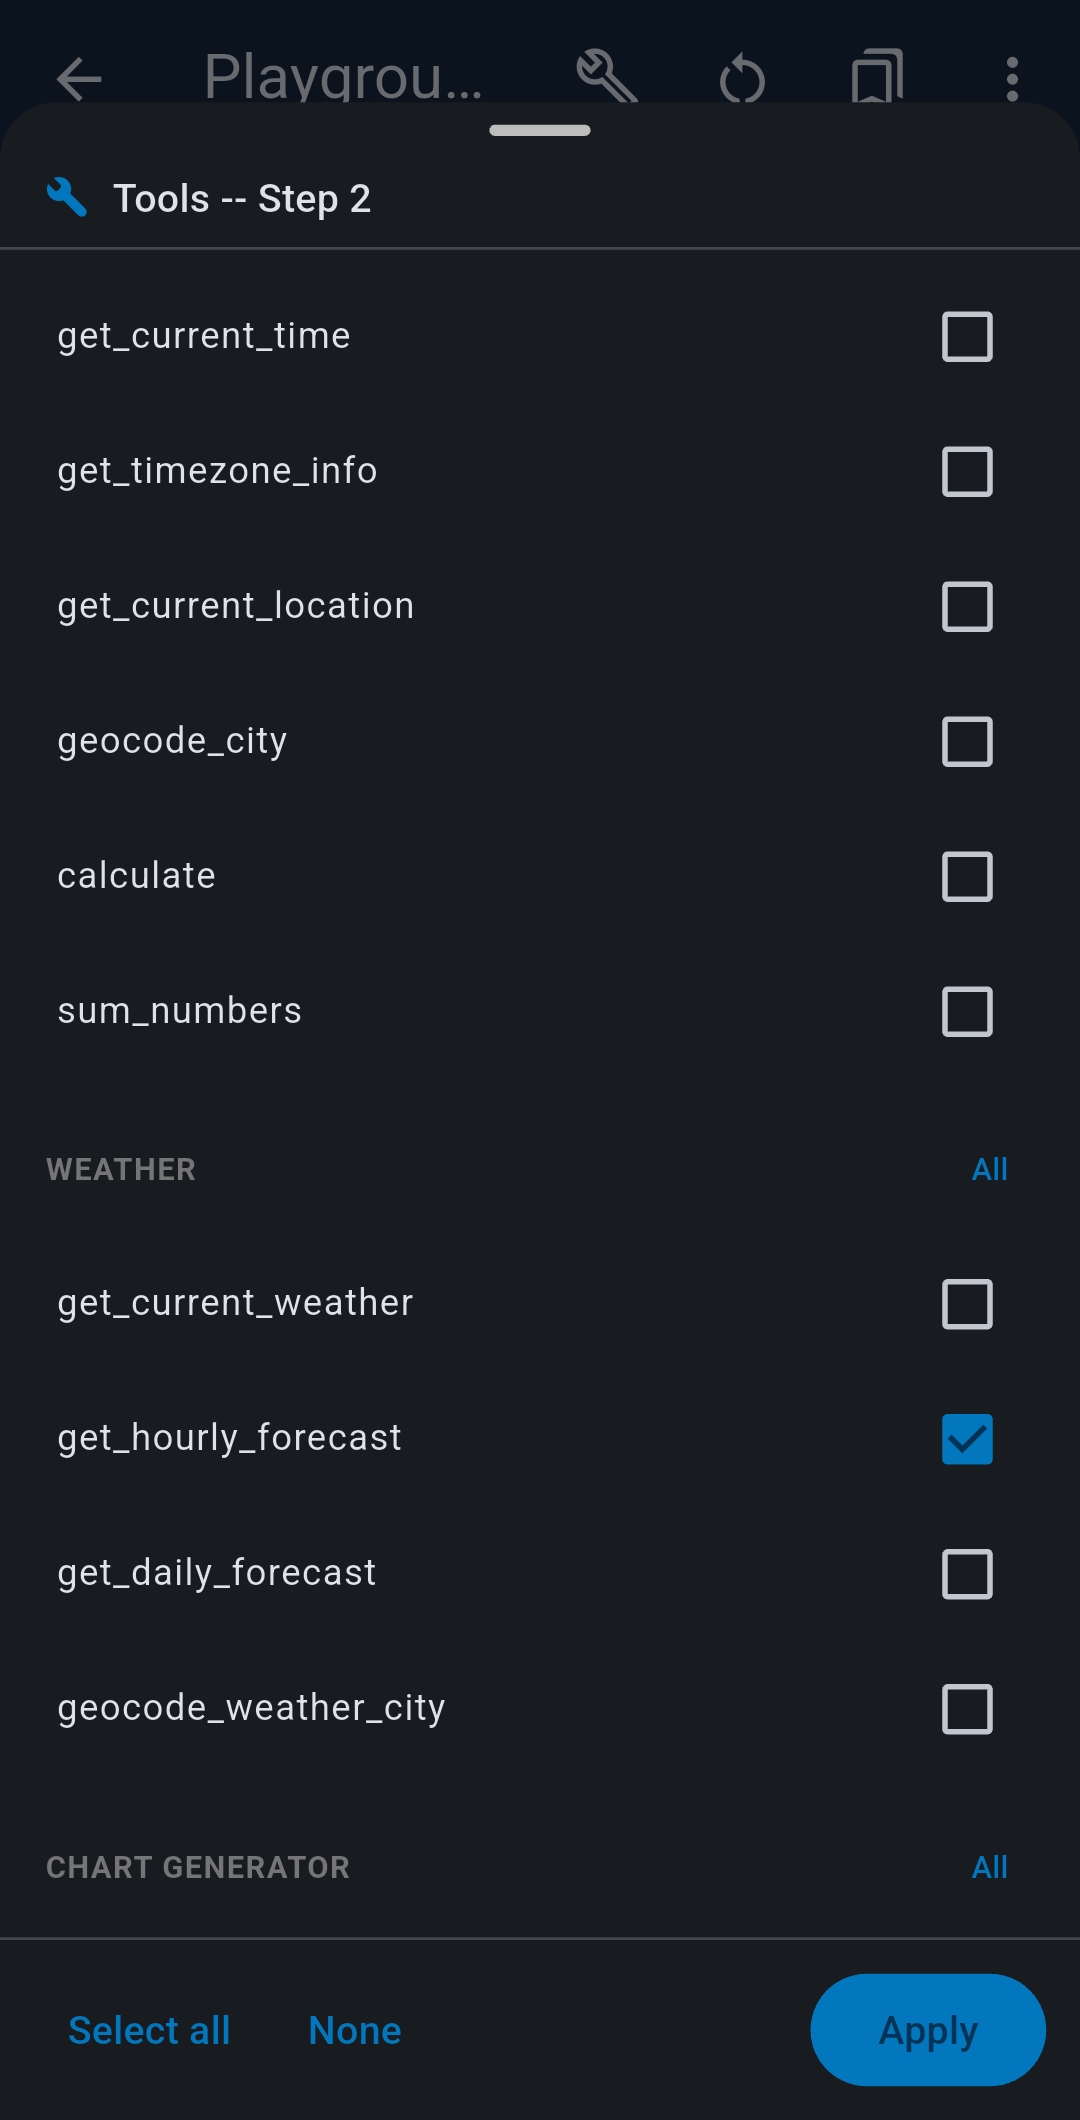
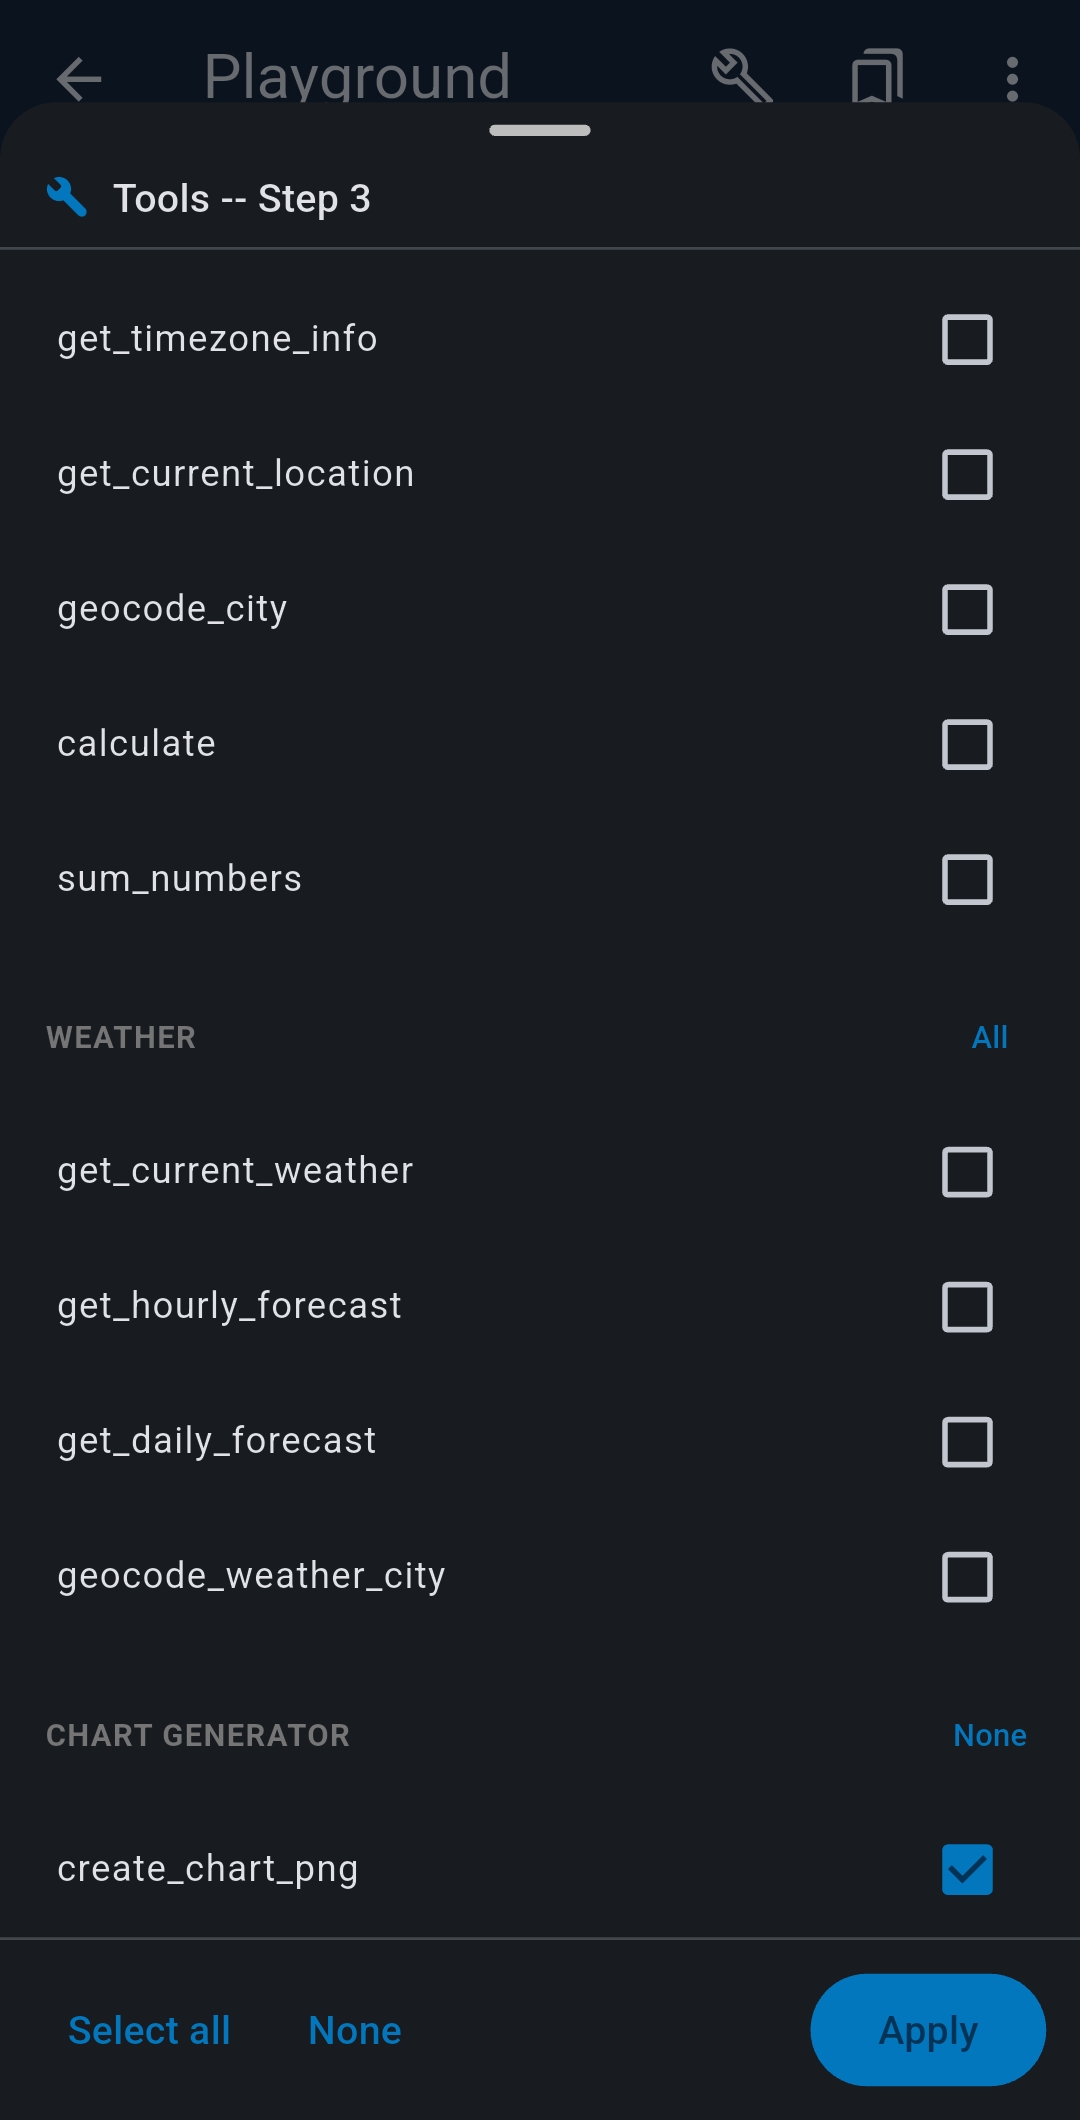
- Tools — tap + Select Tools to choose MCP tools for this session
- Generate system prompt — auto-generates a system prompt based on selected tools
- Chat mode — direct LLM chat, no tools, no system prompt; fastest for SLMs doing simple tasks
- Stop after tool call — executes the first tool call, returns raw output as session
result and
${task_result}for chained agents - System Prompt — type a topic and tap ◆ to AI-generate, or write manually
- LLM selector — LLM 1, LLM 2, or Custom (temporary parameter overrides)
- Initial input — optional first message pre-filled in the chat input
- Advanced Settings — override Temperature, Max Tokens, Thinking/Reasoning, and Native Tool Calling (Ollama only) for this session
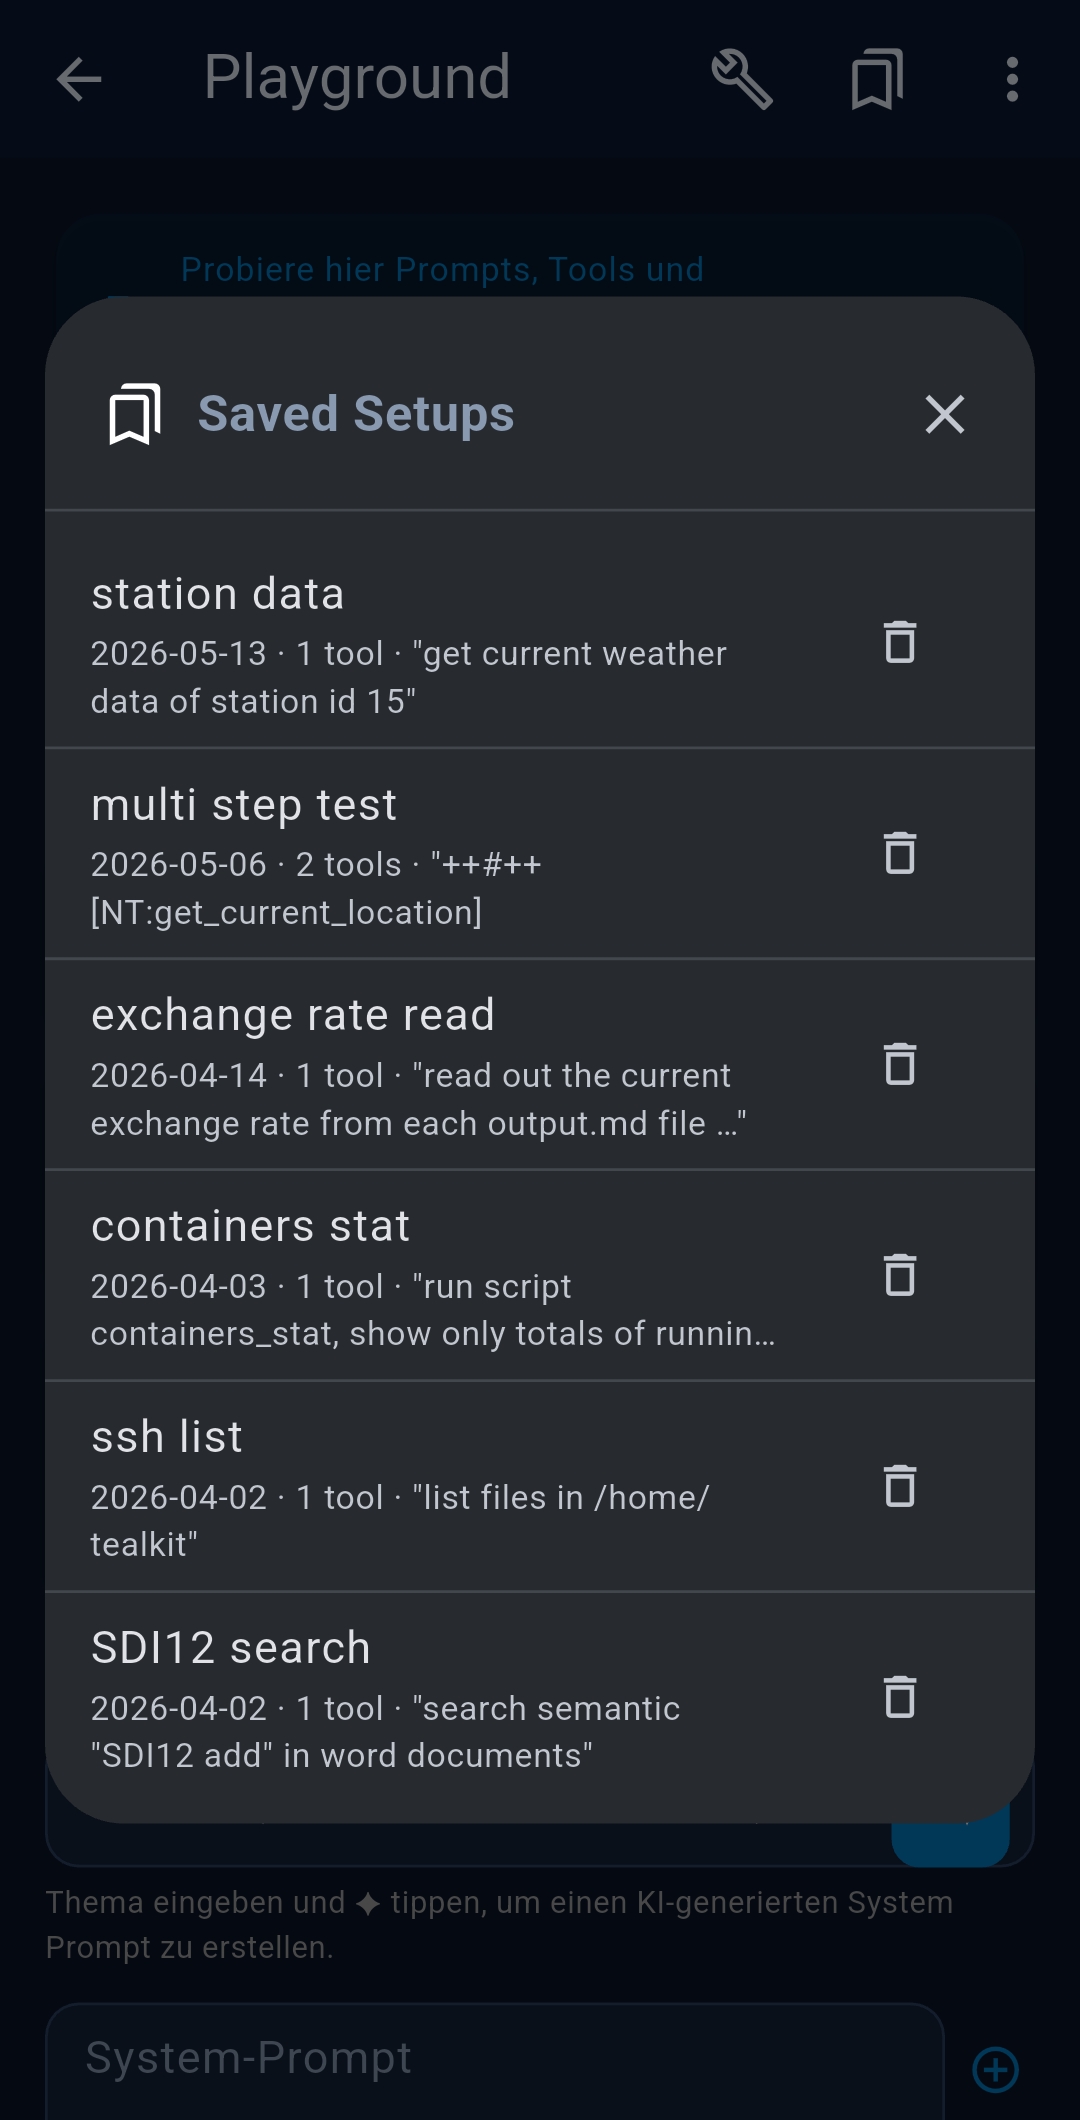
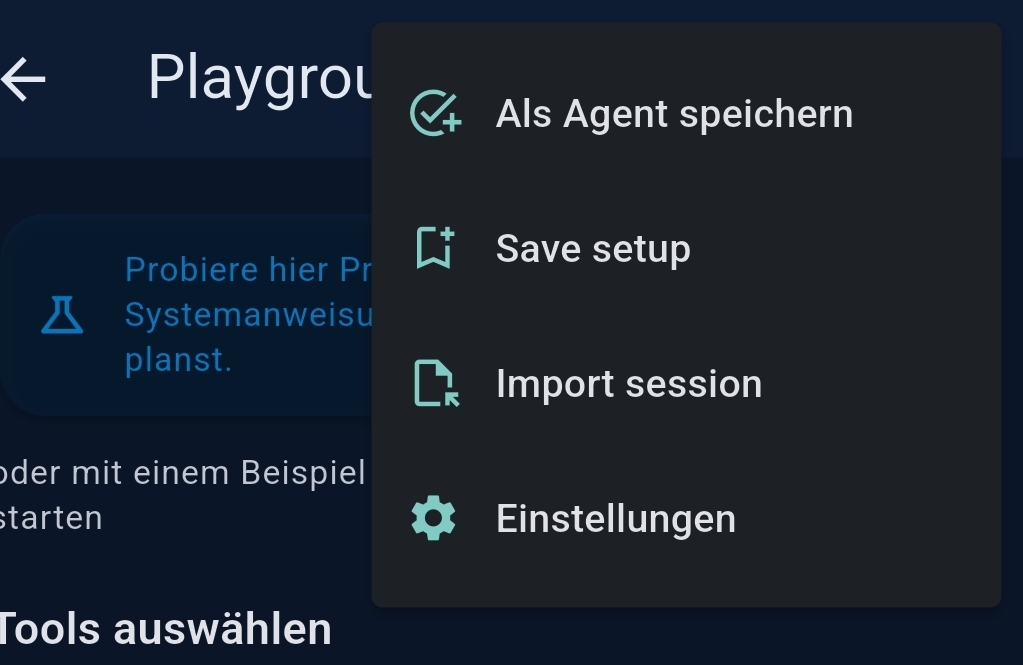
Saving and converting
Tap the bookmark icon to save the current setup as a reusable configuration. Tap Save as Agent to create a scheduled agent from the current Playground setup.
Note: In Local Mode, saved configurations are stored locally on your device's storage. In Server Mode, they are stored on the remote server's database and shared among all connected devices.
Token & cost statistics
A live token counter appears at the bottom. Tap it to see prompt tokens, completion tokens, last-request cost, and cumulative session cost. Tap Reset Chat (↻) to clear conversation history and reset counters while keeping tools and system prompt.
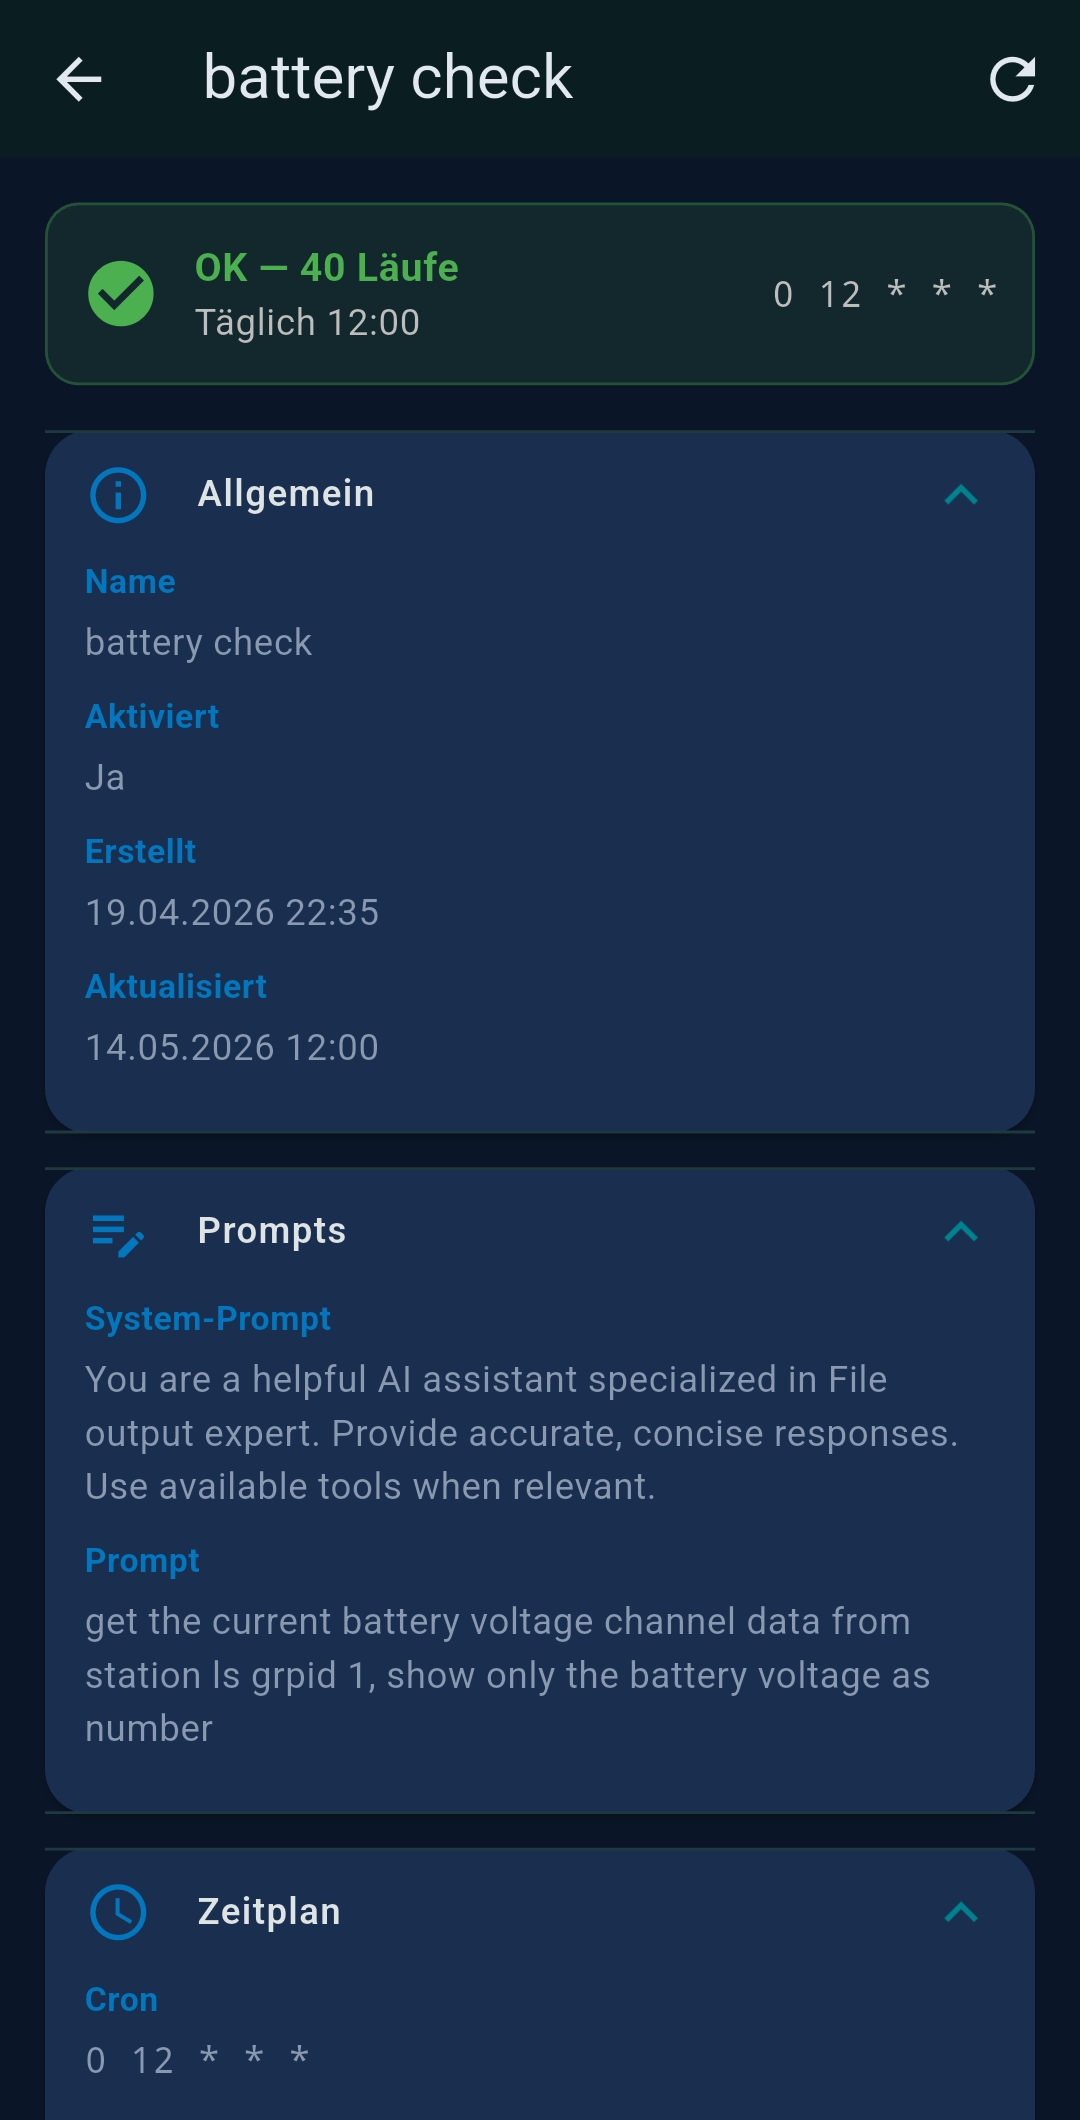
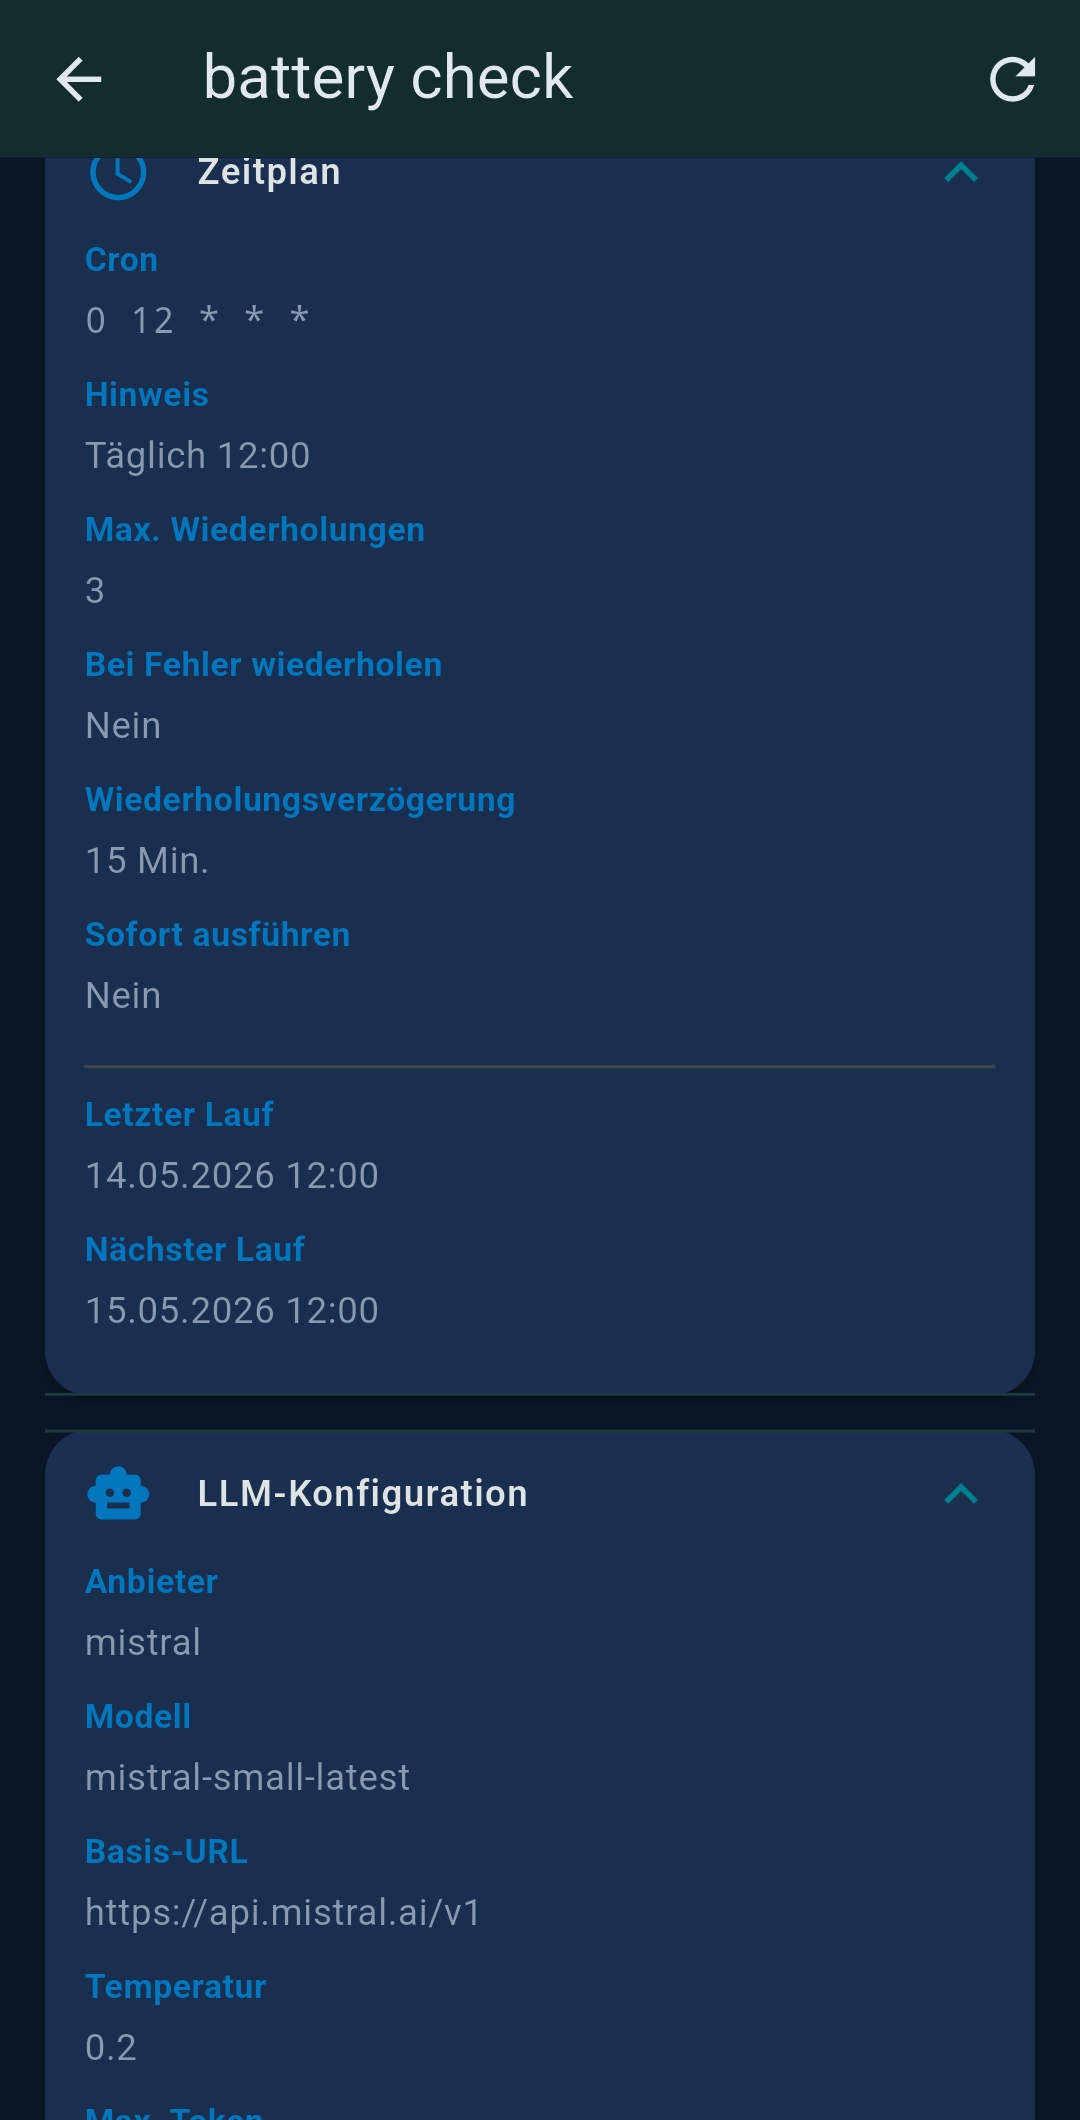
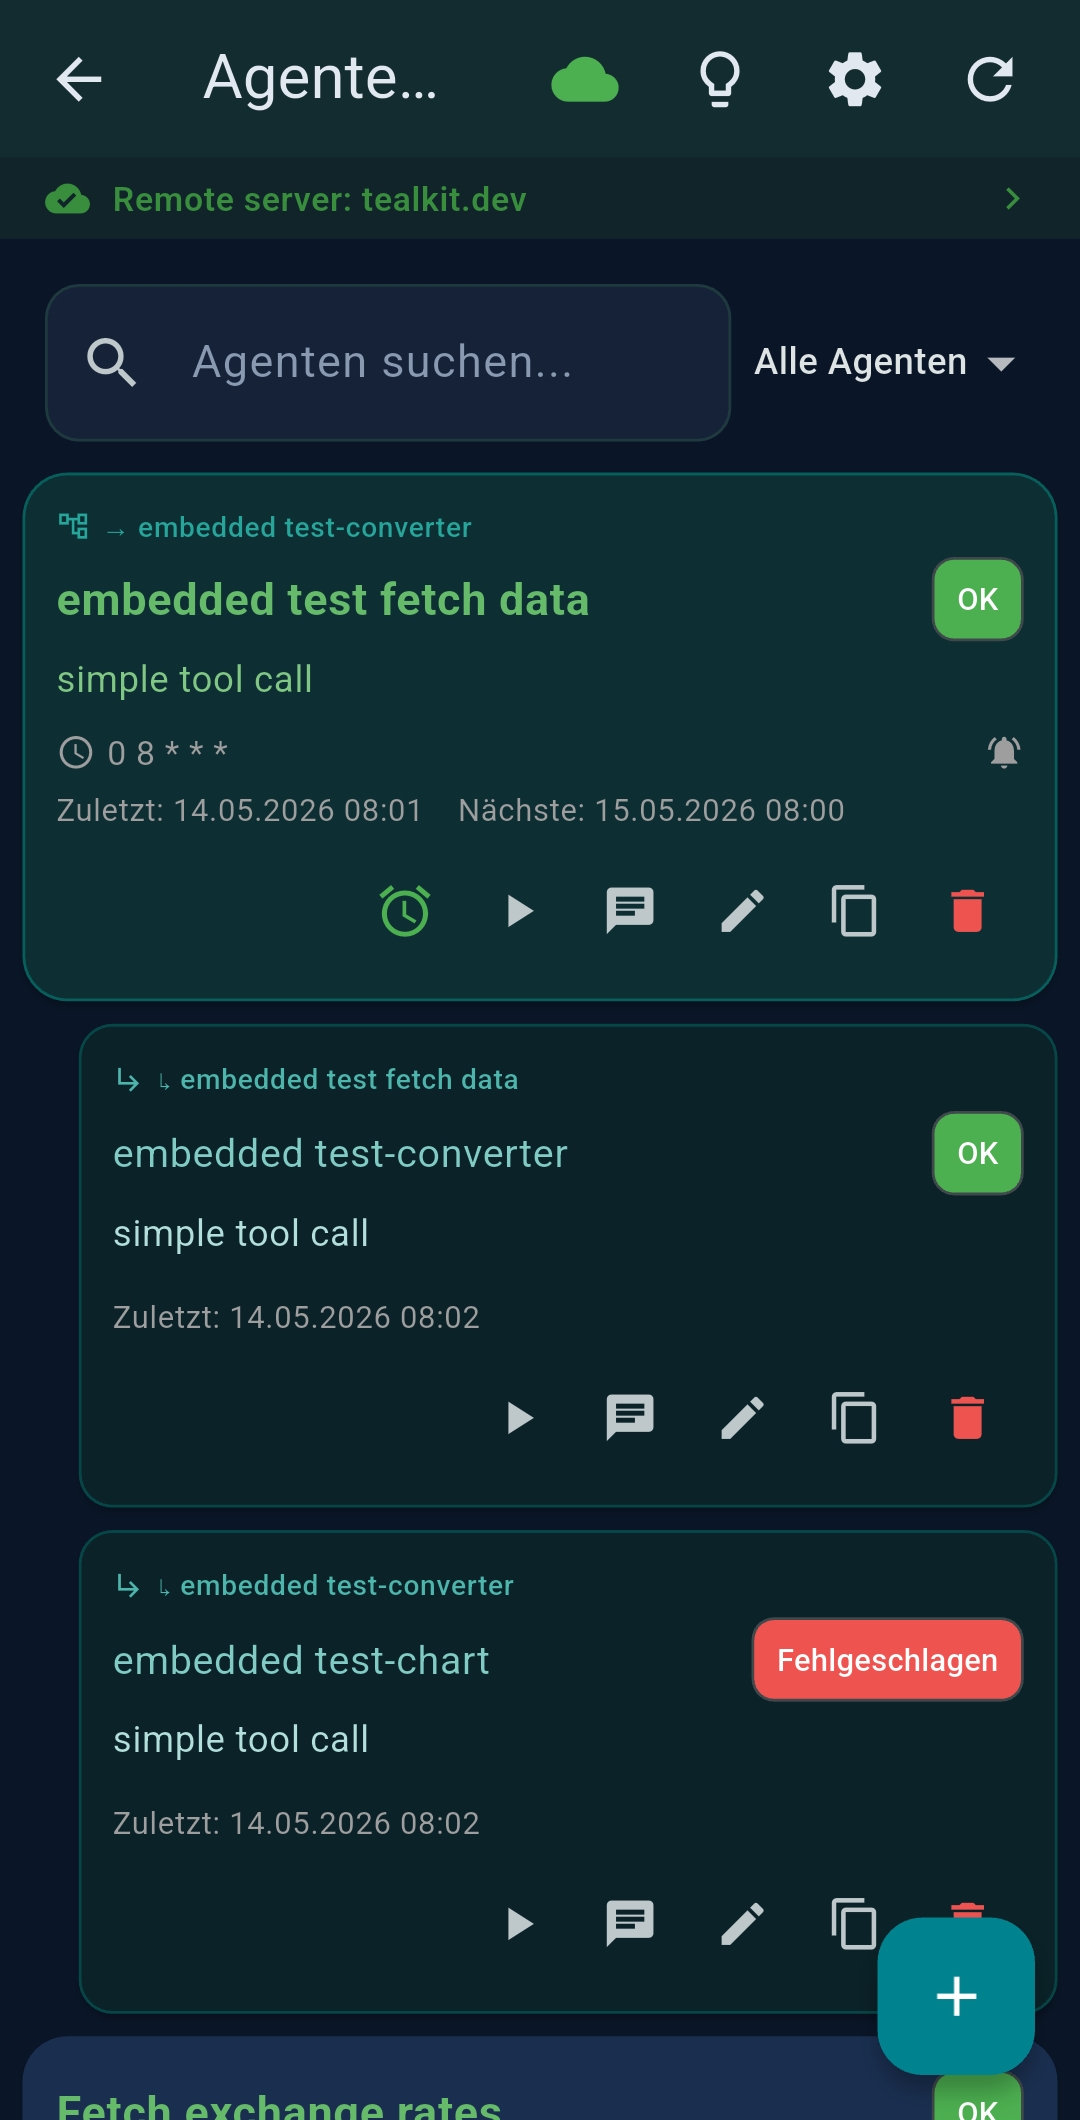
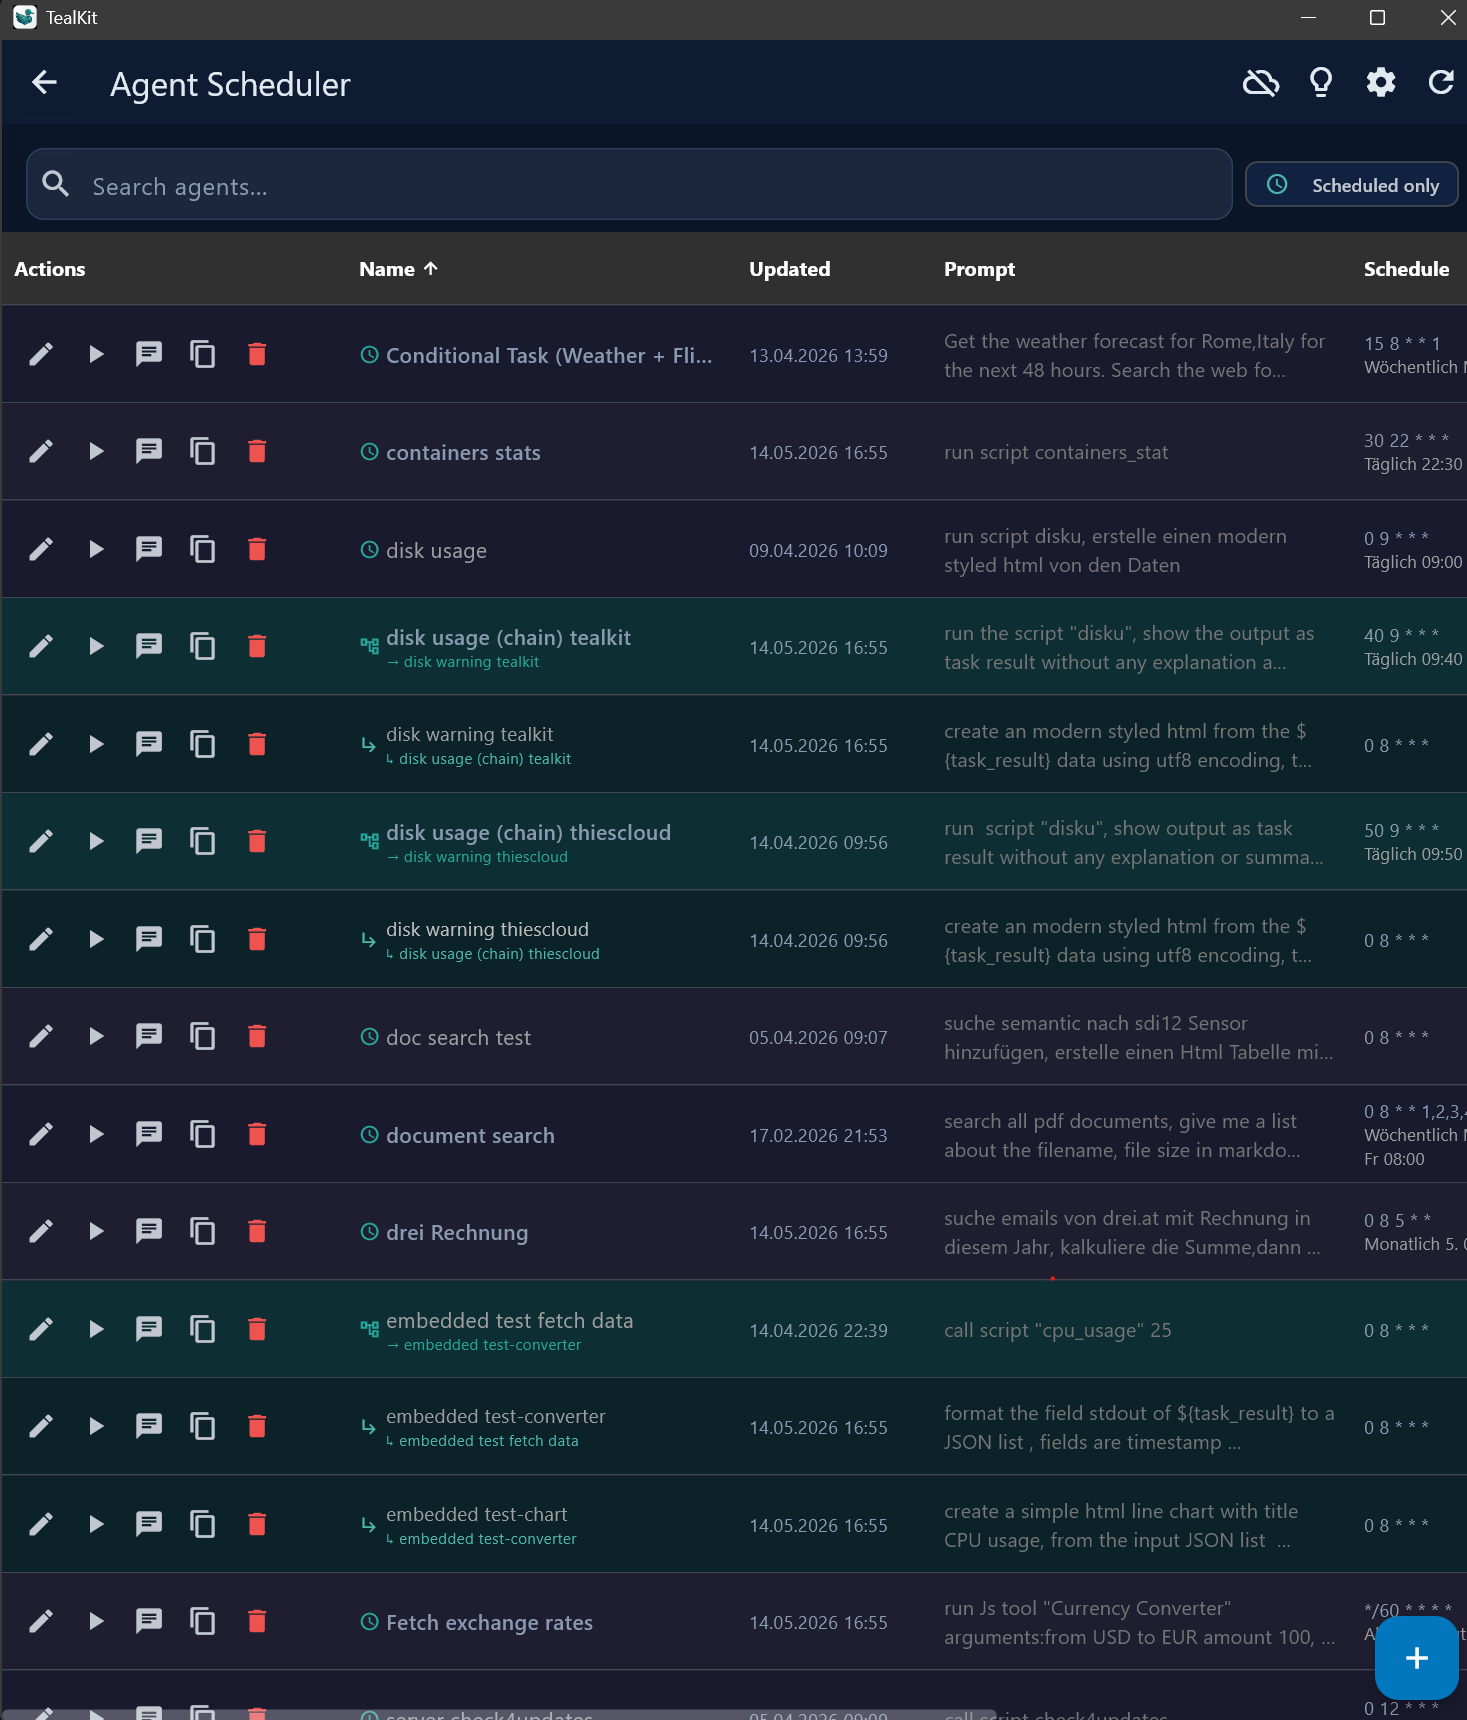
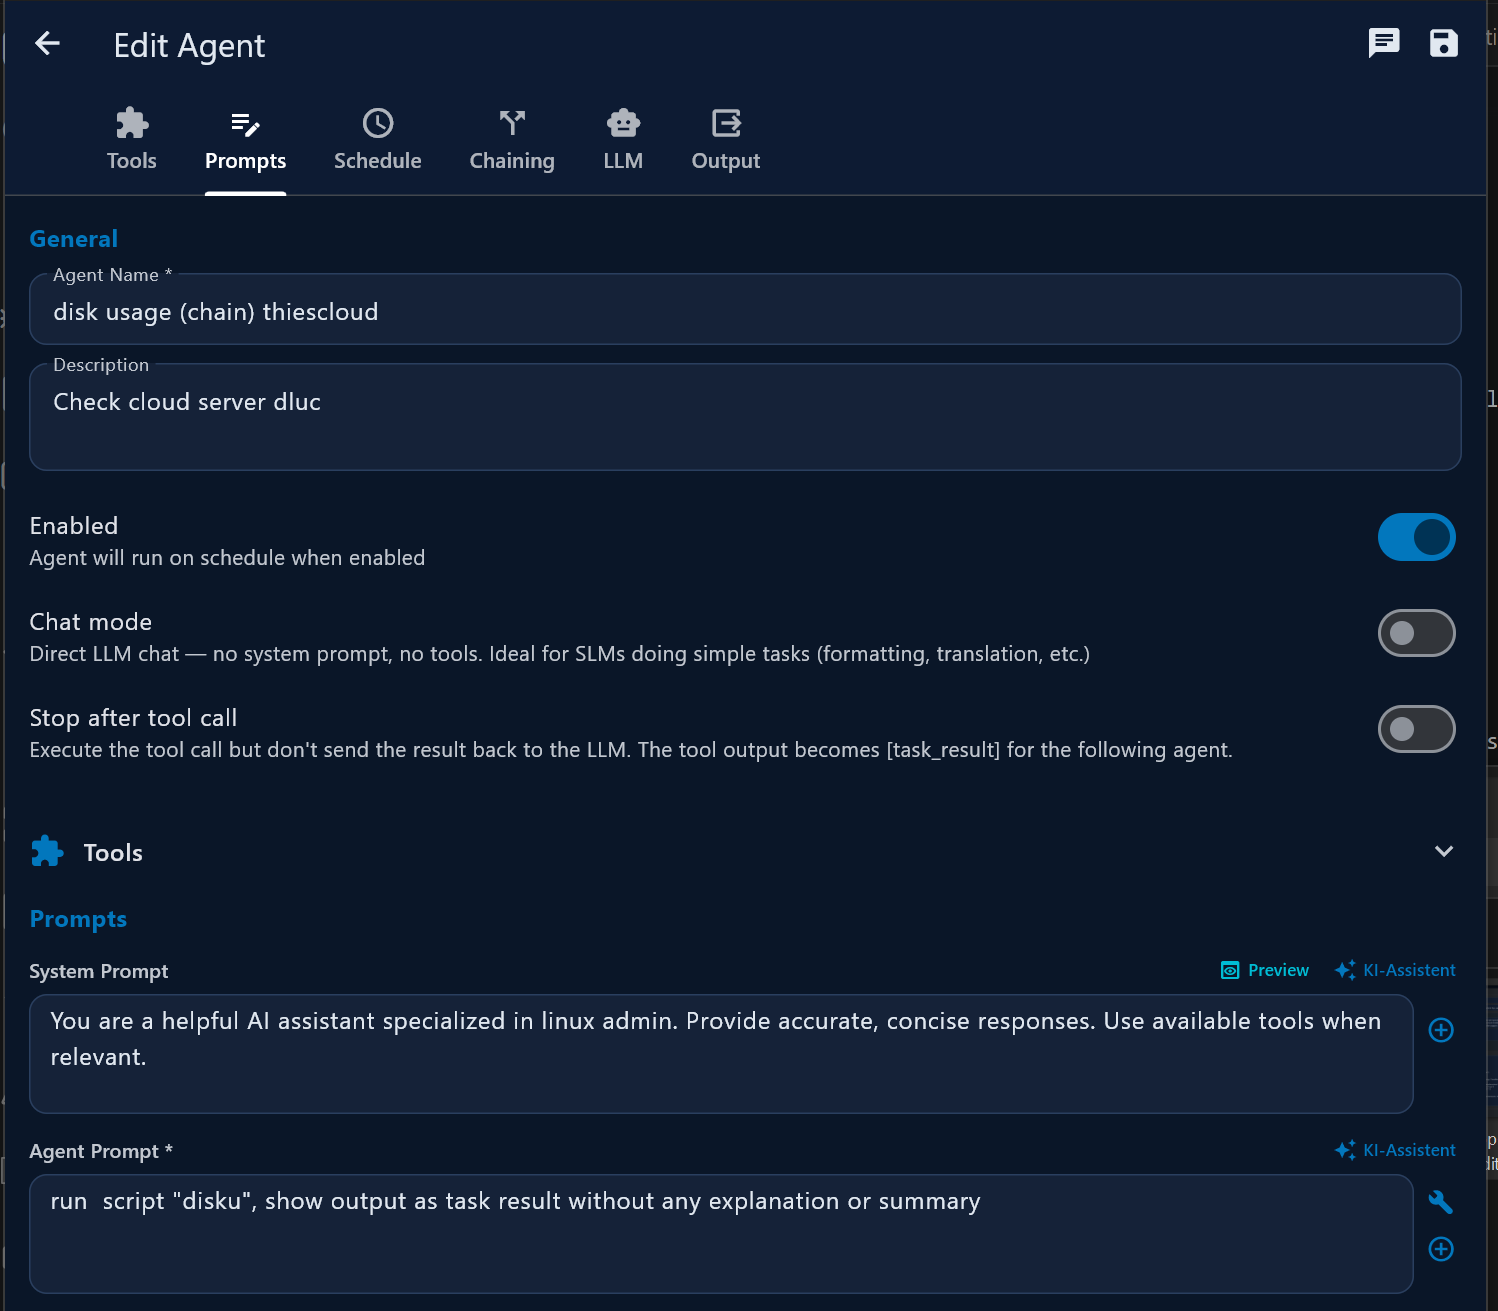
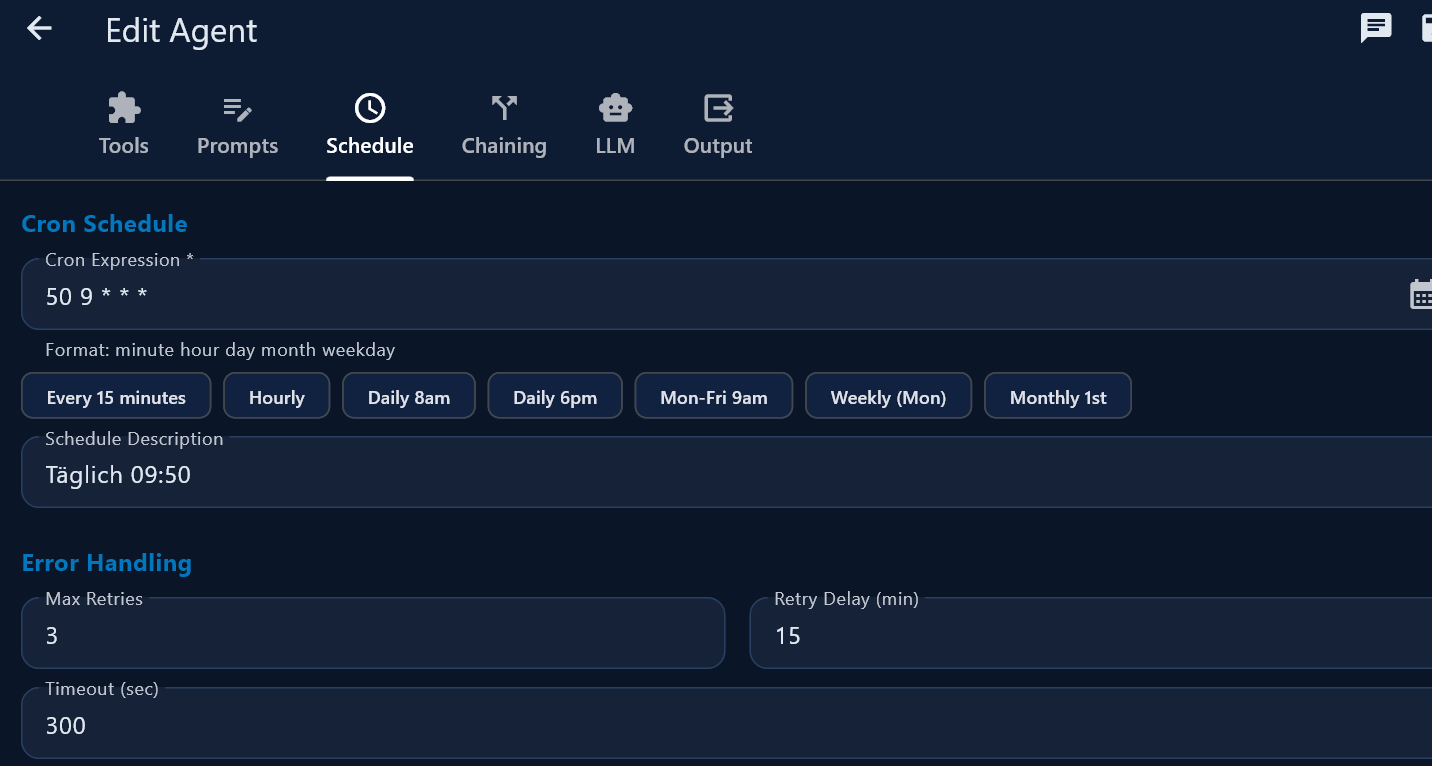
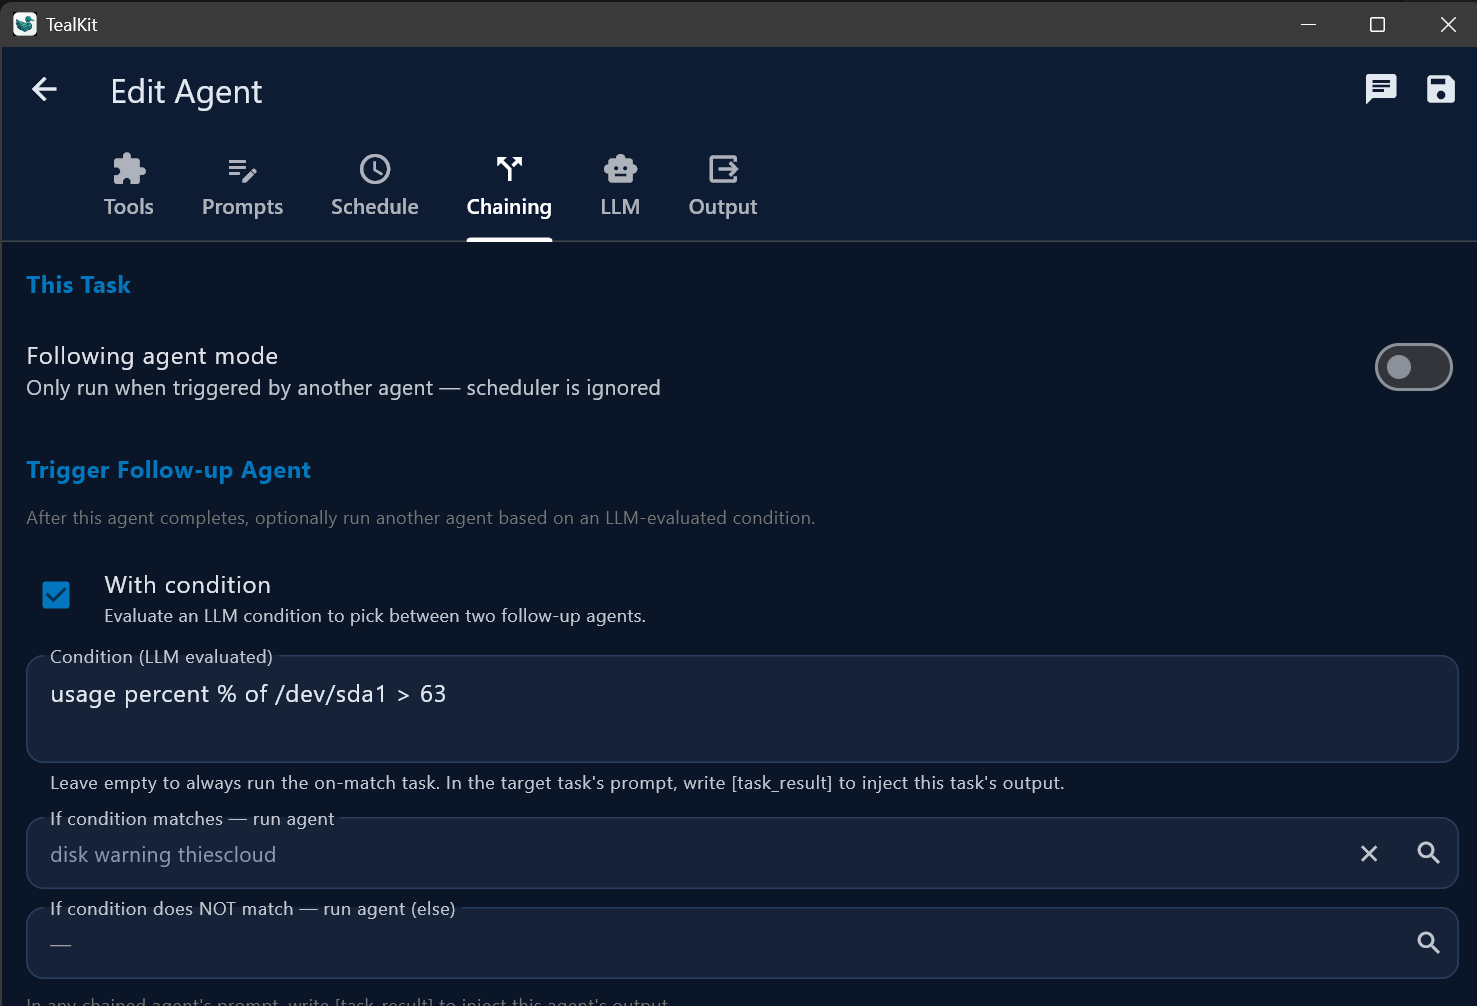
5 Agents
Agents are saved AI workflows that run automatically on a cron schedule, on demand, or triggered by another agent.
Agent list
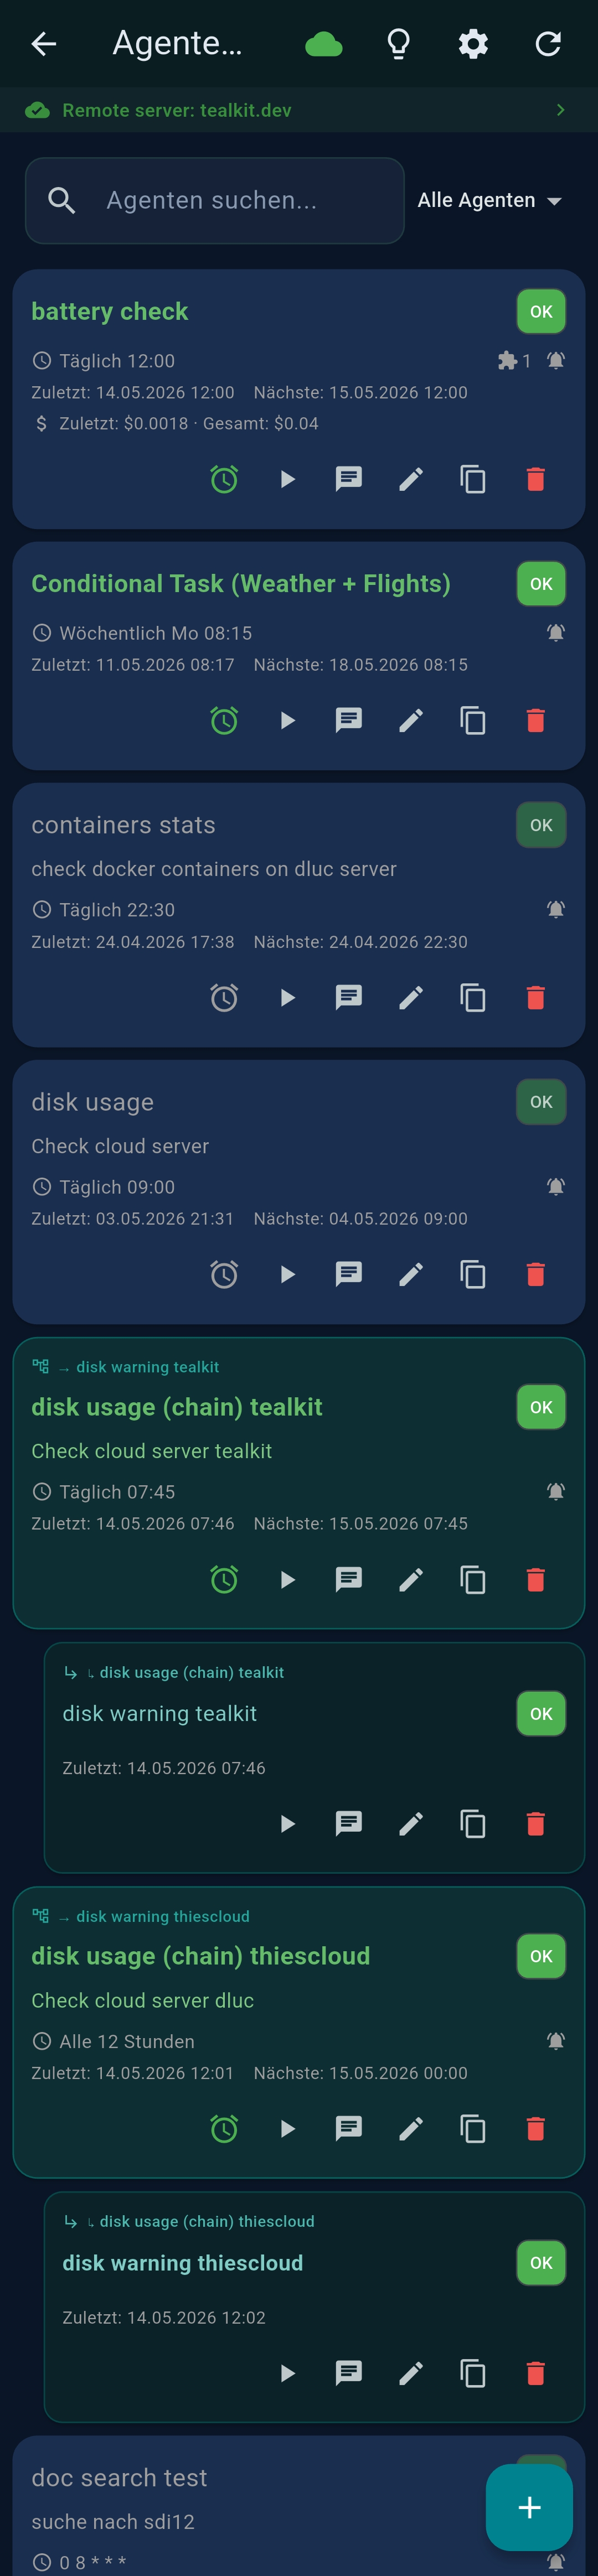
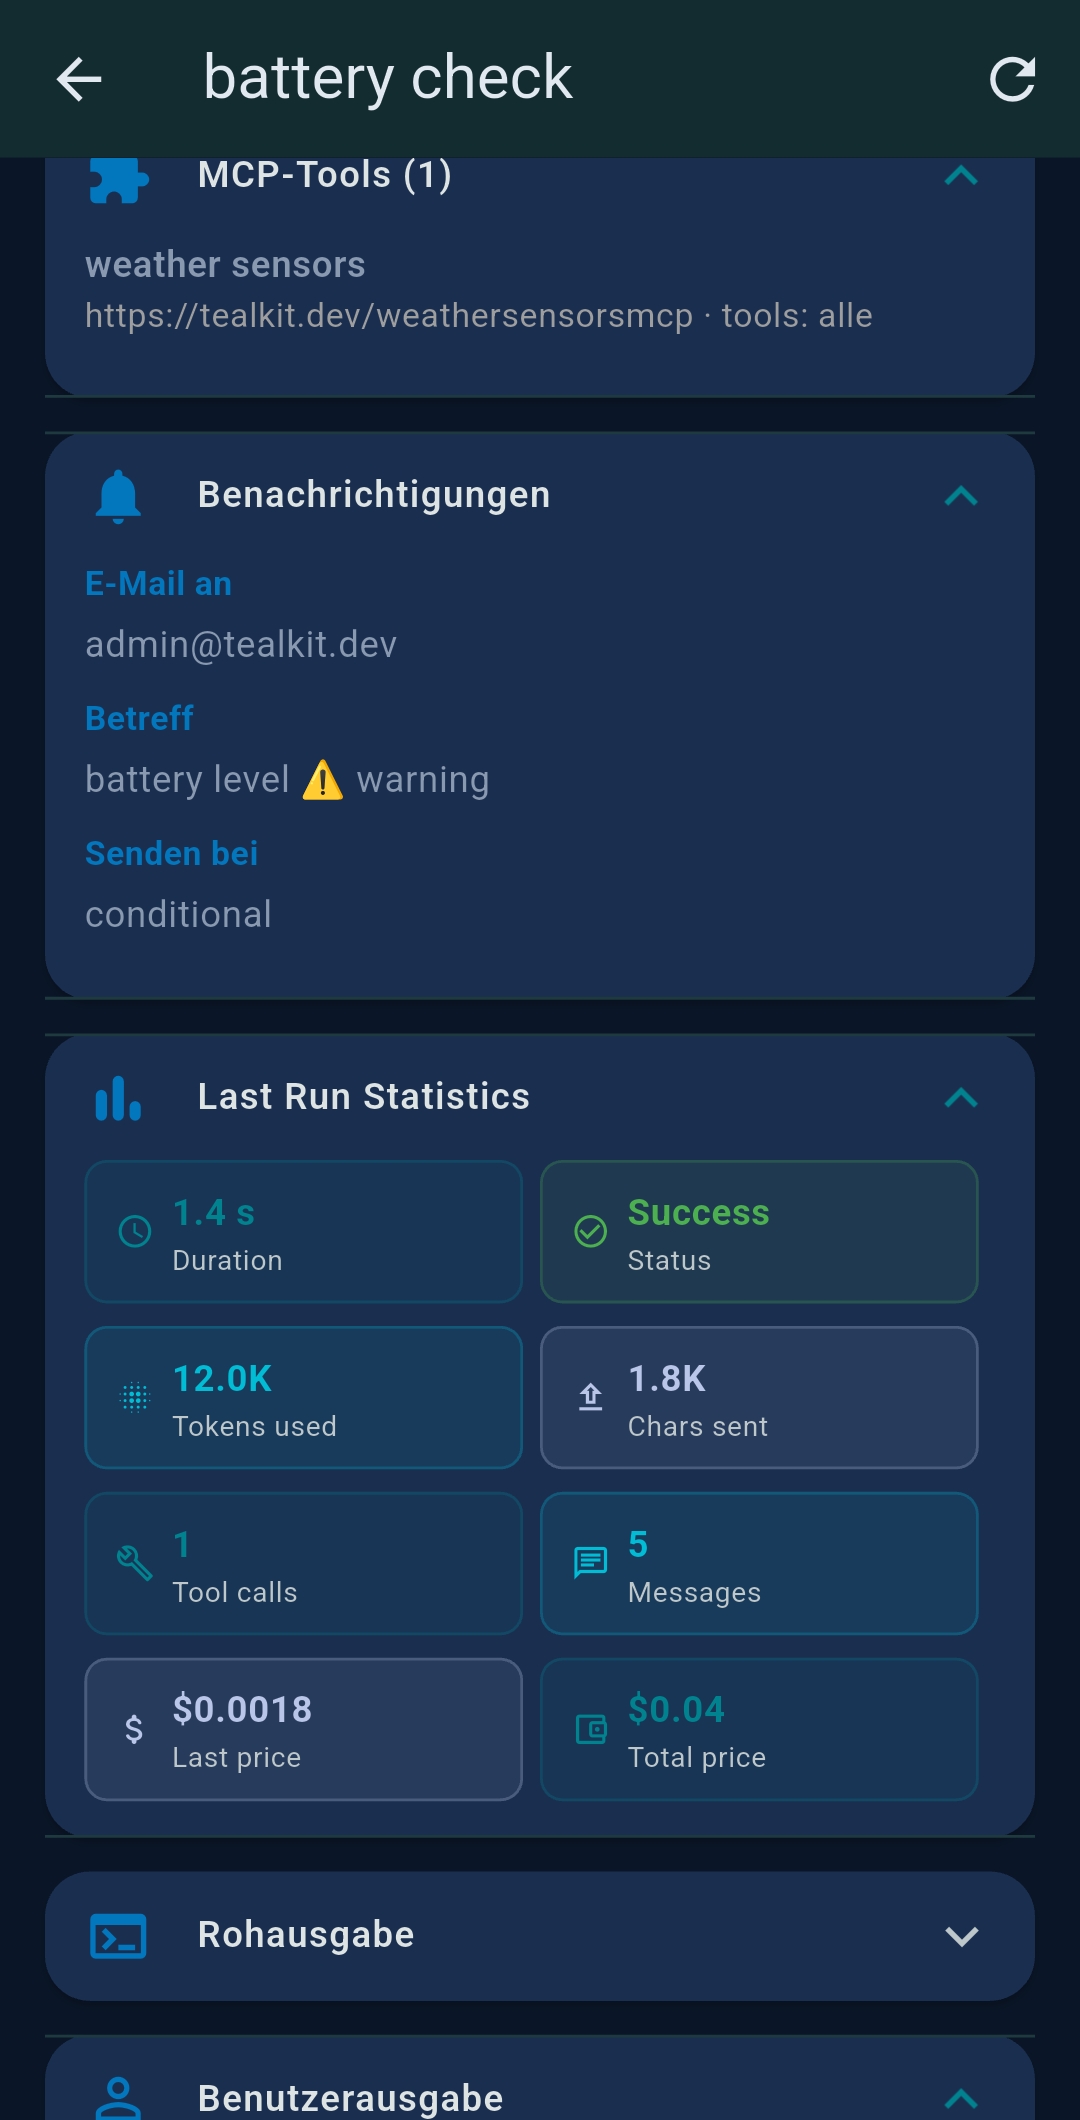
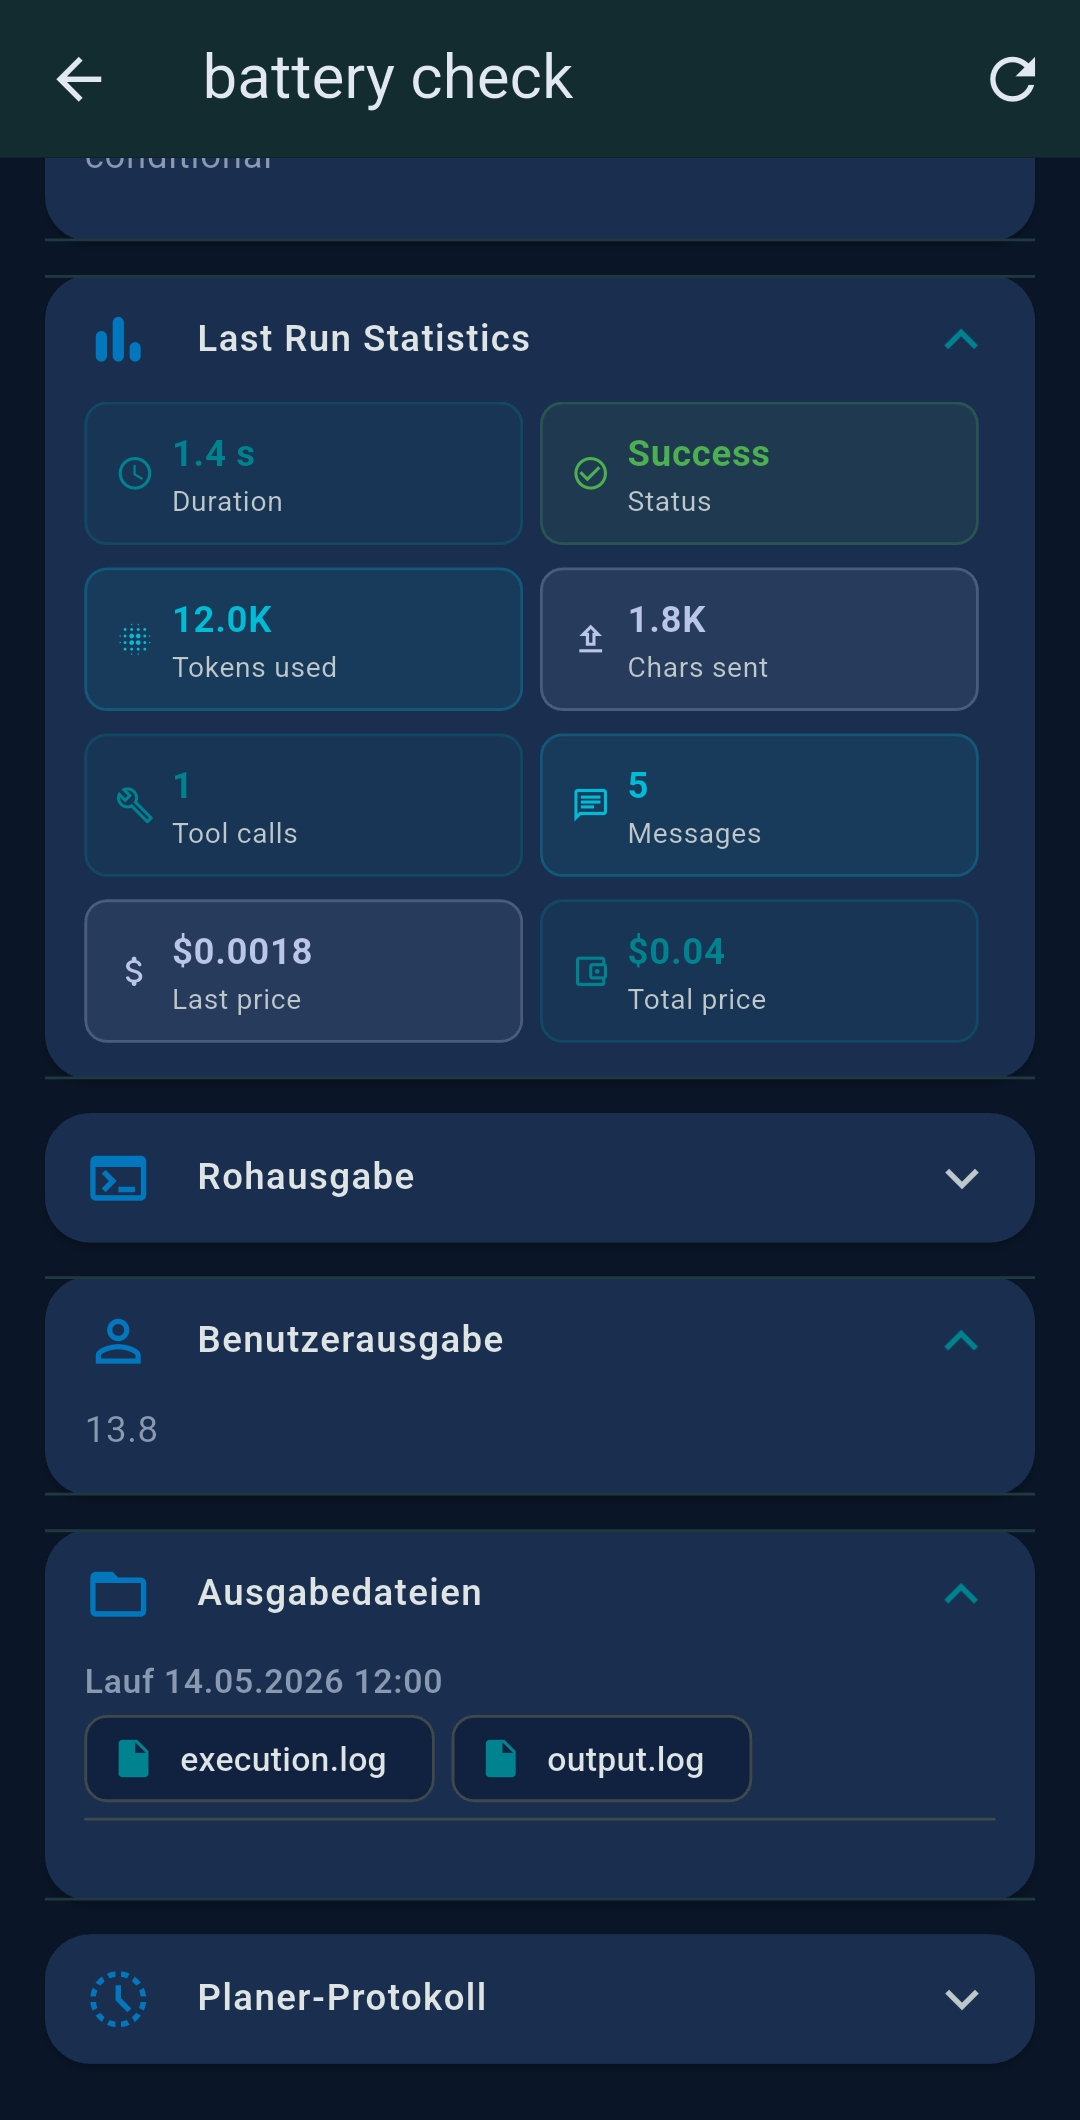
Each card shows: name, description, schedule, last/next run time, status badge, cost. Action buttons: ⏰ Schedule · ▶ Run · 💬 Chat/Interactive · ✏ Edit · 📋 Copy · 🗑 Delete. Chained agents appear as indented groups.
Agent editor
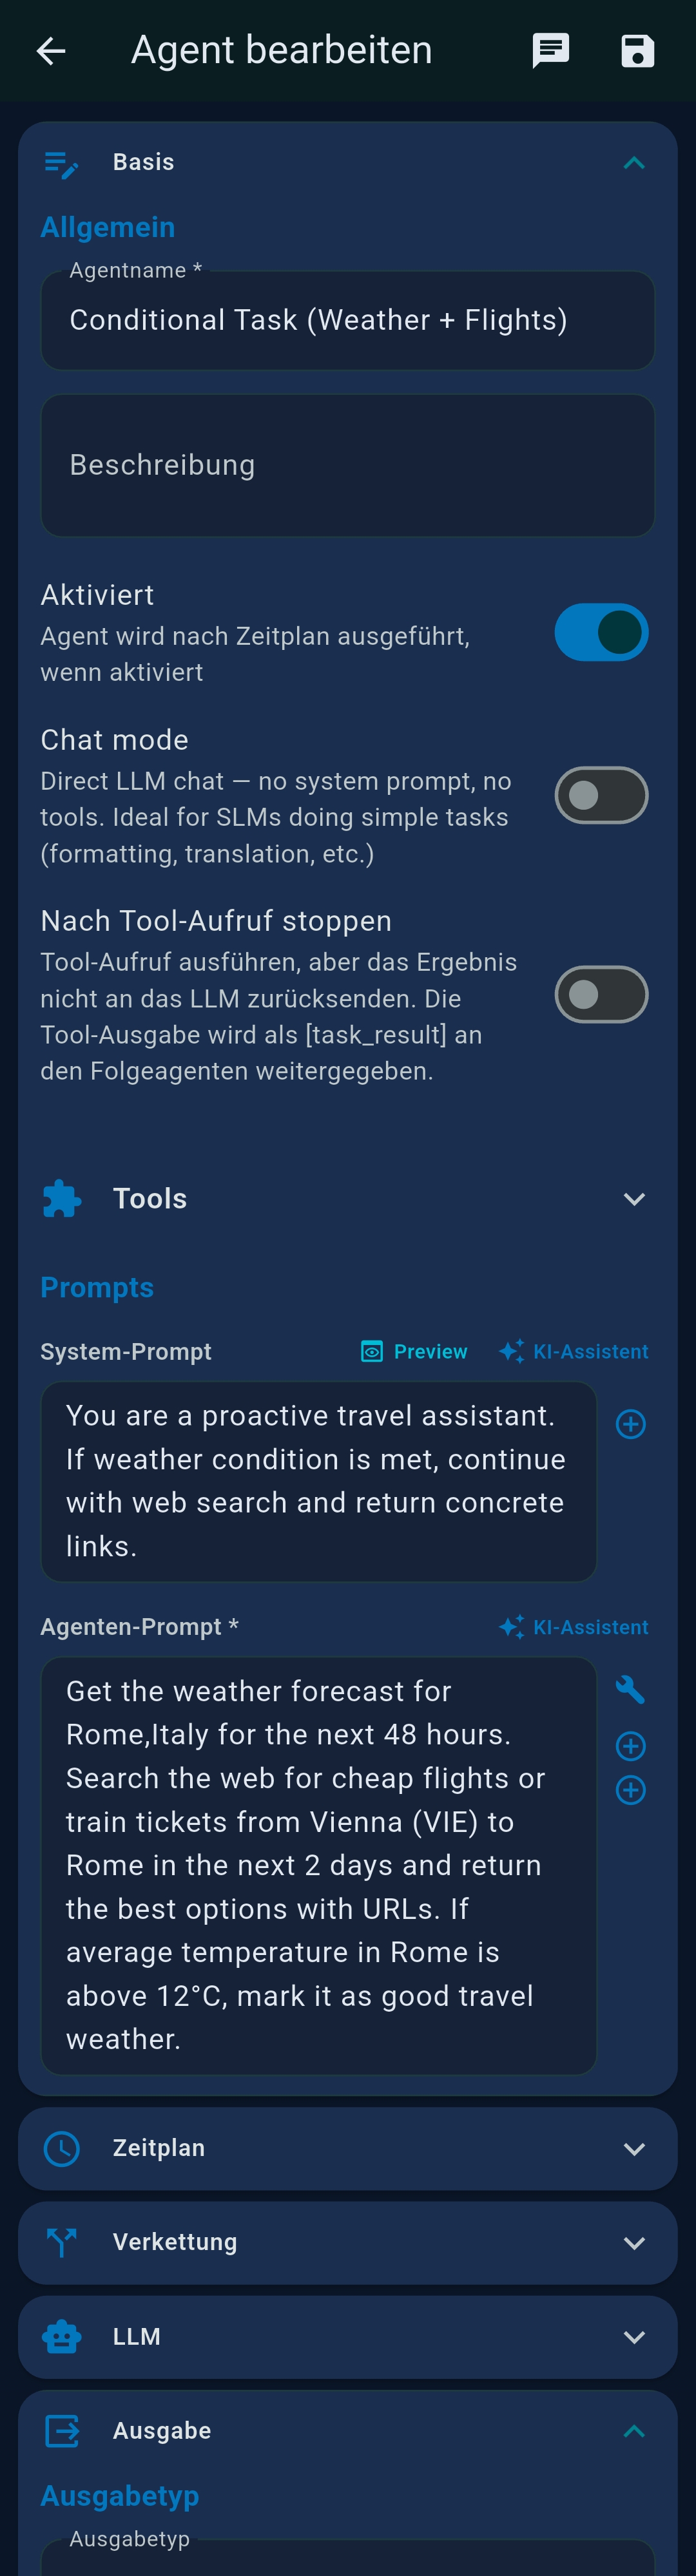
| Section | Contents |
|---|---|
| Basis | Name, description, Activated toggle, Chat mode, Stop after tool call |
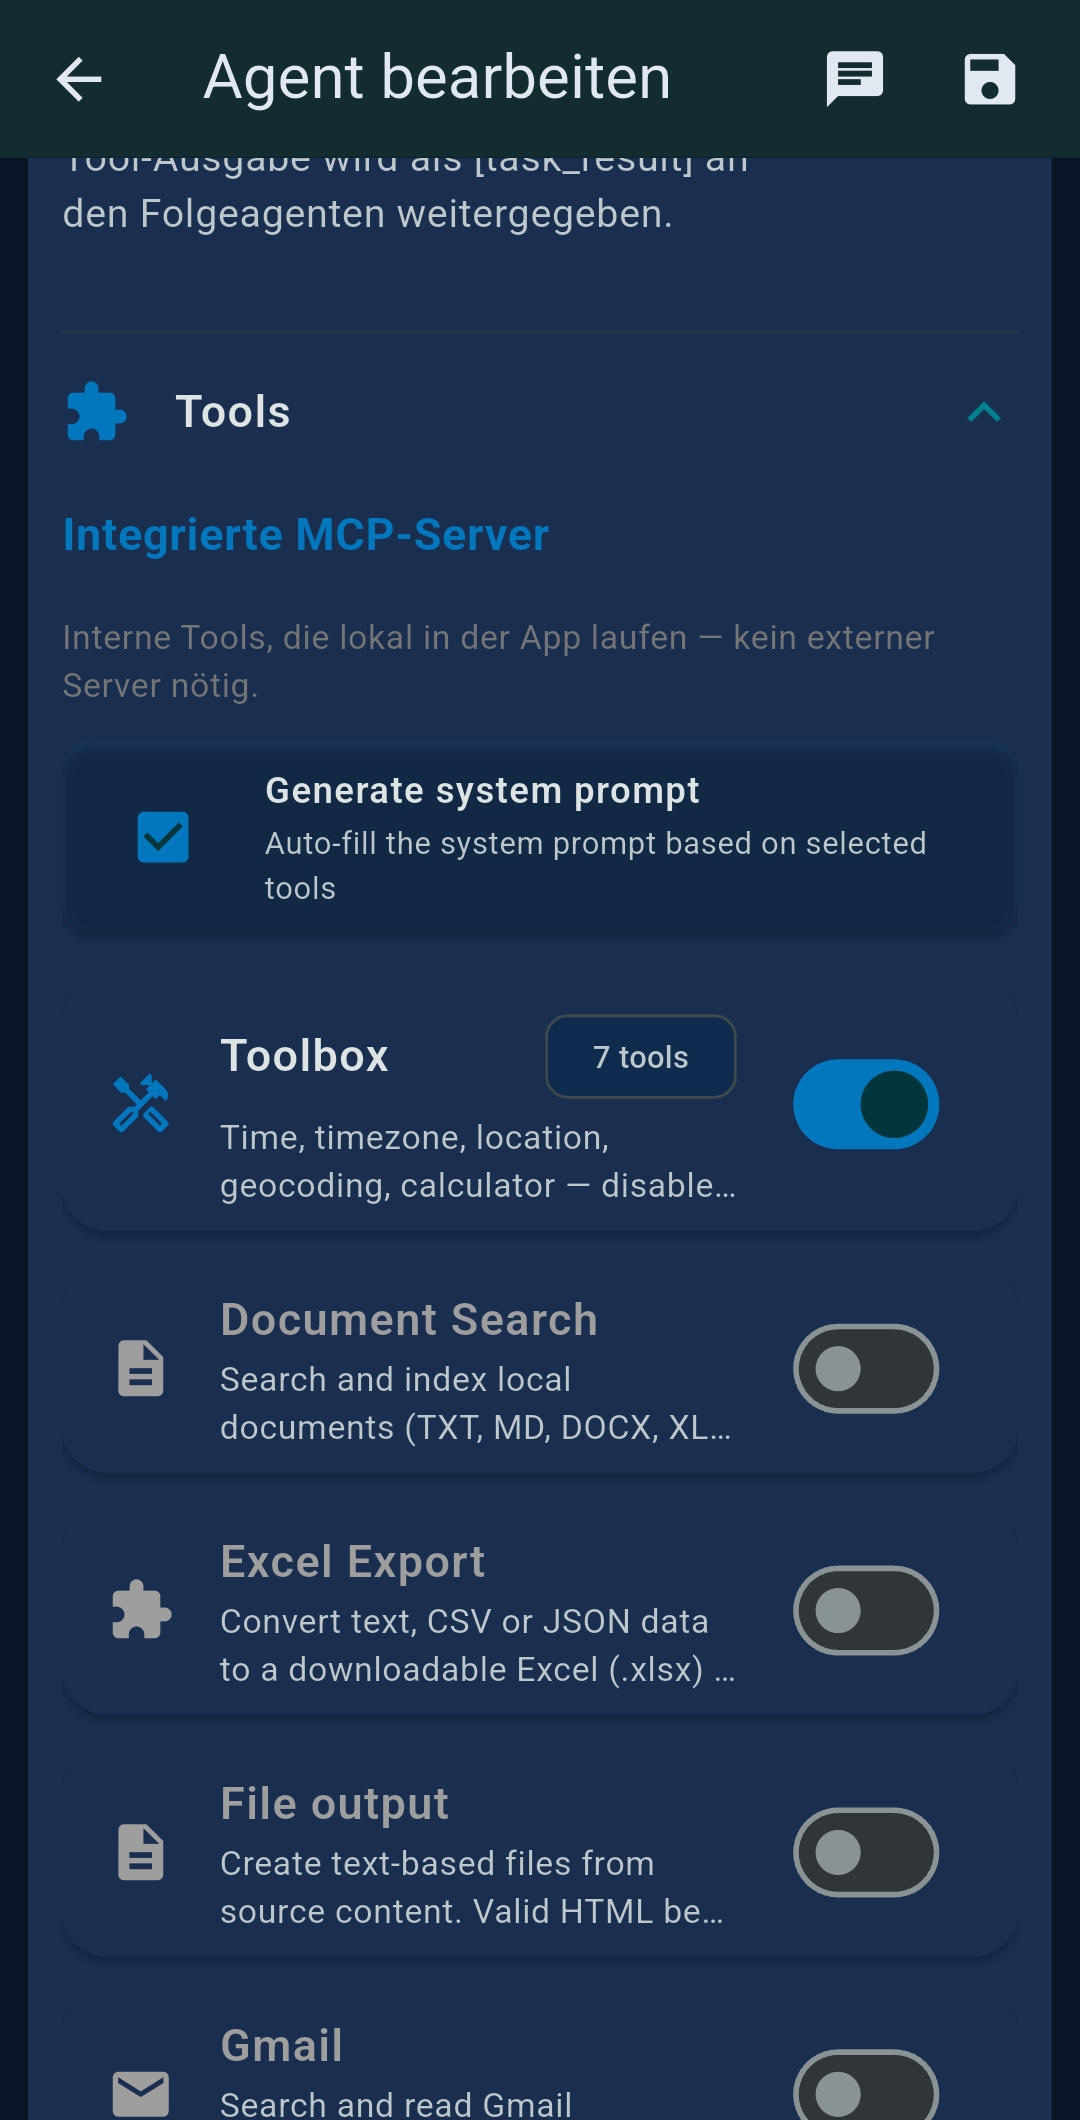
| Tools | MCP tool selection |
| Prompts | System Prompt (AI wizard), Agent Prompt (supports ++#++ split), per-step tools |
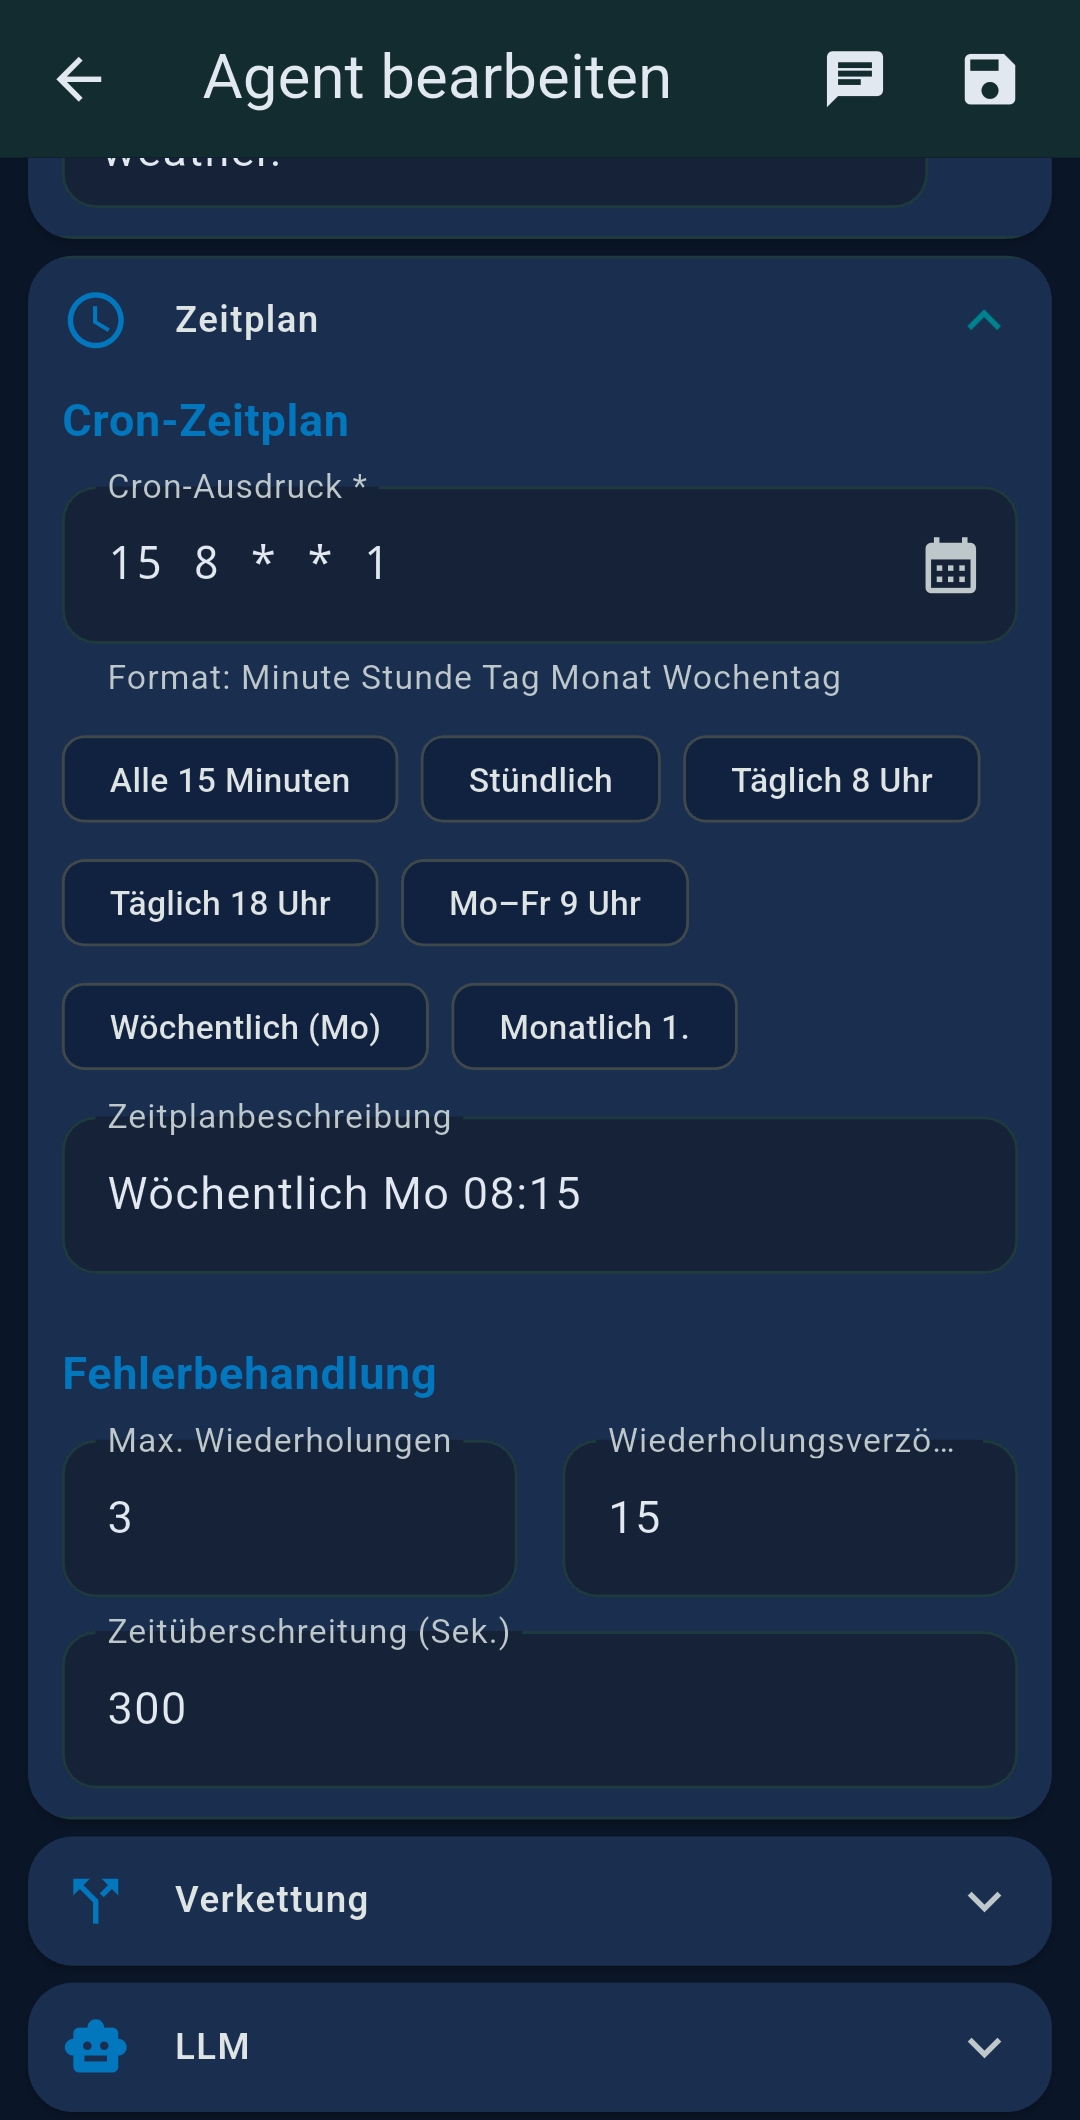
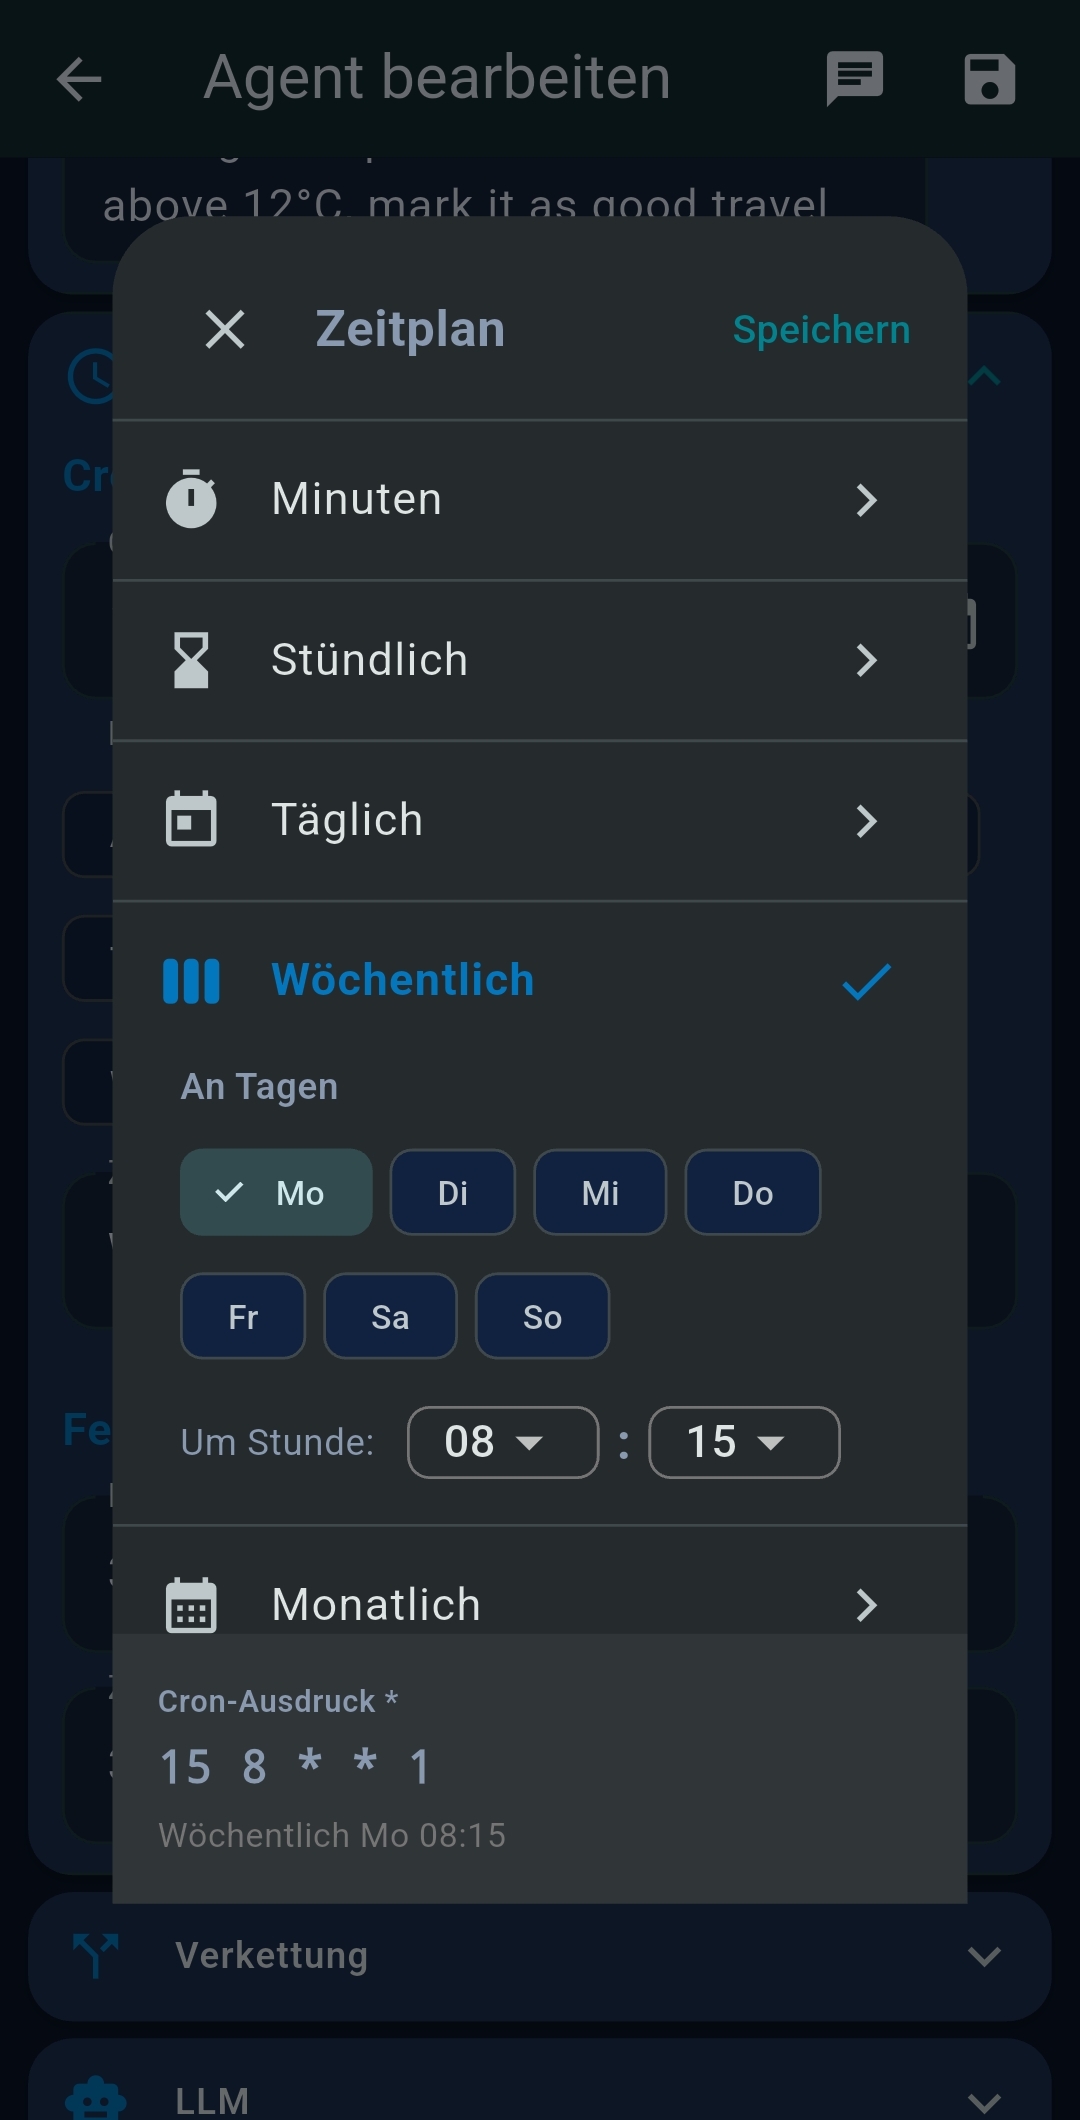
| Zeitplan (Schedule) | Cron expression, completion notification |
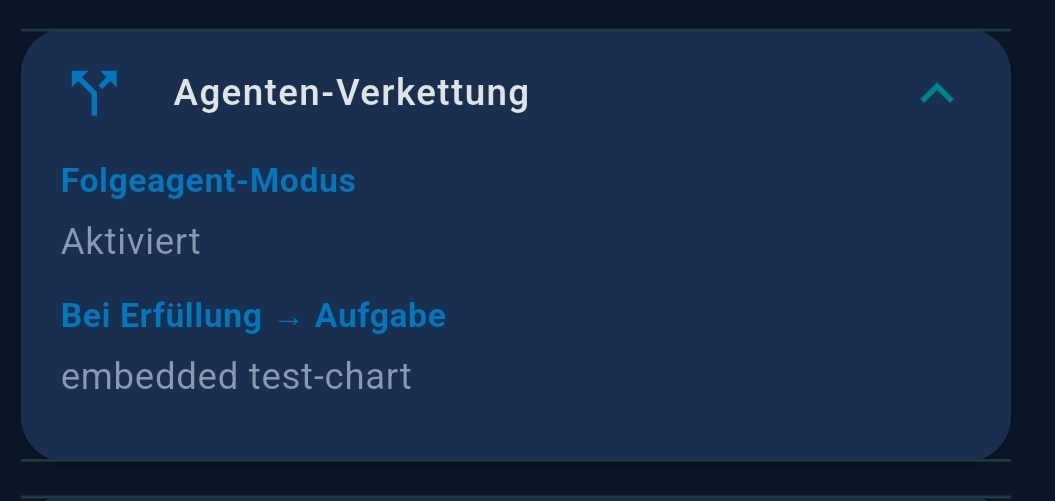
| Verkettung (Chaining) | Follow-up agent mode, conditional routing, successor selector |
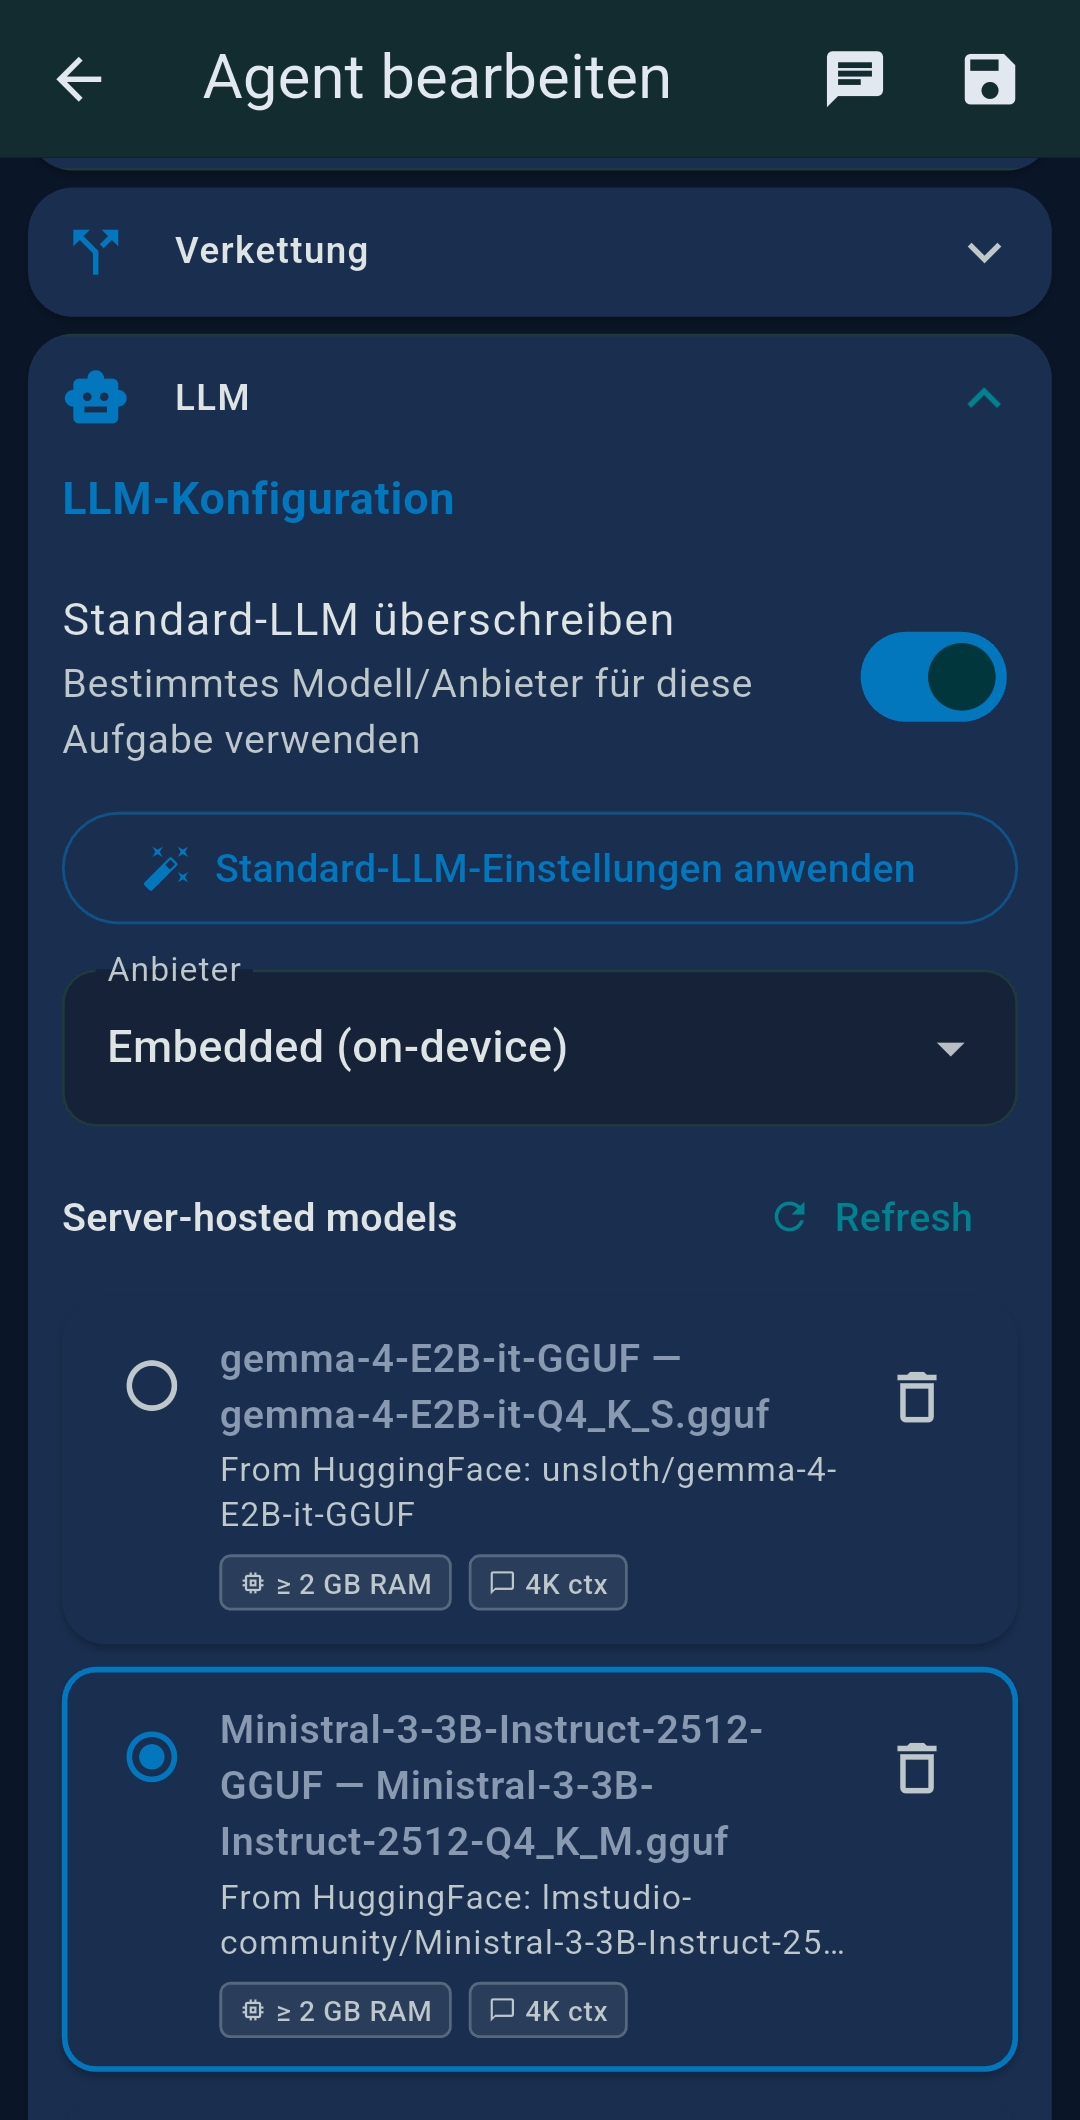
| LLM | Override global LLM for this agent, including Native Tool Calling toggle (Ollama only) |
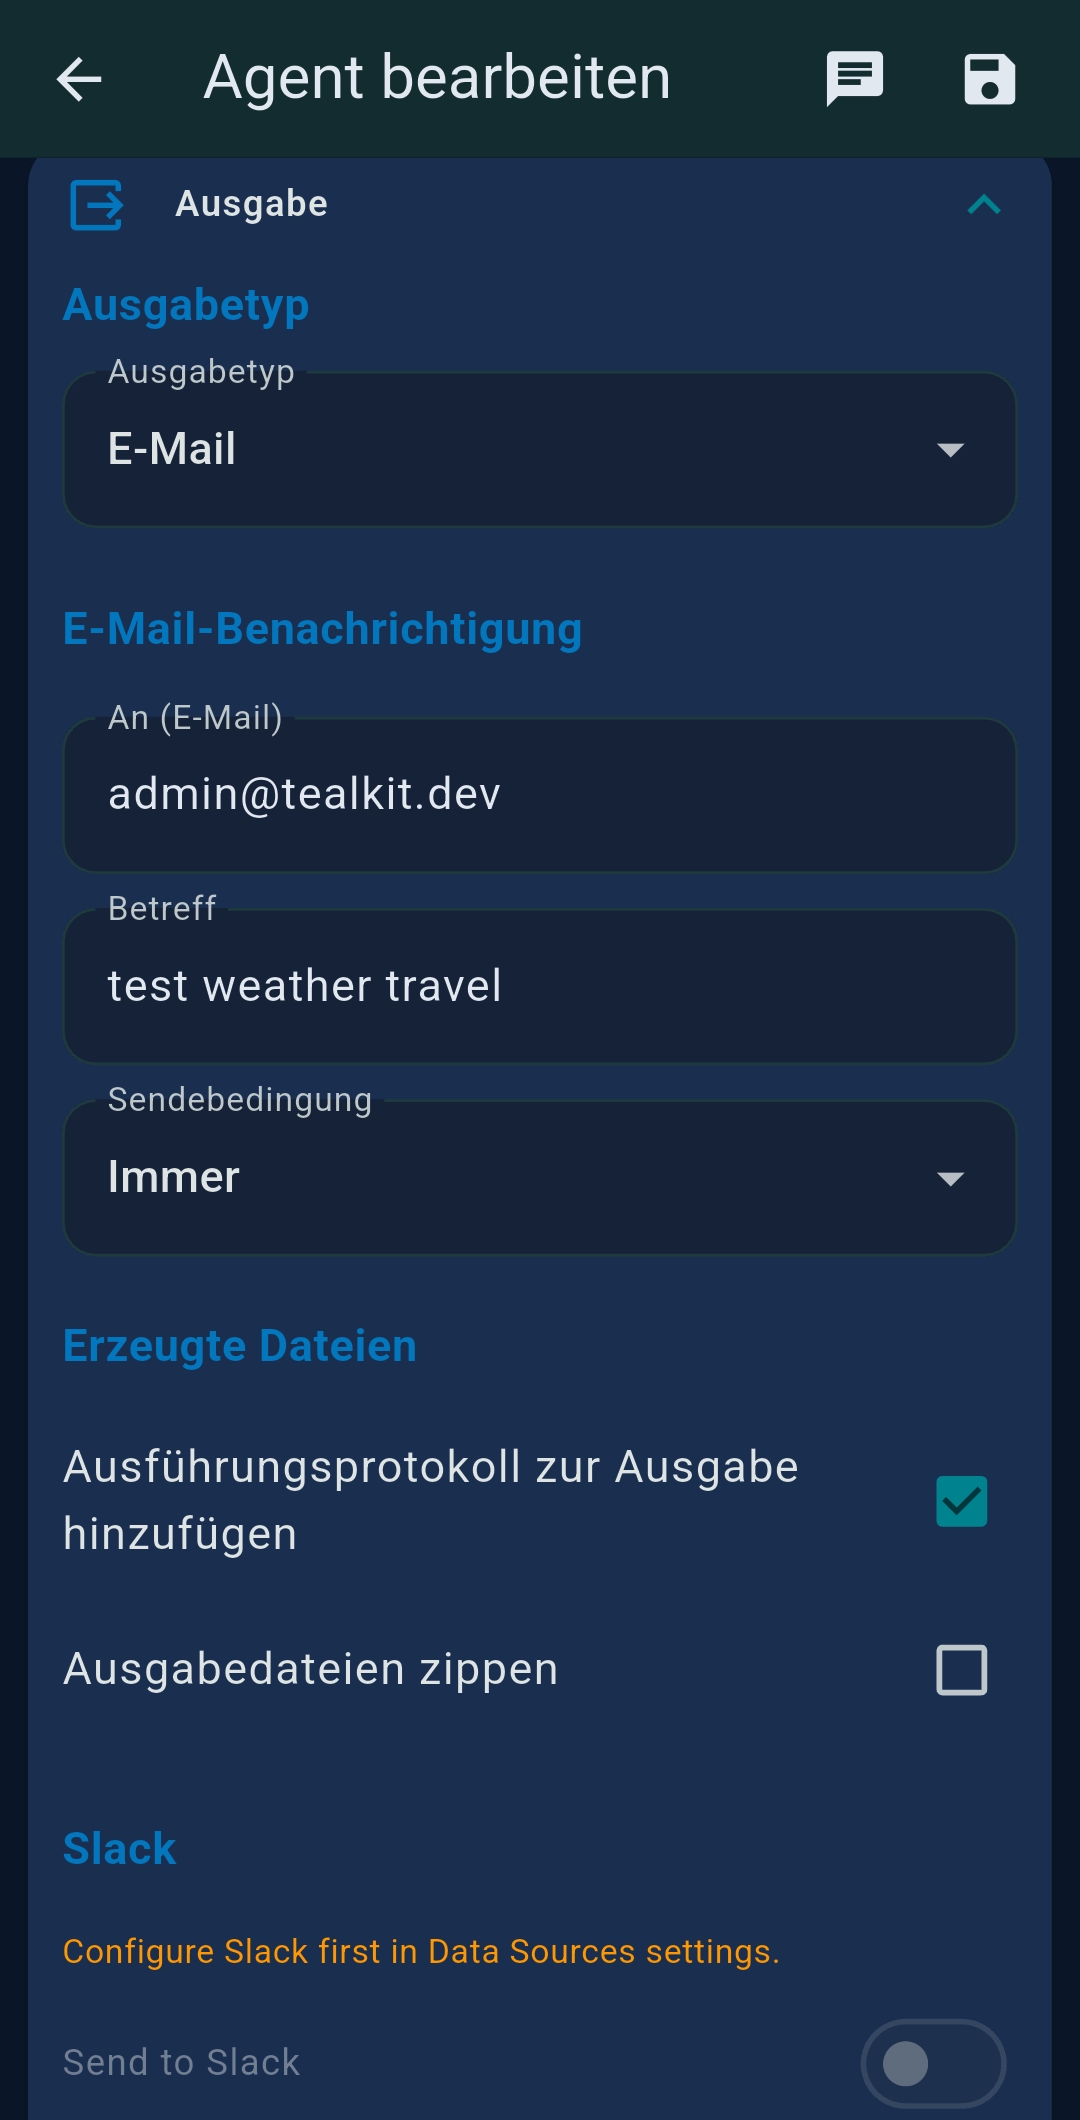
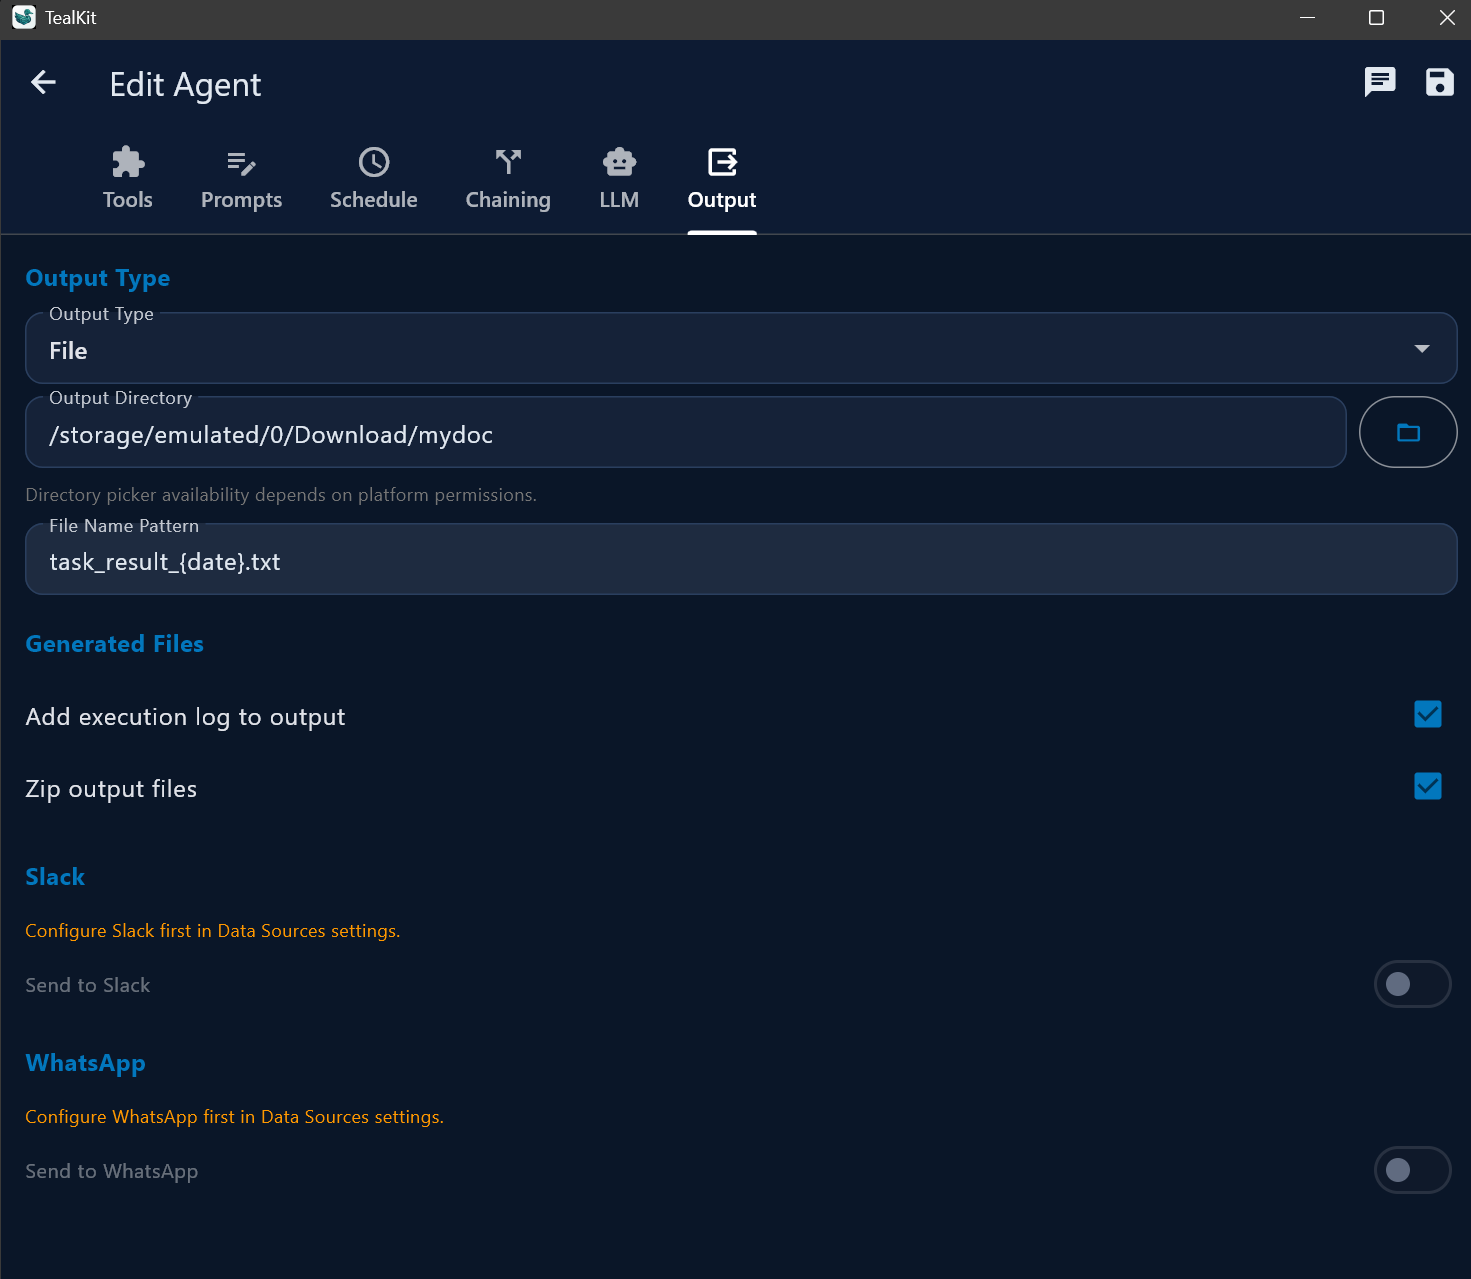
| Ausgabe (Output) | File, Email, Slack, WhatsApp, SFTP, ZIP |
Output channels
| Channel | Description |
|---|---|
| File | Save to local file (TXT, MD, HTML, JSON, CSV, PDF, PNG) |
| Send via configured SMTP server | |
| Slack | Post to Slack channel via Incoming Webhook |
| Send via WhatsApp Business API | |
| SFTP | Upload to remote server via SFTP |
| ZIP | Compress output before saving or uploading |
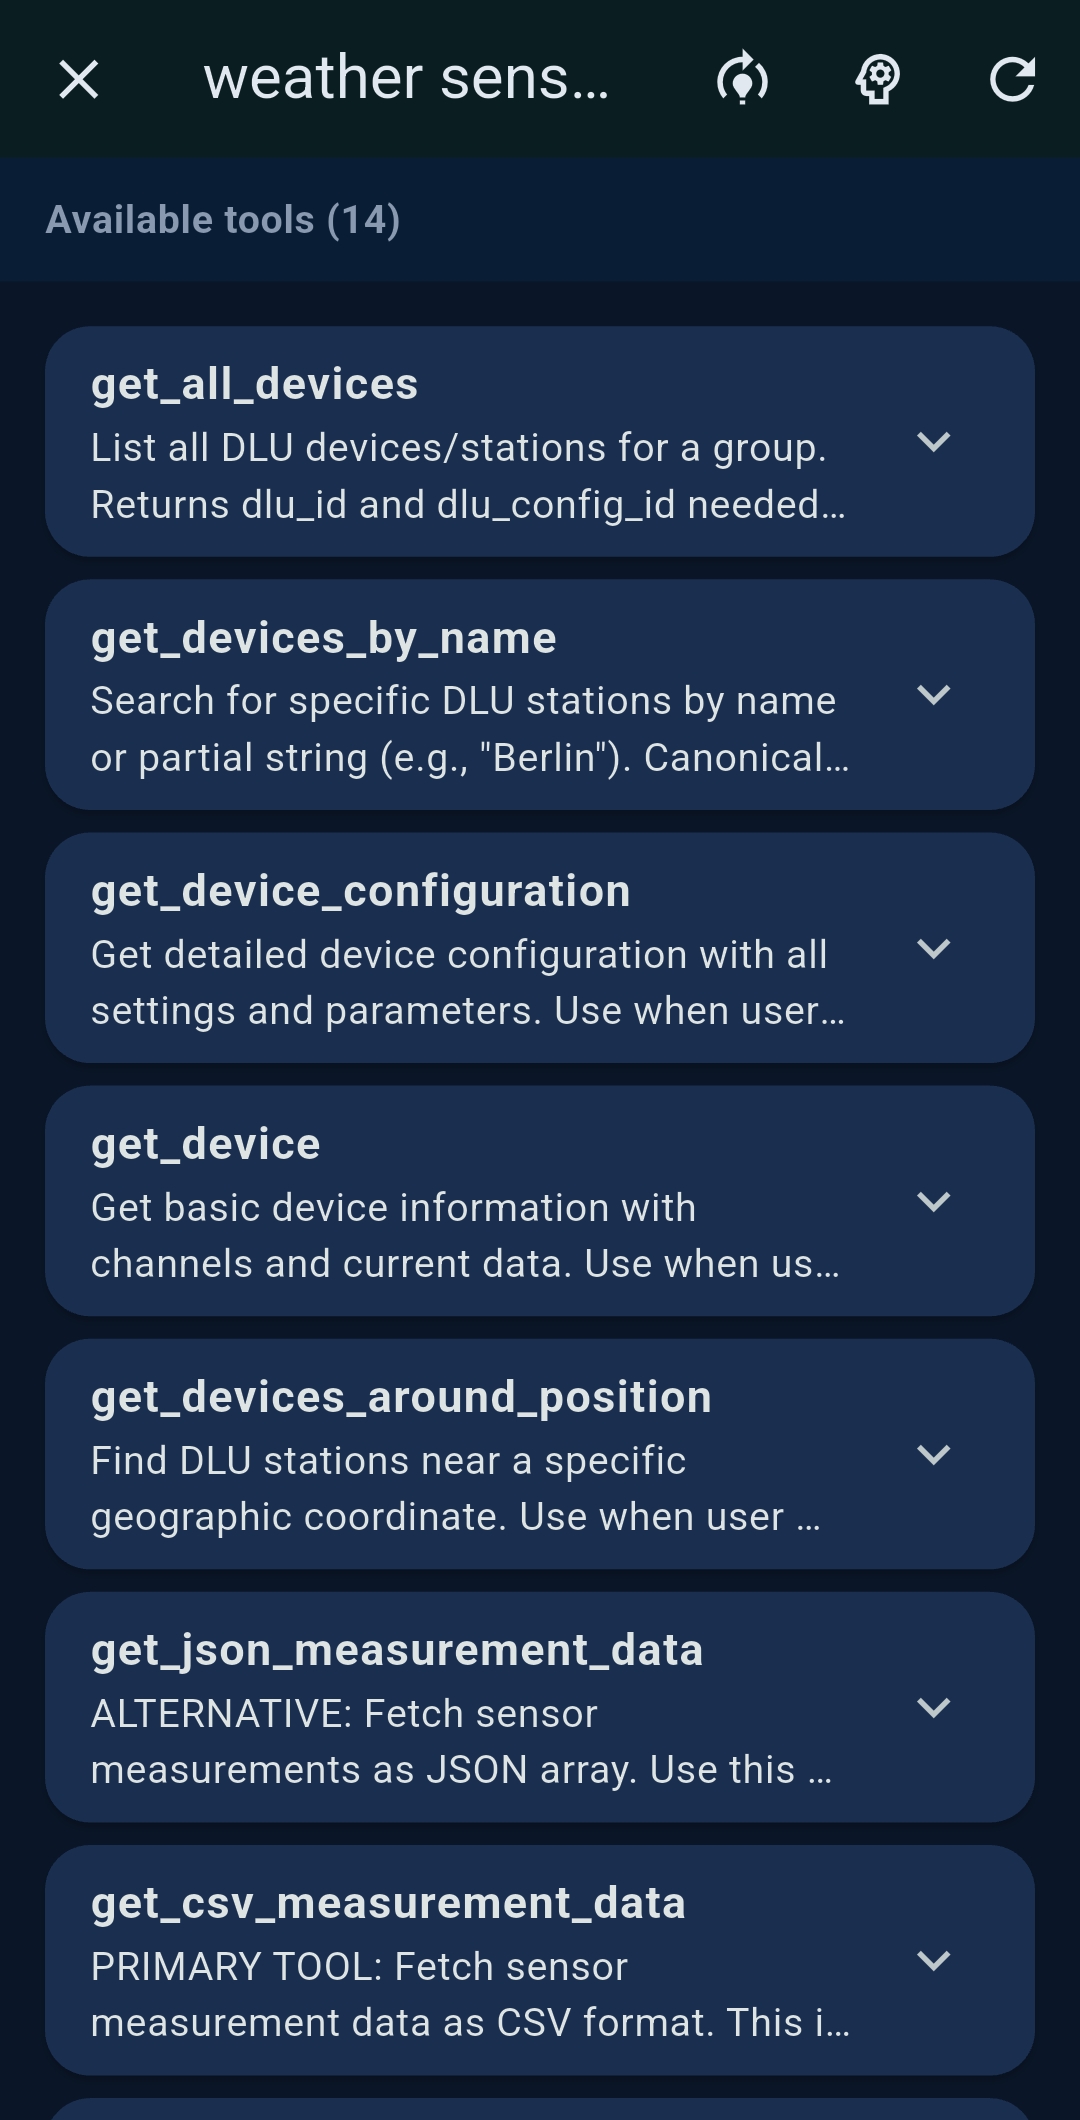
6 Tools Reference
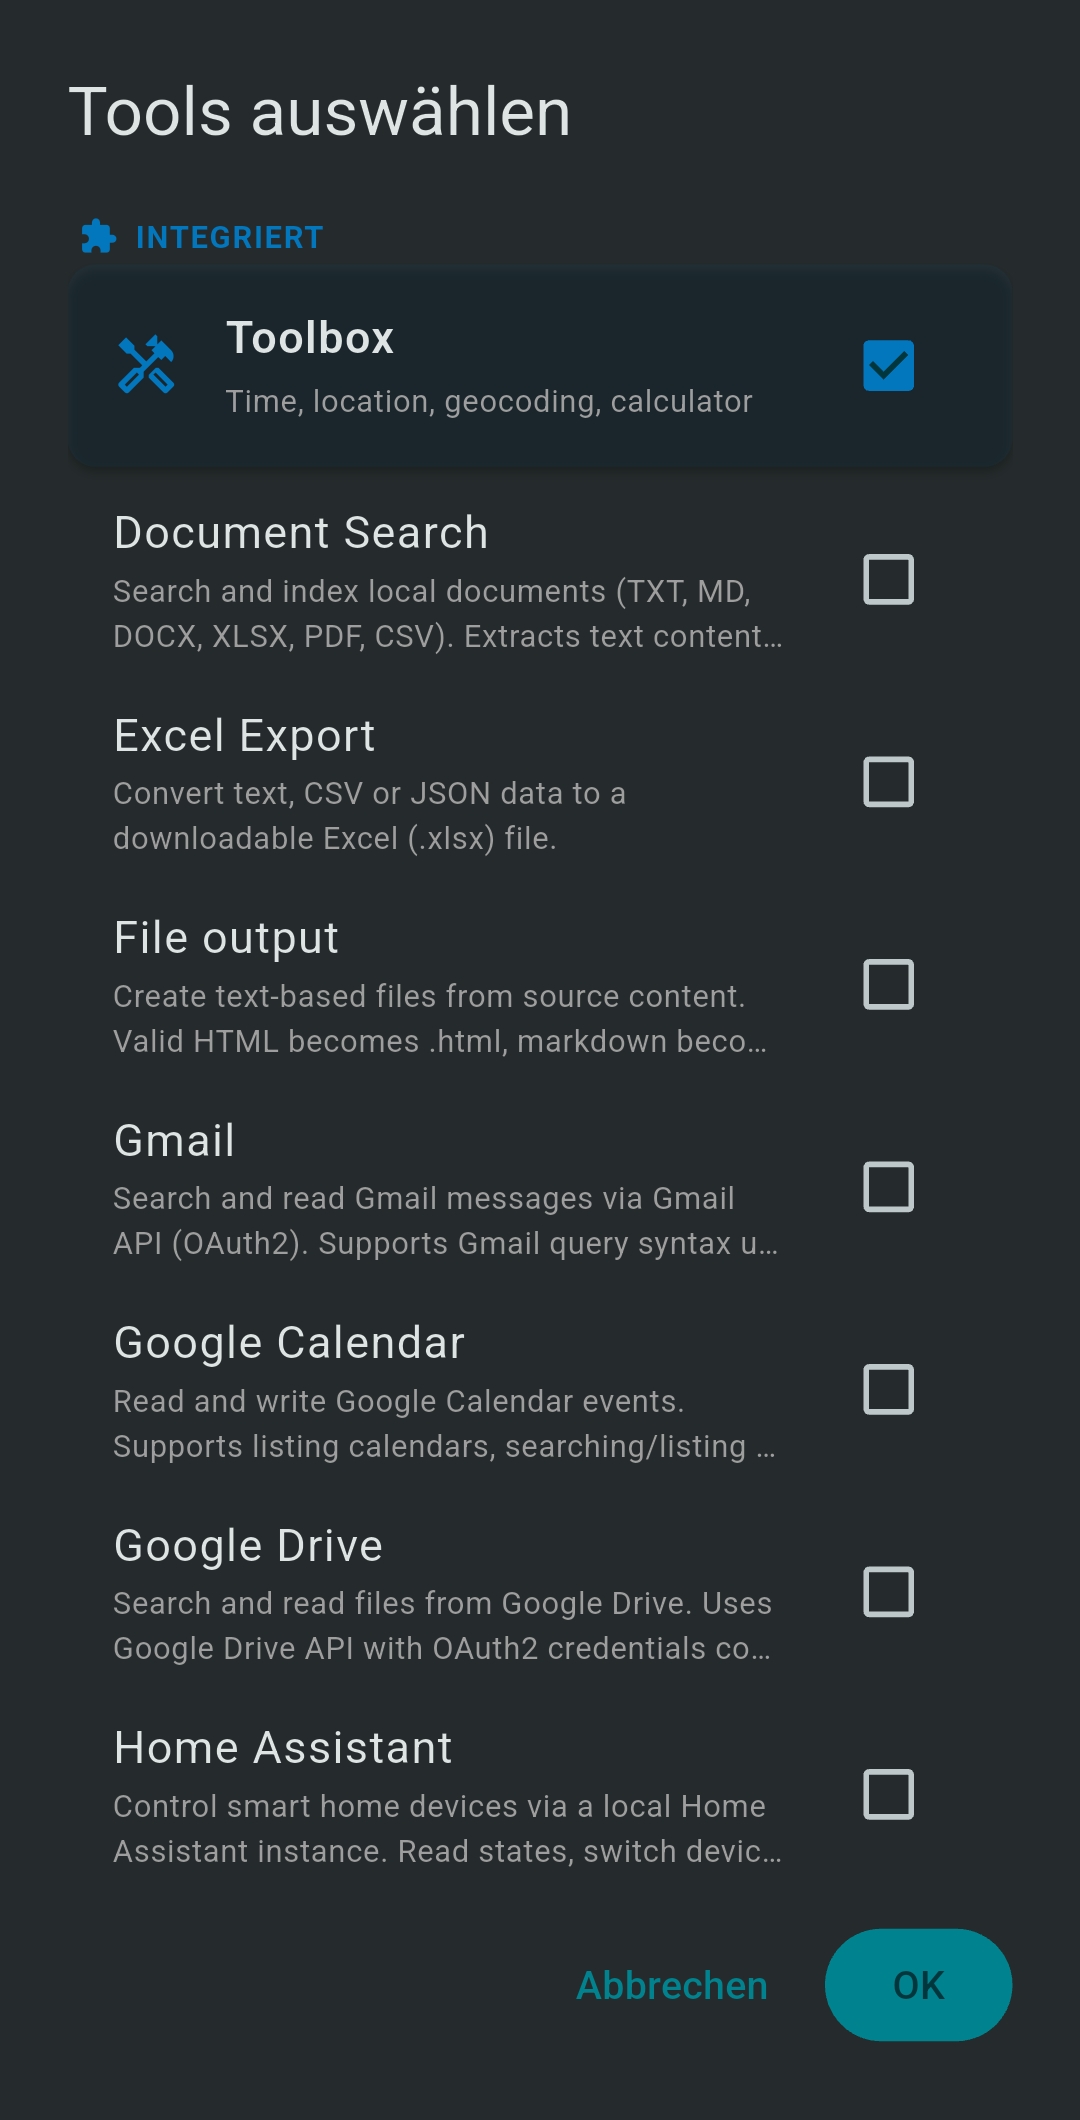
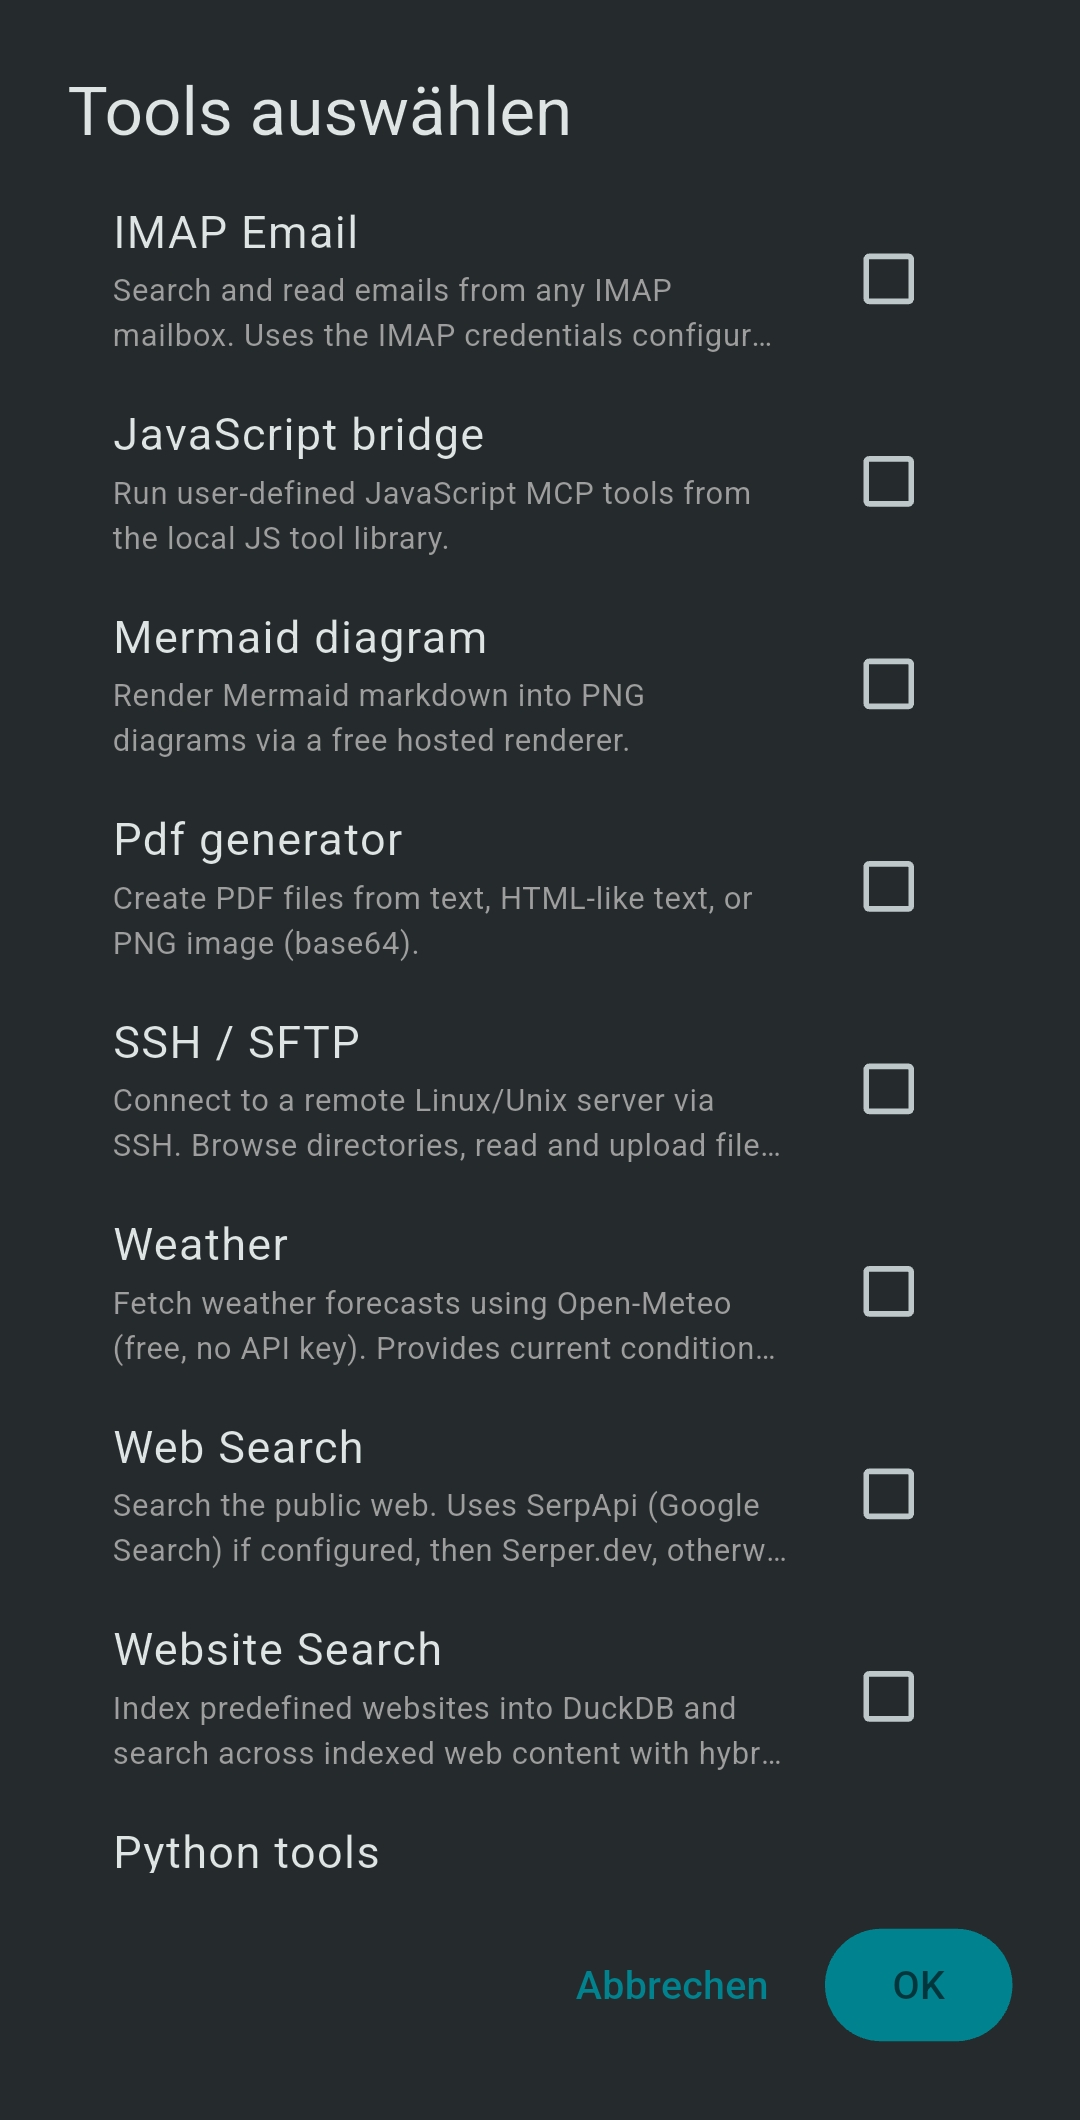
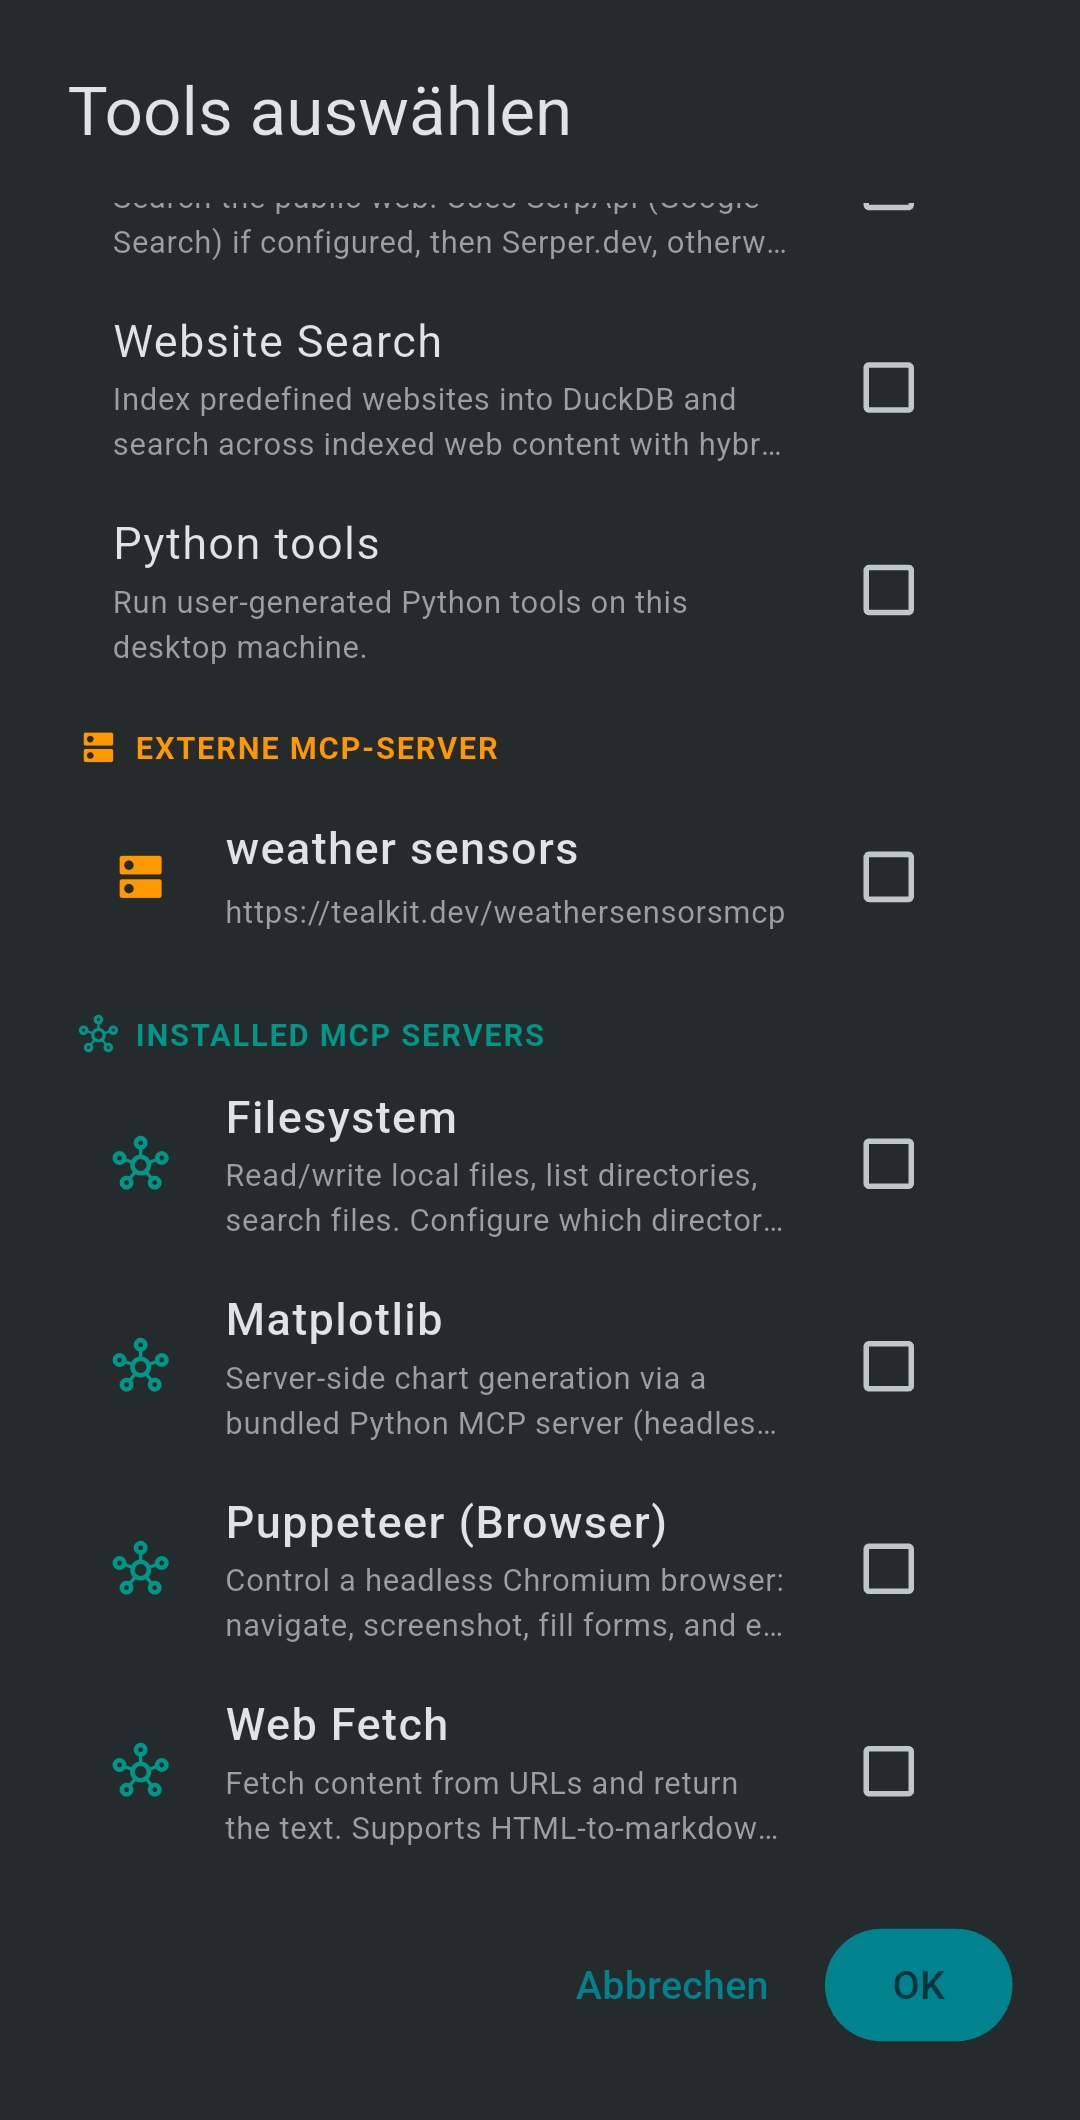
| Tool / Server | Description | Key tools |
|---|---|---|
| Web Search | Search the public web. Uses SerpApi → Serper.dev → Brave → DuckDuckGo (free fallback). | web_search |
| Website Search | Index websites into DuckDB and search with hybrid full-text + semantic search. | search_website, reindex_website |
| Document Search | Index local documents (PDF, DOCX, TXT, MD, CSV) and search with hybrid search. | search_documents, get_document_content, reindex |
| Weather | Fetch weather forecasts using Open-Meteo (free, no API key). | get_current_weather, get_hourly_forecast, get_daily_forecast |
| SSH/SFTP | Connect to remote Linux/Unix server. Browse, read/write files, run scripts. | ssh_execute, sftp_list, sftp_read, sftp_upload |
| IMAP Email | Search and read emails from any IMAP mailbox. | search_emails, read_email |
| Home Assistant | Control smart home via HA REST API. | ha_get_states, ha_call_service |
| JavaScript Bridge | Run user-defined JS tools from the local JS tool library. | run_js_tool, js_<name> |
| PDF Generator | Create PDFs from text, HTML, or base64 PNG images. | create_pdf |
| Mermaid Diagram | Render Mermaid markdown into PNG diagrams. | render_mermaid |
| Chart Generator | Create line, bar, pie charts as PNG from structured data. | create_chart_png |
| Location | Device location, geocoding, timezone info. | get_current_location, geocode_city, get_timezone_info |
| Calculator | Evaluate math expressions and unit conversions. | calculate, sum_numbers |
| Python Tools | Run Python MCP tools on the local desktop machine. | Custom tools from Python Tool Library |
| PowerShell Bridge | Execute PowerShell scripts locally on Windows. | run_ps_script, list_ps_scripts |
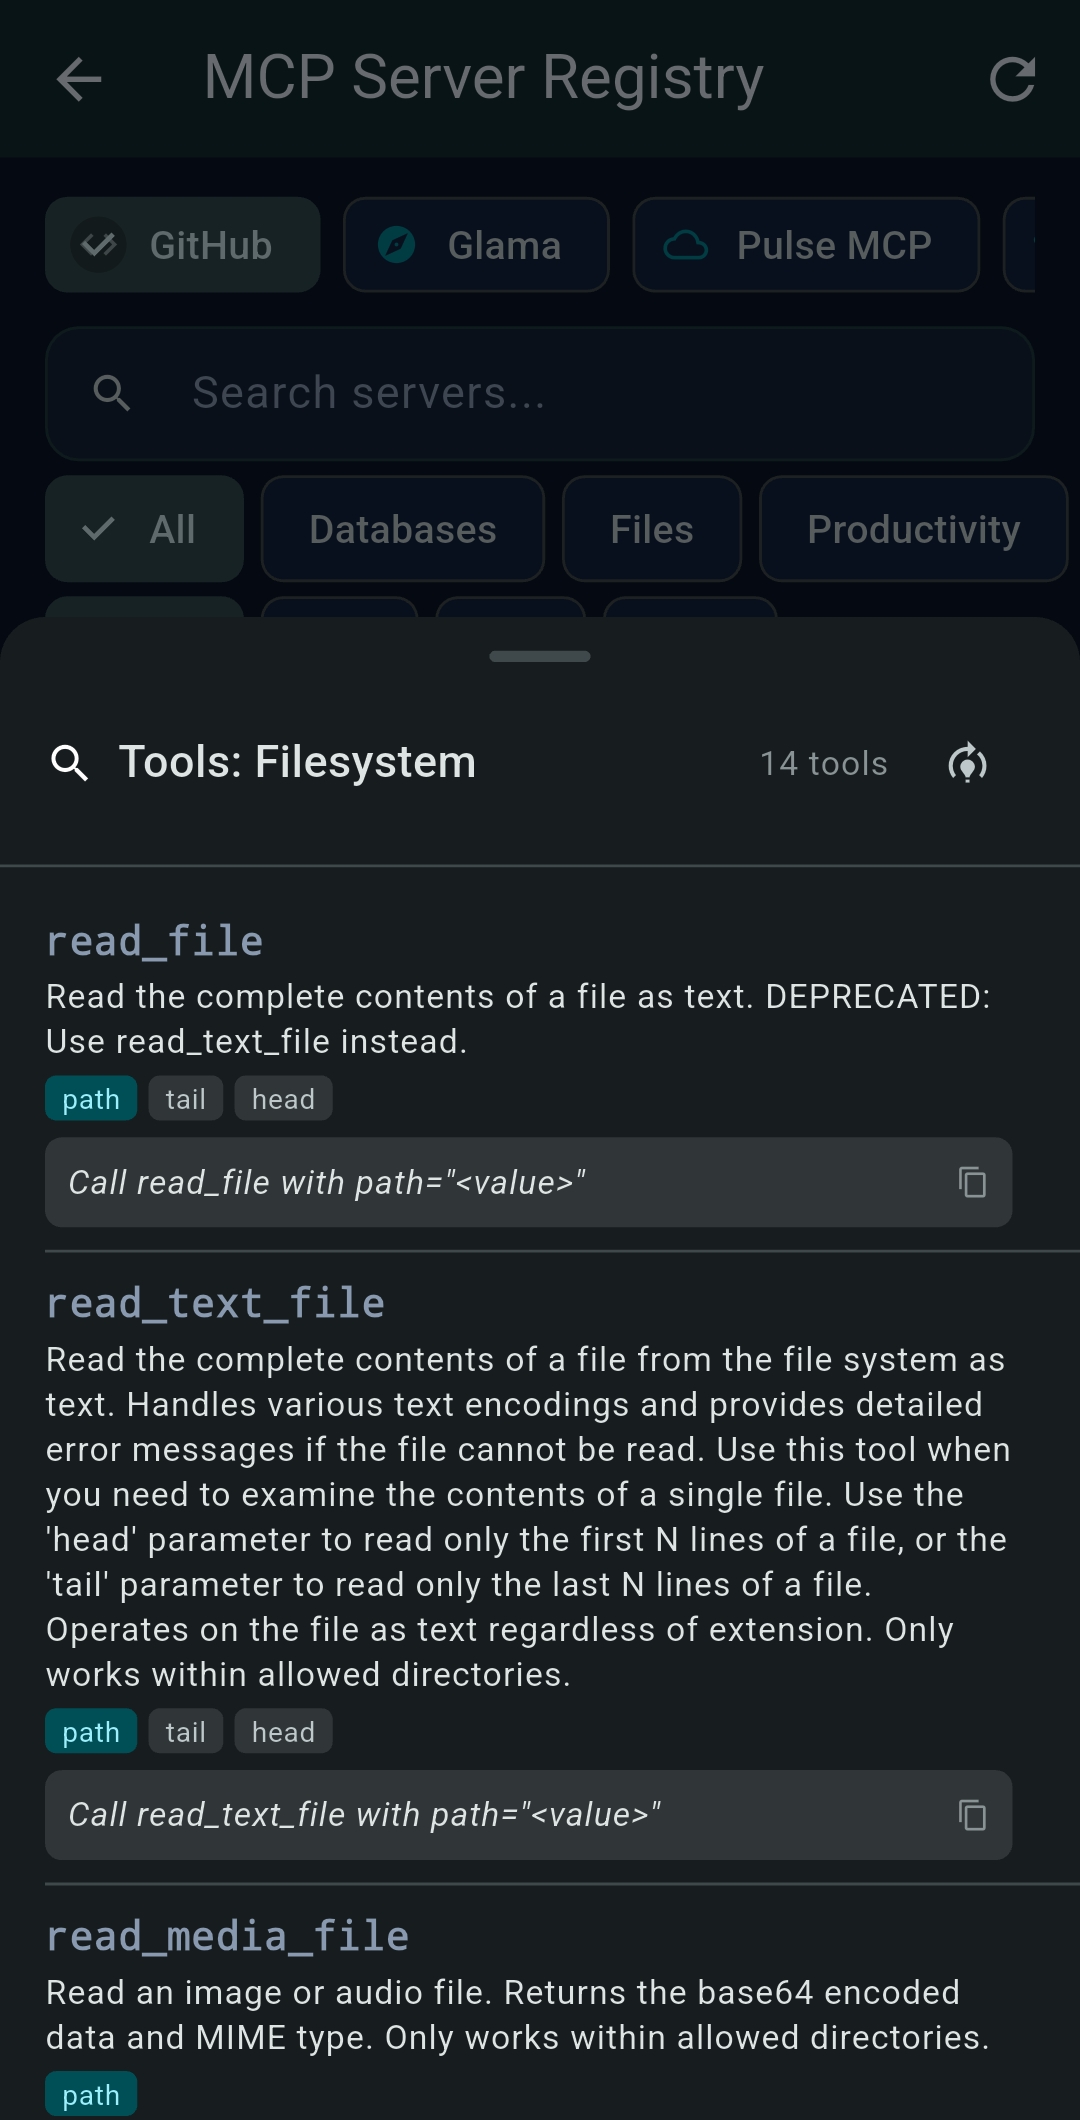
| Filesystem (registry) | Read/write local files within allowed paths. | read_file, write_file, list_directory |
| Web Fetch (registry) | Fetch URL content; HTML-to-markdown conversion. | fetch |
| Puppeteer (registry) | Control headless Chromium: navigate, screenshot, fill forms. | navigate, screenshot, click |
7 Advanced Topics
7.1 Chained Agents

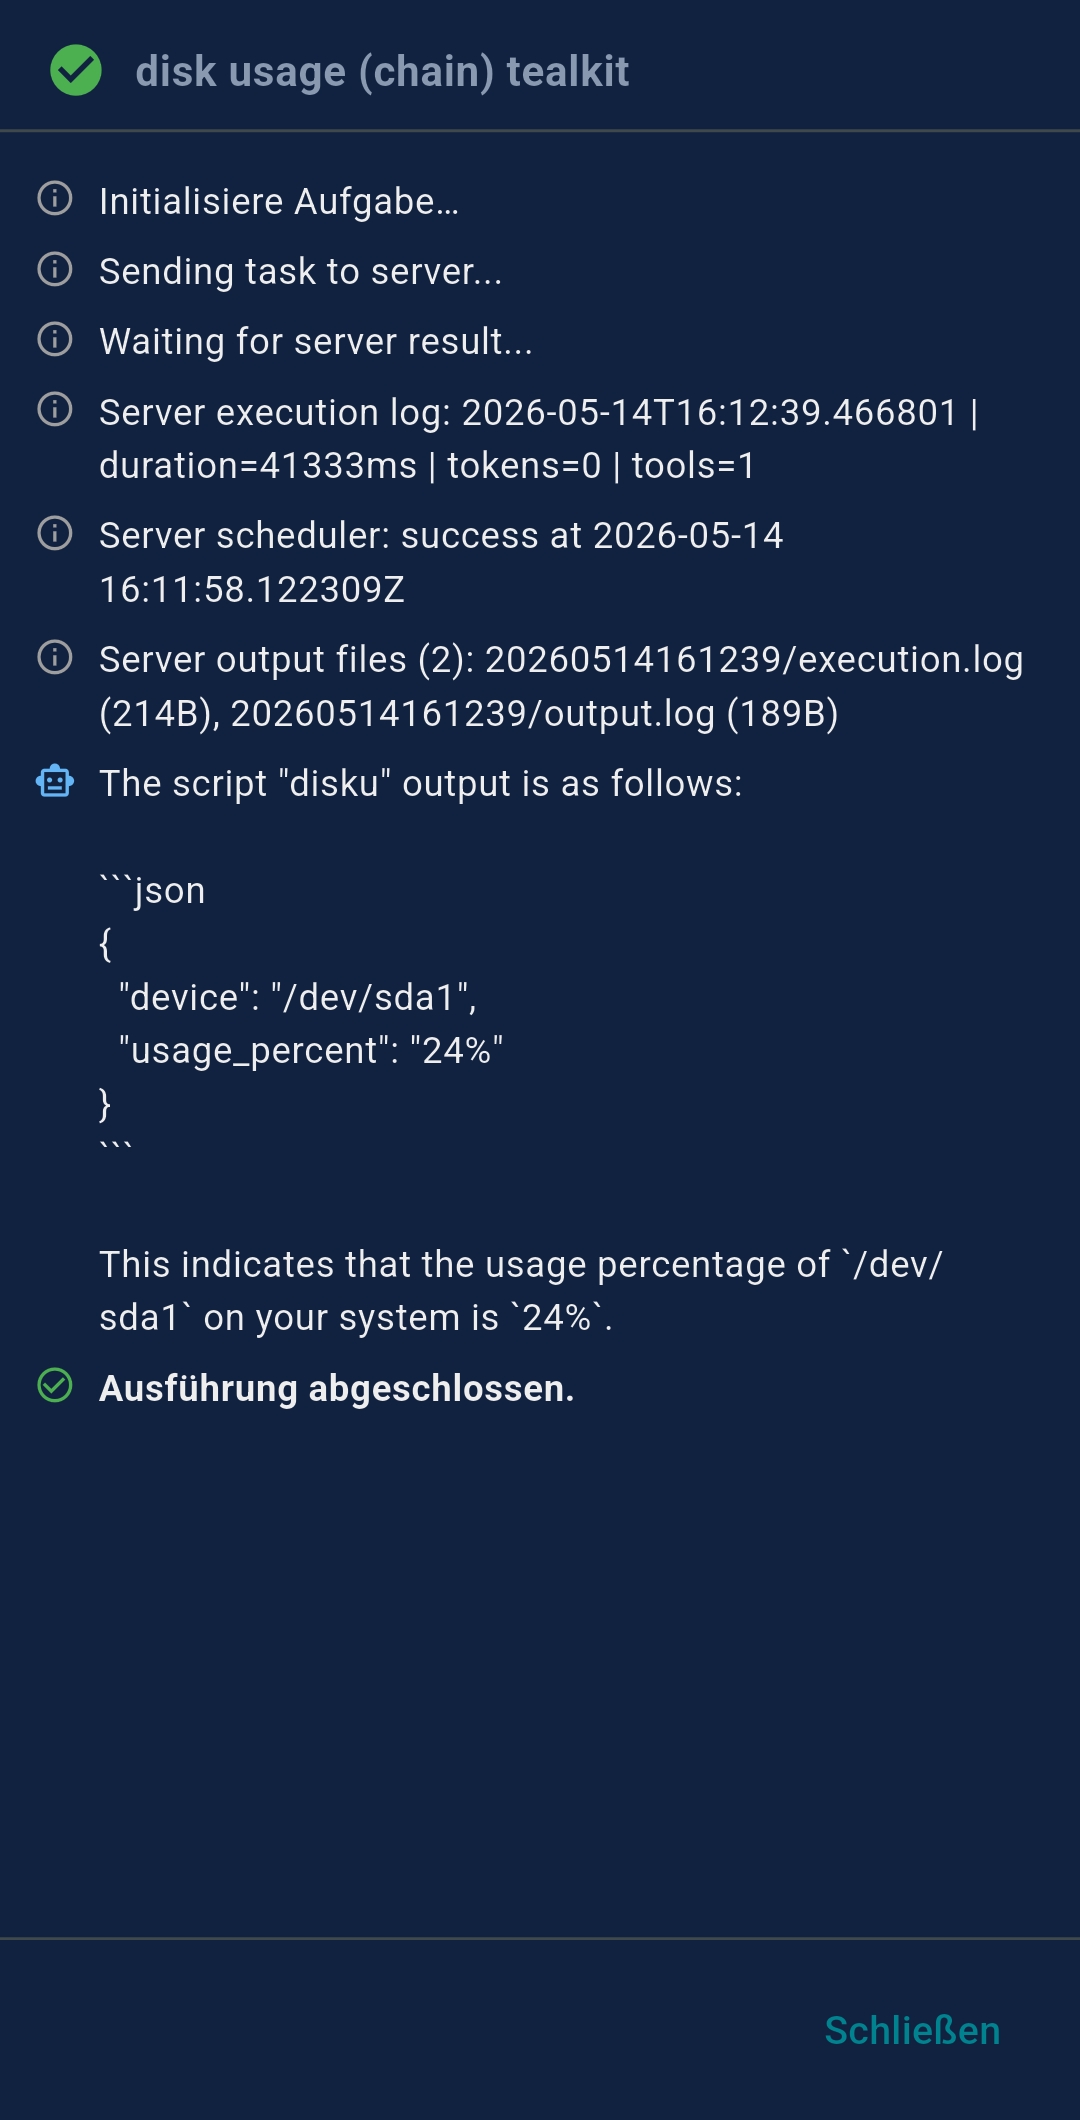
Agent chaining connects separate agents in a pipeline. Each agent has its own model, tools, schedule, and
output. The previous agent's full output is injected as ${task_result} into the next agent's
prompt.
Chain configuration (Verkettung section)
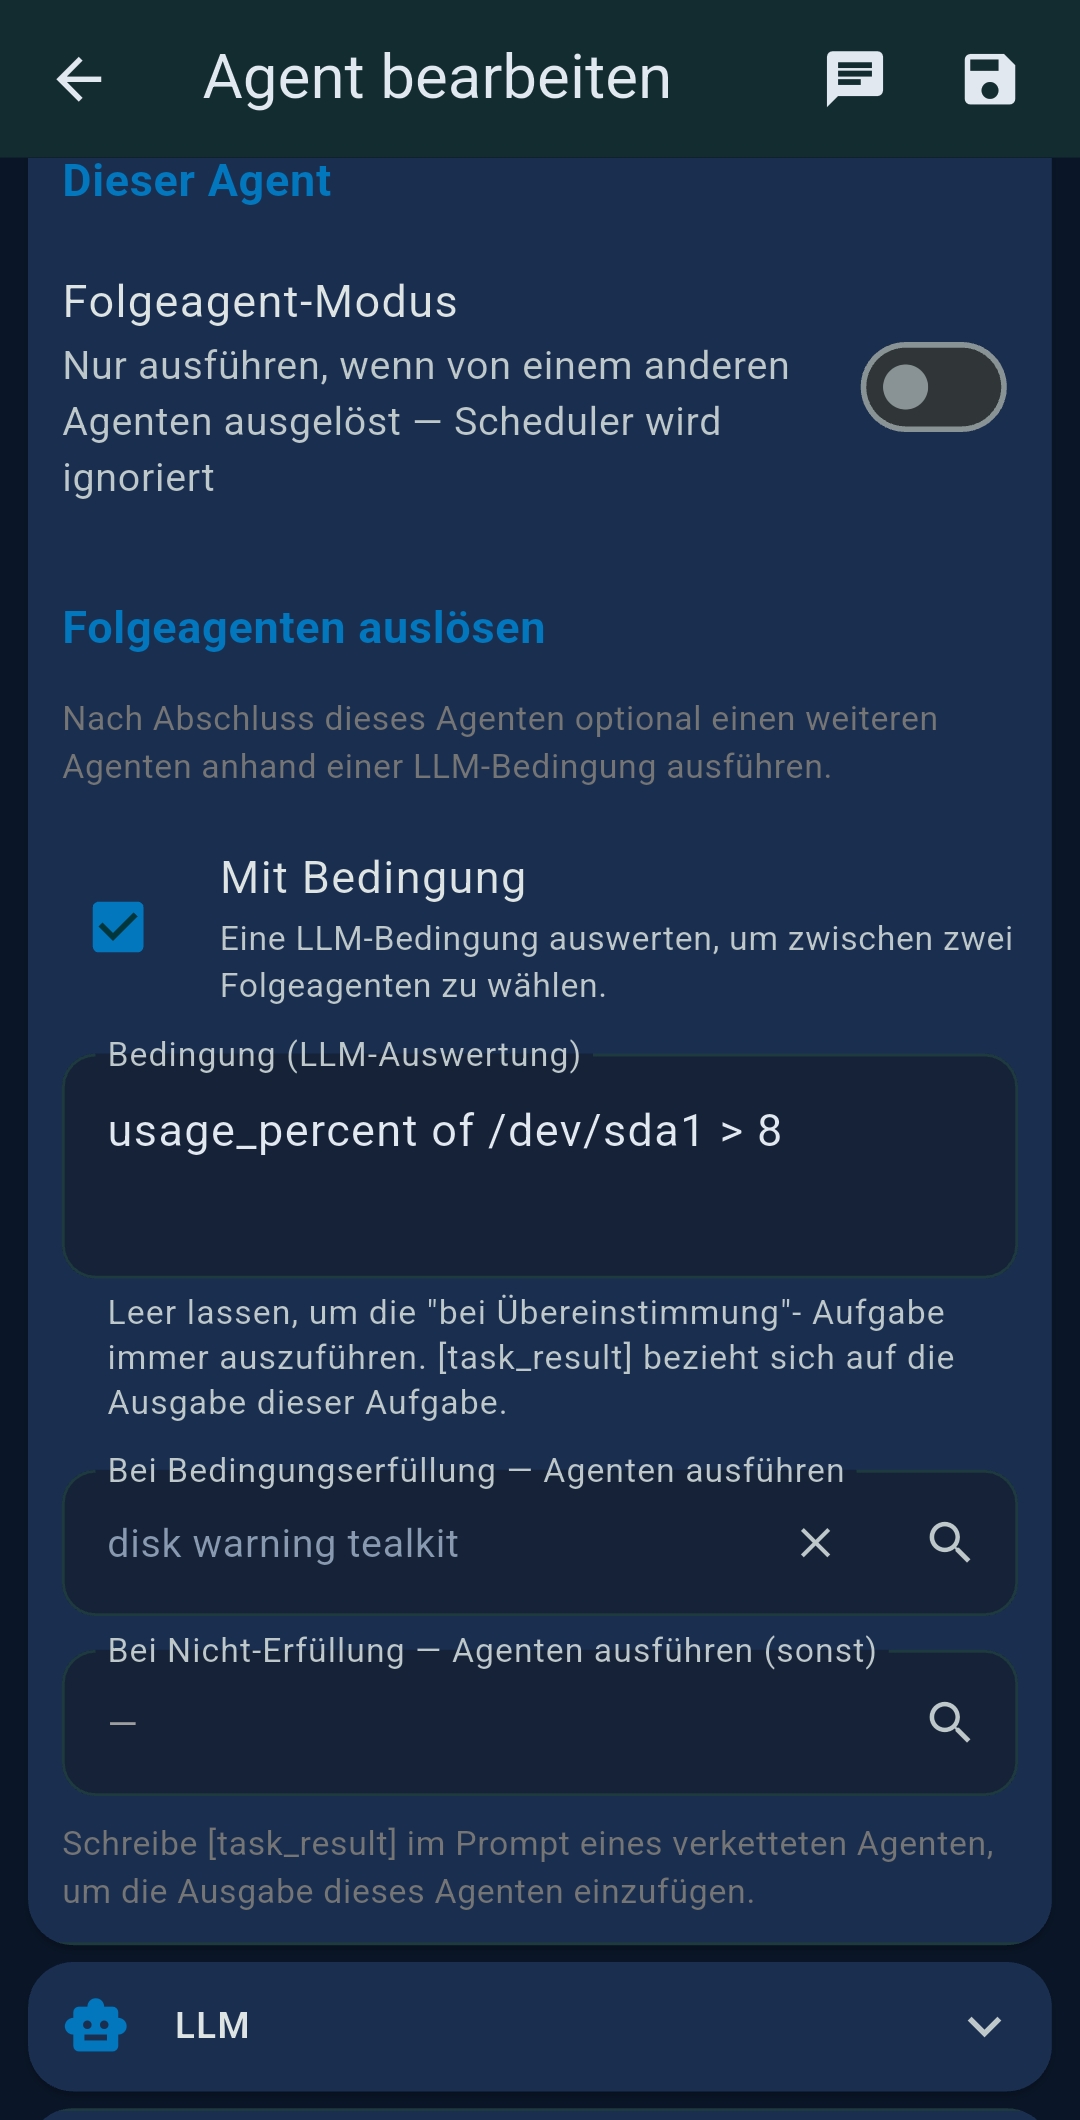
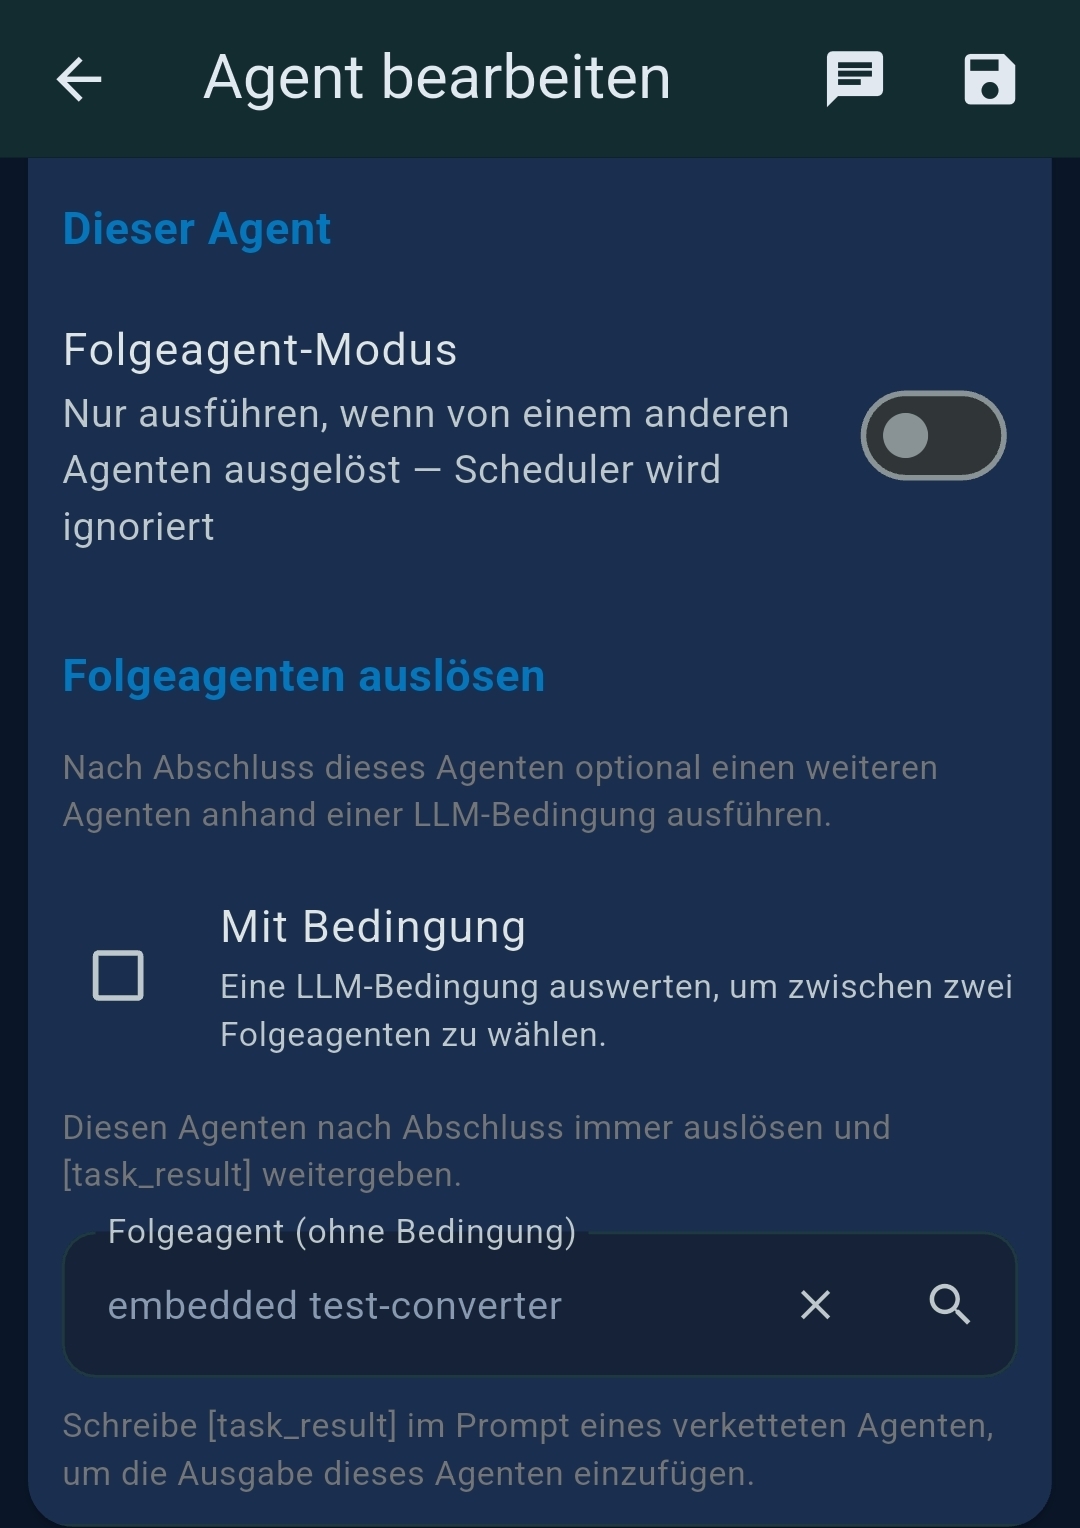
- Folgeagent-Modus — when enabled, this agent only runs when triggered by another agent; the scheduler is ignored
- Unconditional trigger — always runs the successor with
${task_result} - Conditional trigger — LLM evaluates an expression and routes to different successors (on-match vs. on-no-match)
${task_result} without further LLM processing.Chaining vs. Prompt Splitting
Prompt Splitting (++#++) |
Agent Chaining | |
|---|---|---|
| Scope | Single agent, sequential steps | Multiple separate agents |
| LLM per step | Same for all steps | Different per agent |
| Conditional routing | No | Yes |
| Variable injection | ${tool_result} |
${task_result} |
| Best for | Breaking one task into micro-steps for small models | Multi-model pipelines, conditional logic |
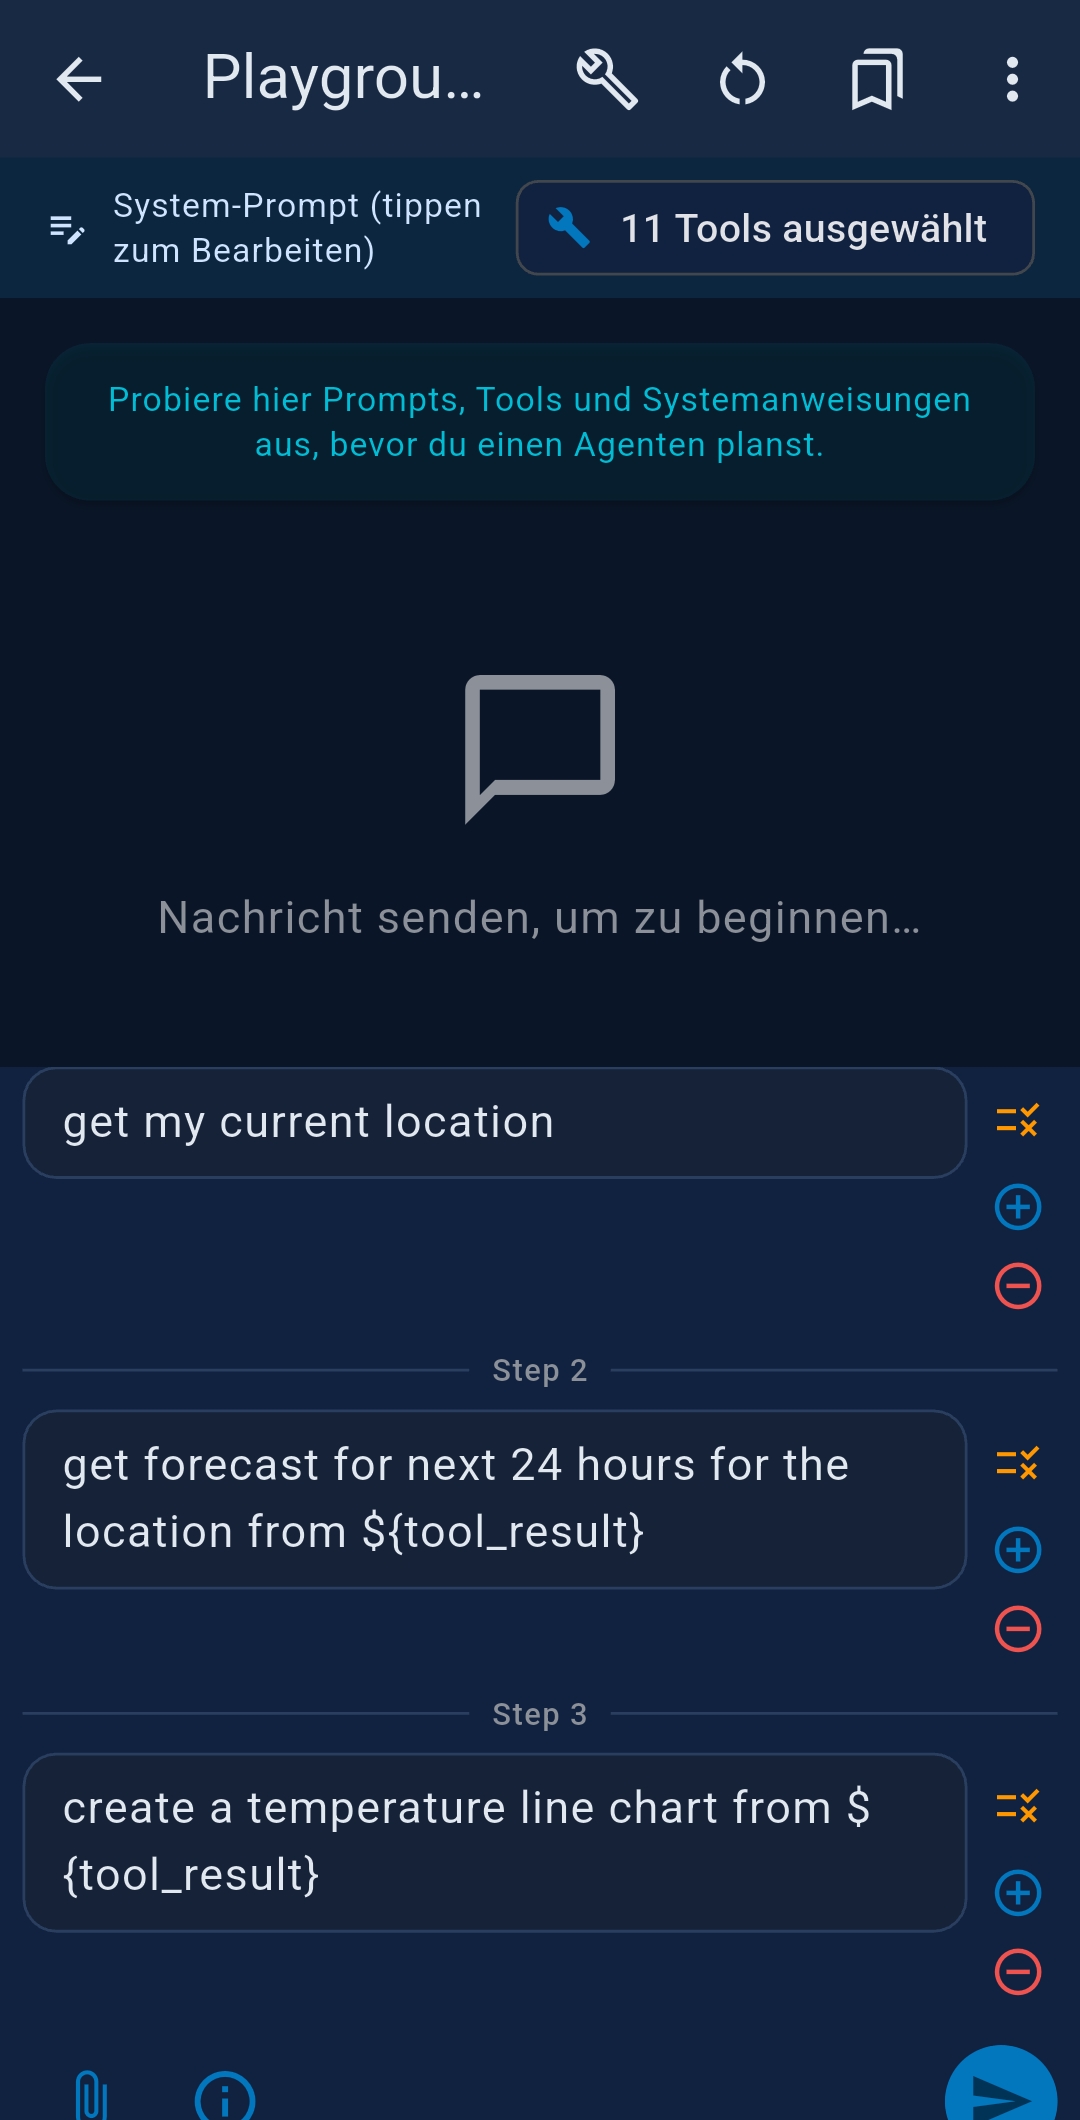
7.2 Prompt Splitting

Prompt Splitting breaks a single agent's prompt into sequential steps separated by ++#++. Use
${tool_result} in a later step to inject raw tool output from the previous step. Free
— works in Playground, scheduled agents, and Server Mode.
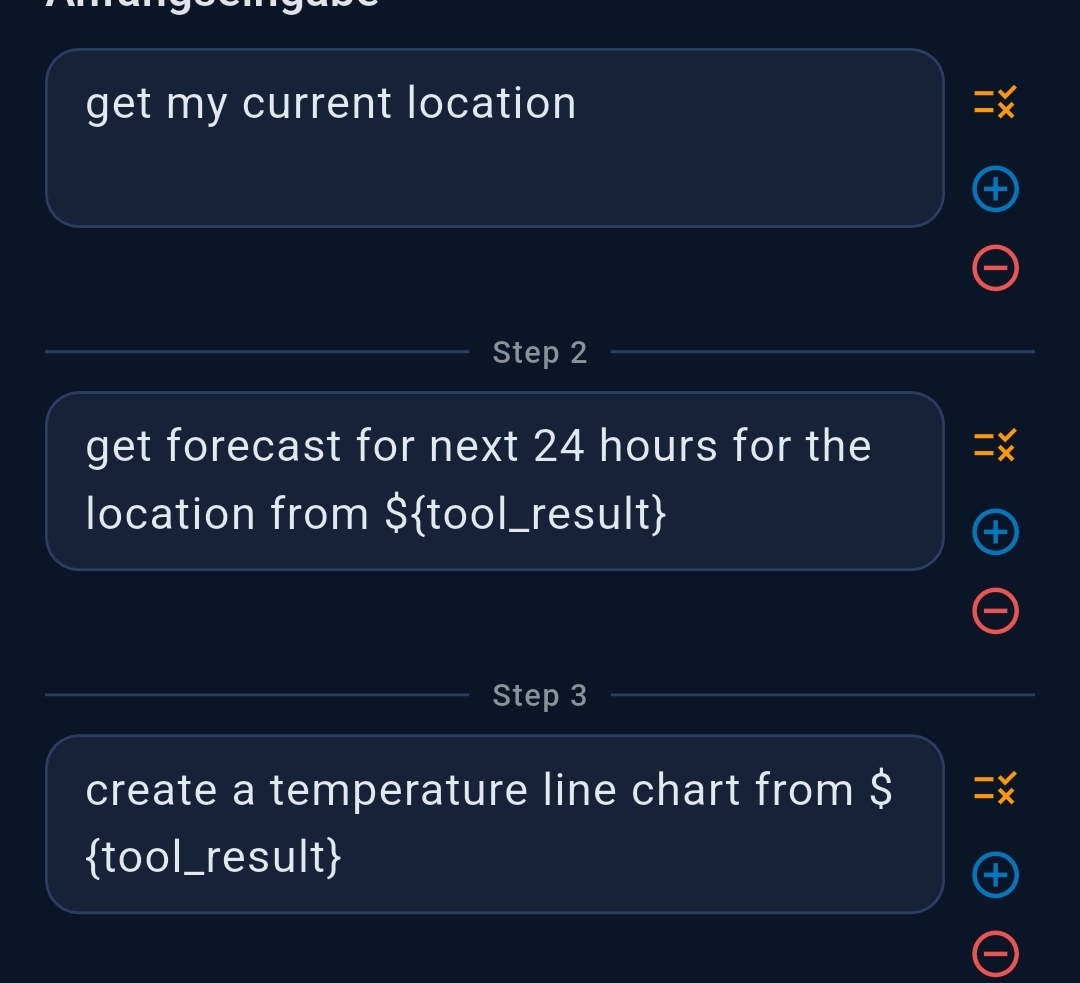
Example — weather chart
Step 1: Get my current location
++#++
Step 2: Get the hourly forecast for the next 24 hours for the location from ${tool_result}
++#++
Step 3: Create a temperature line chart from ${tool_result}
Each step can have its own tool selection and system prompt. Use ⊕/⊖ buttons to add/remove steps; drag ≡ to reorder.
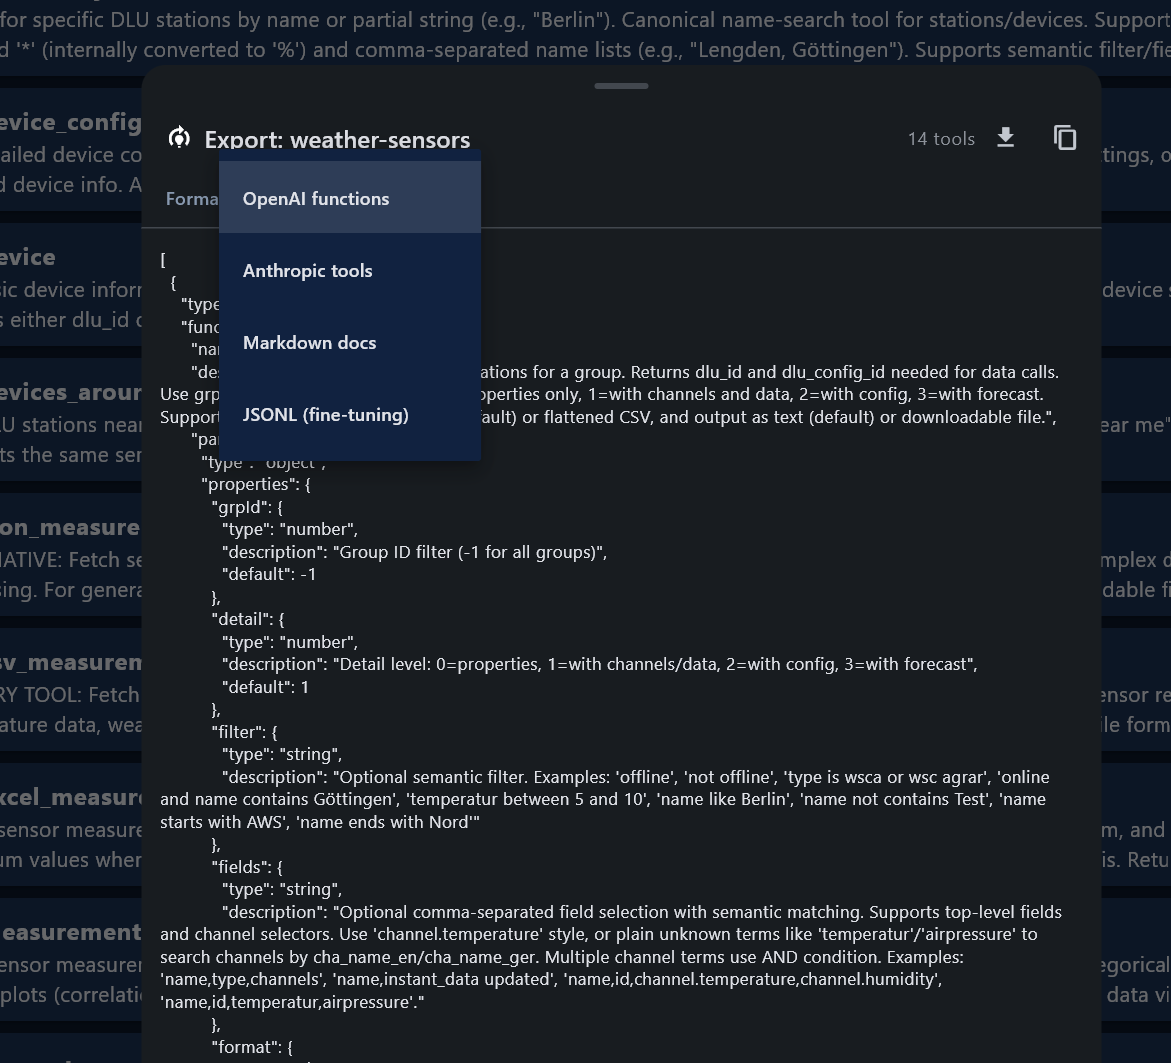
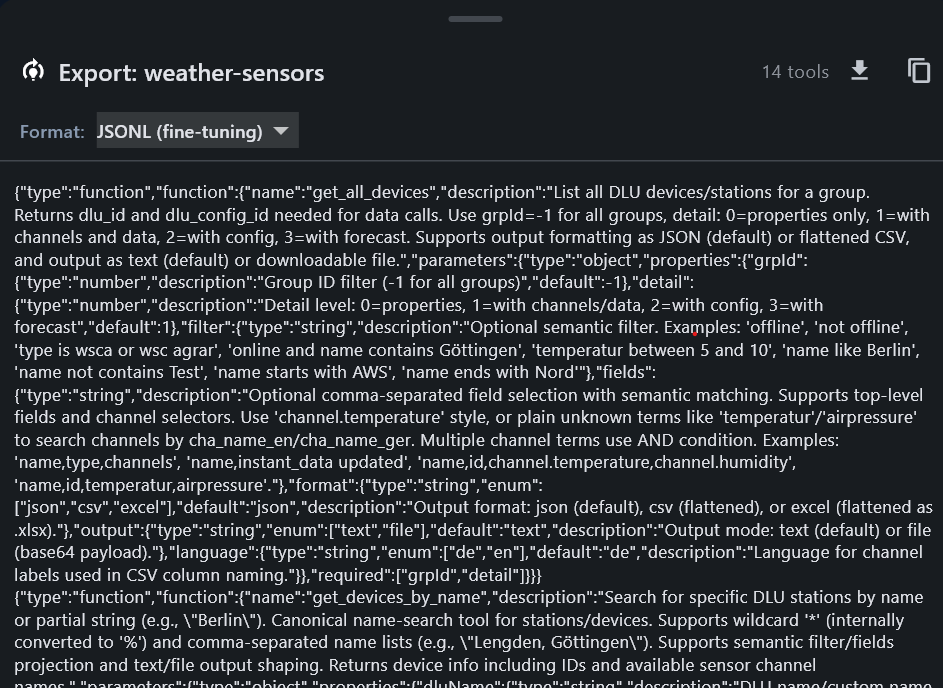
7.3 Export Tool Definitions for Fine-tuning
TealKit can export MCP server tool definitions in four formats — useful for fine-tuning small (< 7 B) or embedded models on your specific tool set. This teaches the model exactly how to call your tools, reducing hallucinations and removing the need for lengthy system-prompt skill descriptions.
Export workflow
Export formats
| Format | Use case |
|---|---|
| OpenAI functions | JSON array of function definitions for OpenAI-format fine-tuning |
| Anthropic tools | Anthropic tool_use format |
| Markdown docs | Human-readable tool documentation |
| JSONL (fine-tuning) | One {"type":"function",…} record per line — import directly into OpenAI,
Axolotl, or LlamaFactory fine-tuning jobs |
7.4 Chaining vs. Prompt Splitting
Use this table to decide whether to build a multi-step workflow with Prompt Splitting (one agent) or Agent Chaining (multiple agents).
Prompt Splitting (++#++) |
Agent Chaining | |
|---|---|---|
| Setup | One agent, one prompt field — visual step editor with per-step tool controls | Multiple separate agents |
| Model per step | Same model for all steps | Different model per agent |
| Conditional branching | No | Yes (LLM-evaluated condition) |
| Scheduling | One schedule, one task | Each agent can have its own schedule |
| Variable injection | ${tool_result} — previous step's raw tool output |
${task_result} — previous agent's full output |
| Best for | Small / local models needing focused single-step prompts; sequential fetch → format → summarise within one agent | Complex cross-model pipelines; conditional routing; different output channels per step; large workflows where each agent runs on its own schedule |
7.5 Desktop Mode
Windows app on the Microsoft Store. Linux from GitHub Releases.
Desktop-exclusive: system tray background execution, Python MCP Tool Generator, MCP Server Registry, PowerShell Tool Library (Windows).
eval $(gnome-keyring-daemon --start --components=secrets)
8 FAQ
Does TealKit store my API keys on a server?
No. All API keys are stored exclusively in the device's OS secure keychain (iOS Keychain / Android Keystore) and never leave your device.
Can I use TealKit offline?
Local Ollama models and embedded (on-device) GGUF models work fully offline. Cloud AI providers and web search require internet.
How do I delete all my data?
Uninstall TealKit. All local databases, keys, and settings are removed automatically.
The indexing is slow or stuck
Large document folders or websites take time. Tap the red Stop button to cancel at any point.
Where is the output folder on Android?
By default, files go to internal app storage. Set a custom path in Settings → General → Output Directory (e.g. Downloads).
What is the difference between Prompt Splitting and Agent Chaining?
Prompt Splitting (++#++) breaks a single agent's prompt into sequential steps
within the same agent. All steps share the same model, tools, and settings. Use
${tool_result} to inject prior step output. Free.
Agent Chaining connects separate agents — each with its
own model, tools, schedule, and output. Injects ${task_result}. Supports conditional routing.
Short rule: use Prompt Splitting for micro-steps within one agent; use Agent Chaining for multi-model pipelines. See Section 7.1.
How does agent chaining work?
Each chained agent starts after its predecessor finishes. The predecessor's output is injected as
${task_result}. Chaining can be unconditional (always trigger) or conditional (LLM evaluates an
expression to choose between successors). Enable Stop after tool call on the parent to pass raw
tool output directly as ${task_result}.
What is the difference between Run and Interactive mode?
Run executes the agent autonomously and saves the result. Interactive opens a live chat with the same LLM and tools for guided exploration and debugging.
What is the advantage of using a European AI provider?
For GDPR compliance, choose Mistral AI — headquartered in France, all data processed within the EU. Enter your API key under Settings → LLM 1 and select Mistral AI.
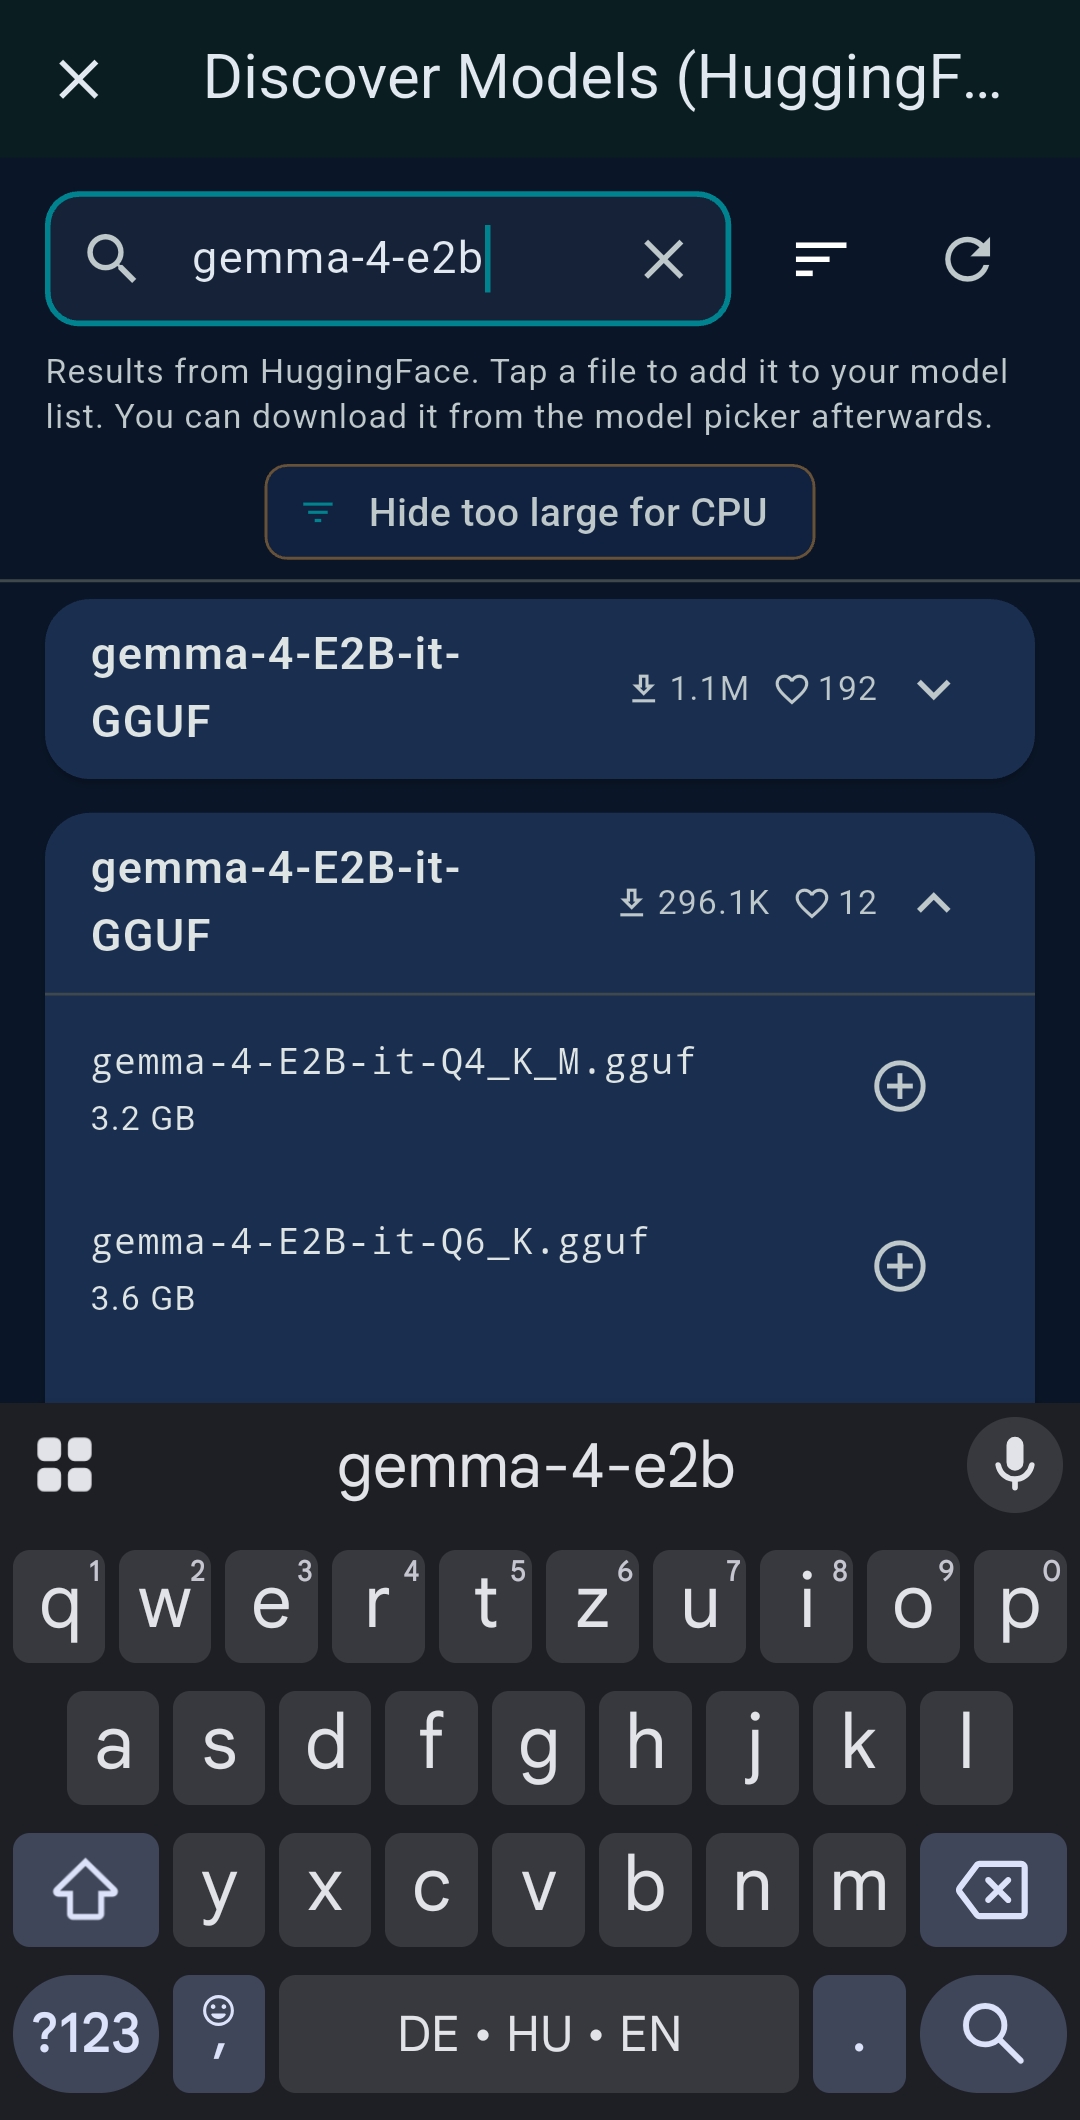
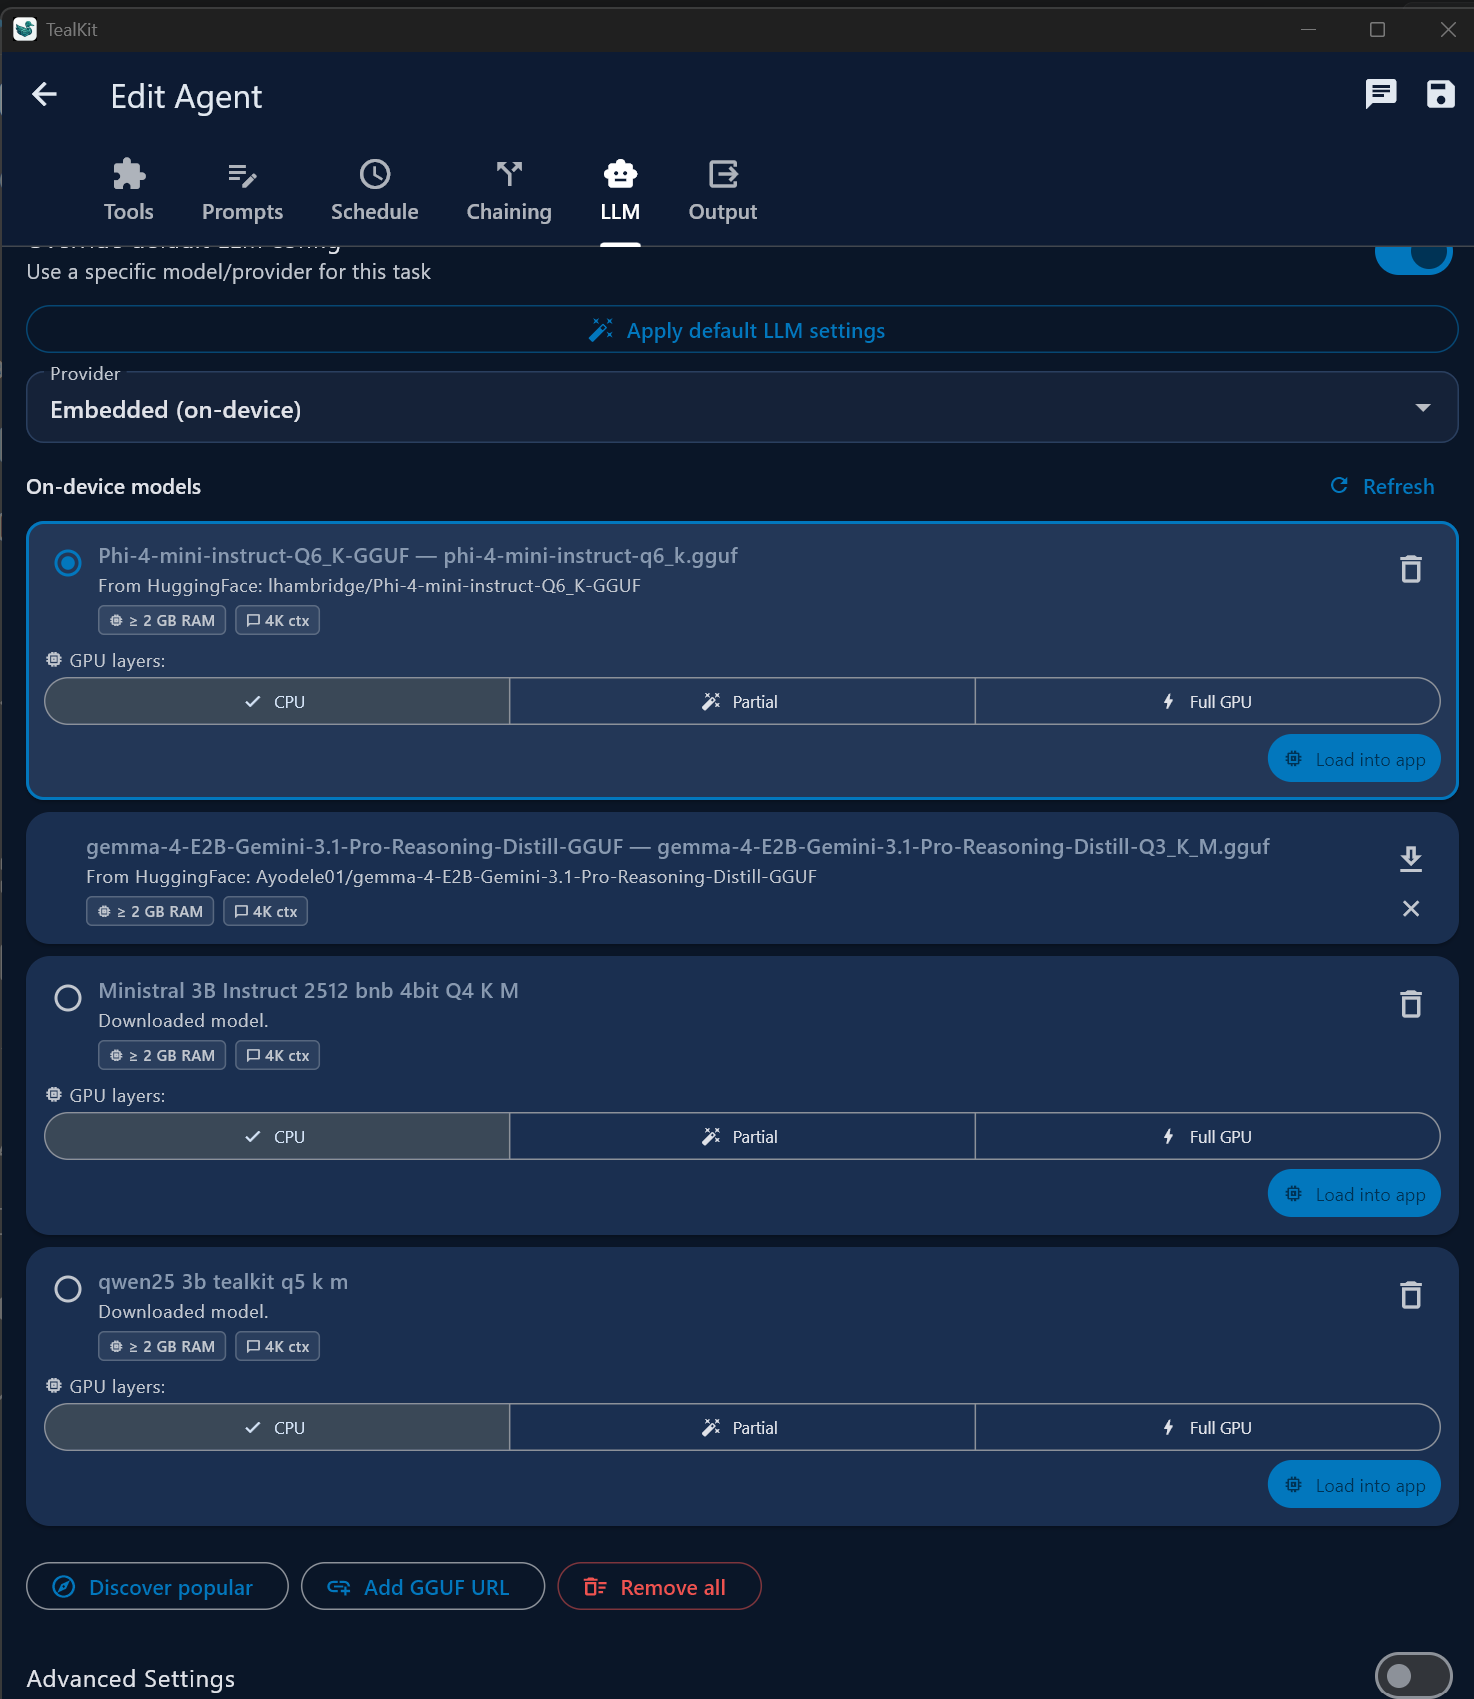
Can I run models directly on my device without the internet?
Yes. Go to Settings → Embedded Models to download GGUF models and run inference fully on-device — no API key, no internet. Browse the HuggingFace catalog or paste a direct GGUF URL. Choose CPU-only, Partial GPU, or Full GPU offloading. Best for text formatting, translation, and summarisation in Chat Mode. For agentic tool calling, you need a model explicitly trained for function calling (e.g. Qwen2.5-3B-Instruct) and sufficient GPU VRAM.
Can TealKit run with smaller models on limited hardware?
Yes. TealKit supports SLMs through Ollama, LM Studio, or any OpenAI-compatible local endpoint. Enable SLM mode and Chat mode for text-only tasks. Use the Playground to find the right model before scheduling.
My scheduled agent with an embedded model did not run on Android when the app was closed
This is expected. Embedded models require the app to be open. When Android kills the app, the background alarm cannot load the on-device model and sends a tap-to-open notification instead. For unattended execution use a cloud provider or Ollama. On Desktop the app stays alive in the system tray, so embedded-model agents run normally there.
Scheduled agents don't run reliably on iOS / iPad
iOS BGAppRefreshTask timing is controlled by the OS based on battery, network, and app-usage patterns. Tasks may be delayed or not fire at all in Low Power Mode. Keep the app in the foreground or background (not force-quit) for most reliable execution.
How does the Web Search tool decide which API to use?
Priority order: SerpApi (if key configured) → Serper.dev (if key configured) → Brave Search → DuckDuckGo (always free, no key). Configure in Settings → Data Sources → SerpApi.
What LLMs work best for tool calling?
Cloud models (GPT-4o, Claude 3.5 Sonnet, Gemini 2.5 Pro, Mistral Medium) are most reliable. For local models, Qwen2.5-7B-Instruct and Mistral 7B Instruct v0.3 via Ollama are solid. Use Temperature 0.1–0.2 for deterministic tool calls. Enable SLM mode for smaller models.
9 All Features
TealKit is completely free — all features are available to every user with no purchase required.
- Playground — unlimited interactive sessions
- Agents — create, schedule, run, view results
- All built-in MCP tools (Web Search, Weather, Calculator, Location, Document Search, Website Search, SSH, Home Assistant, Charts, PDF, Mermaid)
- JavaScript Tool wizard and library
- Remote MCP Servers
- LLM 1 and LLM 2 configuration
- Scheduled agents and recurring background automation
- Advanced output channels: Email, Slack, WhatsApp, SFTP, ZIP
- Agent Chaining with conditional routing
- Server Mode — 24/7 persistent server execution
- Prompt Splitting (
++#++) - Tool Skills generation and management
- Embedded (on-device) models
- Backup & Restore vault
- Desktop (Windows / Linux) app
- Python MCP Tool Generator (Desktop)
- MCP Server Registry (Desktop)
- PowerShell Tool Library (Windows Desktop)